🍪🍫 Chocolate Chip Cookie Sticks
Buttery, chewy, chocolate-loaded, and perfectly shaped for dipping, these Chocolate Chip Cookie Sticks are a fun twist on the classic chocolate chip cookie. The dough is pressed into a thin sheet, baked until golden, then sliced into long, irresistible cookie sticks.
They’re perfect for lunchboxes, parties, dessert platters, or serving with a cold glass of milk.
⏱️ Recipe Information
Prep Time: 15 minutes
Chill Time: 20 minutes
Bake Time: 12–15 minutes
Total Time: About 50 minutes
Yield: 20–24 cookie sticks
Difficulty: Easy
Method: Oven-Baked
🛒 Ingredients
- ½ cup (113 g) unsalted butter, softened
- ½ cup (100 g) packed brown sugar
- ¼ cup (50 g) granulated sugar
- 1 large egg
- 1 teaspoon vanilla extract
- 1½ cups (190 g) all-purpose flour
- ½ teaspoon baking soda
- ¼ teaspoon salt
- ¾ cup (130 g) chocolate chips
Optional Additions
- ½ cup chopped walnuts or pecans
- ¼ teaspoon espresso powder
- ½ teaspoon cinnamon
- Flaky sea salt, for finishing
- Extra chocolate chips, for pressing on top
👩🍳 Instructions
1. Prepare the Oven and Pan
Preheat your oven to 350°F (175°C).
Line a large baking sheet with parchment paper.
Set aside.
2. Cream the Butter and Sugars
Place the softened butter, brown sugar, and granulated sugar in a large mixing bowl.
Beat with an electric mixer for 2–3 minutes, until the mixture becomes light, creamy, and fluffy.
3. Add the Egg and Vanilla
Add the egg and vanilla extract.
Beat until completely combined and smooth.
Scrape down the sides of the bowl as needed.
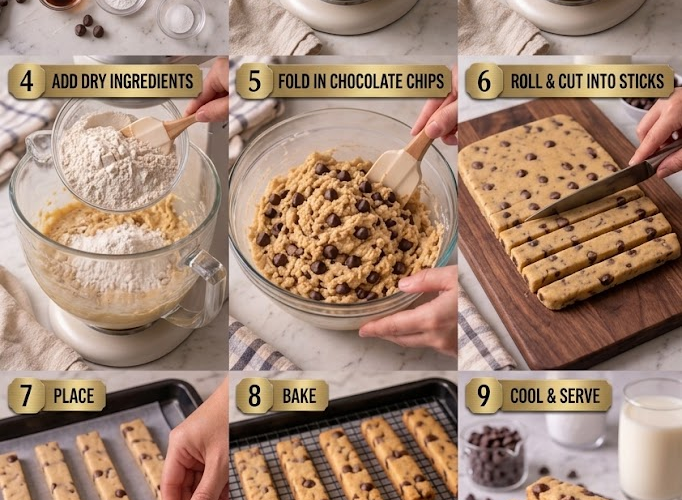
4. Combine the Dry Ingredients
In a separate bowl, whisk together:
- All-purpose flour
- Baking soda
- Salt
Mix until evenly combined.
5. Make the Cookie Dough
Gradually add the dry ingredients to the butter mixture.
Mix on low speed just until the flour disappears.
Be careful not to overmix, as this can make the cookie sticks tough.
6. Add the Chocolate Chips
Fold in the chocolate chips using a rubber spatula.
Reserve a few extra chocolate chips if you’d like to press them onto the surface before baking.
7. Shape the Dough
Transfer the cookie dough to the prepared baking sheet.
Press or roll the dough into an even rectangle approximately ¼–⅓ inch (6–8 mm) thick.
Try to keep the edges straight and the thickness consistent so the cookie sticks bake evenly.
If the dough is sticky, lightly chill it for 15–20 minutes before shaping.
8. Chill the Dough
Place the shaped dough in the refrigerator for approximately 20 minutes.
This helps prevent excessive spreading and makes it easier to achieve neat cookie sticks.
9. Score the Cookie Sticks
Using a sharp knife or pizza cutter, lightly score the dough into long strips.
Don’t cut completely through the dough yet.
You can make the sticks approximately 1 inch (2.5 cm) wide.
If desired, press a few additional chocolate chips into the surface.
10. Bake
Bake for 12–15 minutes, or until the edges are golden brown and the center looks set.
For softer cookie sticks, remove them when the center is still slightly soft.
For crispier cookie sticks, bake for an additional 1–2 minutes.
11. Cut Into Sticks
Immediately after removing the cookie slab from the oven, carefully cut along the scored lines while the cookie is still warm.
Allow the sticks to remain on the baking sheet for 5–10 minutes.
They will firm up as they cool.
12. Cool Completely
Transfer the cookie sticks to a wire rack and allow them to cool completely.
For an extra crisp texture, let them cool uncovered for several minutes after reaching room temperature.
⭐ Chef’s Tips
Use softened butter: Soft butter creams properly with the sugar and gives the cookies a better texture.
Don’t overmix: Once the flour is incorporated, stop mixing.
Keep the dough even: Consistent thickness ensures every cookie stick bakes at the same rate.
Score before baking: This makes cutting the sticks much easier and helps produce clean, uniform pieces.
Cut while warm: The cookie slab becomes crisp as it cools, so slice it shortly after removing it from the oven.
For crispier sticks: Roll the dough slightly thinner and bake until deeply golden around the edges.
For chewier sticks: Keep the dough slightly thicker and remove it from the oven as soon as the edges are lightly golden.
🍫 Easy Variations
Double Chocolate Cookie Sticks
Replace 2 tablespoons of the flour with unsweetened cocoa powder and use a combination of milk and dark chocolate chips.
Peanut Butter Chocolate Cookie Sticks
Add ¼ cup creamy peanut butter to the butter mixture and use chocolate chips for a classic combination.
Chocolate Chunk Cookie Sticks
Replace the chocolate chips with roughly chopped semi-sweet or dark chocolate.
Nutty Chocolate Chip Sticks
Fold ½ cup chopped pecans or walnuts into the dough.
Salted Chocolate Chip Sticks
Sprinkle a small amount of flaky sea salt over the dough before baking.
Espresso Chocolate Sticks
Add ½ teaspoon espresso powder to intensify the chocolate flavor.
🍫 Serving Suggestions
These cookie sticks are delicious served with:
- Cold milk
- Hot chocolate
- Coffee
- Vanilla ice cream
- Chocolate milk
- Caramel sauce
- Chocolate ganache
- Peanut butter dipping sauce
For parties, arrange them in a tall glass or jar so they’re easy to grab and serve.
🧊 Storage
Store completely cooled cookie sticks in an airtight container at room temperature for up to 5 days.
Place parchment paper between layers if stacking them.
❄️ Freezing
The baked cookie sticks can be frozen in an airtight freezer-safe container for up to 2 months.
You can also freeze the shaped, unbaked dough.
Thaw the dough in the refrigerator before baking.
🍪🍫 Final Result
These Chocolate Chip Cookie Sticks turn a classic chocolate chip cookie into a fun, dunkable treat.
They’re buttery, golden, chewy in the center, crisp around the edges, and packed with melty chocolate chips.
Serve them with milk, coffee, or your favorite dessert dip for an irresistible homemade treat.
Grab one, dip it, and enjoy! 🍪🥛🍫✨