🧄🧀 Cheesy Garlic Bread Squares
Soft, fluffy bread squares loaded with gooey melted cheese and brushed with fragrant garlic butter.
These homemade Cheesy Garlic Bread Squares are irresistibly soft on the inside, golden around the edges, and packed with buttery garlic flavor. The dough is easy to make and bakes into pull-apart squares that are perfect as an appetizer, snack, or side dish.
Serve them alongside pasta, soup, pizza, grilled chicken, or simply enjoy them warm straight from the oven.
⏱️ Recipe Information
Prep Time: 20 minutes
Rise Time: 1–1½ hours
Bake Time: 18–22 minutes
Total Time: About 2 hours
Servings: 9–12 squares
Difficulty: Easy
Method: Oven-Baked
🛒 Ingredients
For the Dough
- 2½ cups (315 g) all-purpose flour
- 1 teaspoon instant yeast
- 1 tablespoon sugar
- 1 teaspoon salt
- ¾ cup (180 ml) warm milk
- 2 tablespoons (28 g) melted butter
- 1 large egg
🧄 For the Garlic Butter
- 4 tablespoons (56 g) butter, melted
- 3–4 cloves garlic, finely minced
- 1 tablespoon fresh parsley, finely chopped
- ¼ teaspoon salt
- ½ teaspoon dried oregano, optional
🧀 For the Cheese Filling
- 1½ cups (150–170 g) shredded mozzarella
- ½ cup (50 g) shredded cheddar cheese
- 2 tablespoons grated Parmesan, optional
👩🍳 Instructions
1. Prepare the Dough
In a large mixing bowl, combine the warm milk, sugar, and instant yeast.
Let it stand for about 5 minutes.
The milk should be warm, not hot.
2. Add the Remaining Ingredients
Add the egg and melted butter.
Stir to combine.
Gradually add the flour and salt.
Mix until a soft dough begins to form.
3. Knead the Dough
Transfer the dough to a lightly floured work surface.
Knead for approximately 8–10 minutes, until the dough becomes smooth, elastic, and slightly tacky but not excessively sticky.
You can also knead it in a stand mixer fitted with a dough hook for about 5–7 minutes.
Avoid adding too much extra flour, as this can make the finished bread dense.
4. Let the Dough Rise
Place the dough in a lightly greased bowl.
Cover with plastic wrap or a clean kitchen towel.
Let it rise in a warm, draft-free place for approximately 1 hour, or until doubled in size.
The exact time will depend on the temperature of your kitchen.
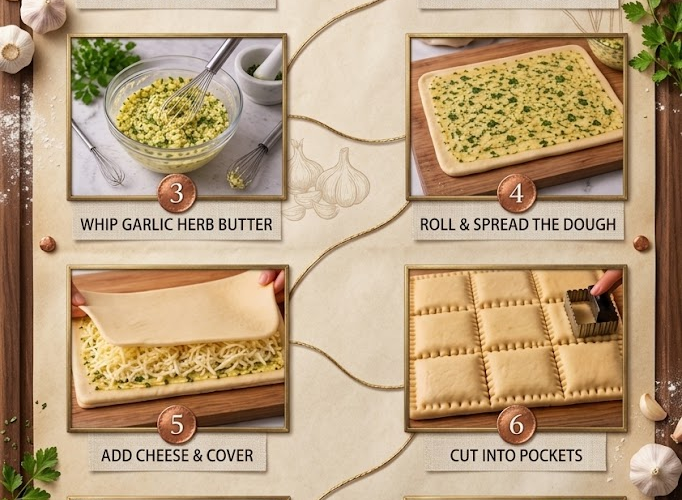
5. Prepare the Garlic Butter
While the dough rises, combine the melted butter, minced garlic, chopped parsley, salt, and optional oregano in a small bowl.
Mix well.
Set aside.
6. Prepare the Cheese
Combine the mozzarella and cheddar in a bowl.
If using Parmesan, mix it in as well.
Set aside until ready to assemble.
7. Shape the Dough
Once the dough has doubled in size, gently punch it down to release excess air.
Transfer it to a lightly floured surface.
Roll or press the dough into a rectangle approximately ¼–½ inch thick.
8. Add the Cheese
Brush the surface lightly with some of the garlic butter.
Sprinkle the shredded cheese evenly over the dough, leaving a small border around the edges.
For an extra cheesy center, use a generous layer of mozzarella.
9. Fold and Seal
Fold the dough over itself to enclose the cheese.
Gently press the edges to seal.
Roll or flatten it slightly so the dough forms an even rectangle.
10. Cut Into Squares
Using a sharp knife or pizza cutter, divide the filled dough into approximately 9–12 squares.
Don’t worry if the squares aren’t perfectly identical—slightly rustic pieces bake beautifully.
11. Arrange in the Baking Pan
Grease a 9-inch (23 cm) square baking pan.
Arrange the dough squares inside the pan with a little space between them.
They will expand as they rise and bake.
Cover loosely and let them rest for another 20–30 minutes.
12. Preheat the Oven
During the final rise, preheat the oven to 375°F (190°C).
13. Brush With Garlic Butter
Brush the tops generously with the remaining garlic butter.
Make sure the butter gets into the spaces between the squares as well.
For an especially cheesy finish, sprinkle a little extra mozzarella and Parmesan over the tops.
14. Bake
Place the pan in the preheated oven.
Bake for approximately 18–22 minutes, or until the bread is puffed and golden brown and the cheese is melted and bubbling.
If the top begins browning too quickly, loosely cover it with aluminum foil for the remaining baking time.
15. Finish With More Garlic Butter
Remove the bread from the oven.
Immediately brush the hot tops with a little additional garlic butter if desired.
Sprinkle with fresh parsley.
Allow the bread to cool for 5–10 minutes before serving.
⭐ Chef’s Tips
Use warm—not hot—milk: Excessively hot milk can damage the yeast.
Don’t over-flour the dough: A slightly soft dough creates lighter, fluffier bread.
Use low-moisture mozzarella: It melts beautifully without releasing too much water into the bread.
Let the dough rise properly: The first rise is what gives the bread its soft, airy texture.
Brush with garlic butter twice: Applying it before and after baking gives you maximum garlic-butter flavor.
For extra-cheesy squares: Add a little extra mozzarella between the pieces before baking.
🧀 Easy Variations
Cheesy Jalapeño Garlic Bread
Add finely chopped jalapeños to the cheese filling.
Garlic Parmesan Bread Squares
Use mozzarella and Parmesan, then sprinkle extra Parmesan over the top before baking.
Herb & Cheese Bread
Add fresh basil, parsley, oregano, or Italian seasoning to the cheese.
Spicy Garlic Bread
Add ½ teaspoon red pepper flakes to the garlic butter.
Pepperoni Pizza Squares
Add finely chopped pepperoni and mozzarella to the filling for a pizza-inspired version.
Three-Cheese Garlic Bread
Combine mozzarella, cheddar, and Parmesan for an extra-rich cheese filling.
🍝 Serving Suggestions
These cheesy garlic bread squares are perfect alongside:
- Spaghetti Bolognese
- Creamy Alfredo pasta
- Lasagna
- Tomato soup
- Chicken soup
- Grilled chicken
- Baked pasta
- Salads
- Pizza
They also make a fantastic appetizer served with warm marinara sauce for dipping.
🧊 Storage
Store leftover bread in an airtight container at room temperature for up to 2 days.
For longer storage, refrigerate for up to 4 days.
Because refrigeration can make bread firmer, reheating is recommended before serving.
🔥 Reheating
Reheat in a 350°F (175°C) oven for approximately 5–8 minutes.
You can also use an air fryer at 160°C (320°F) for about 3–5 minutes.
Brush with a little garlic butter before reheating for an extra-soft, flavorful finish.
❄️ Freezing
The baked bread squares can be frozen for up to 2 months.
Wrap individual portions tightly in plastic wrap, then place them in a freezer-safe bag or container.
Thaw and reheat in the oven until warm.
🧄🧀 Final Result
These Cheesy Garlic Bread Squares are soft, fluffy, buttery, garlicky, and loaded with gooey melted cheese.
Every square has a tender homemade bread center, a rich garlic-butter topping, and plenty of stretchy cheese.
Pull one apart while it’s still warm, watch the cheese stretch, and enjoy the ultimate homemade garlic bread experience! 🧄🧀🥖✨