🍫 Buckeye Pie – No-Bake Chocolate Peanut Butter Pie
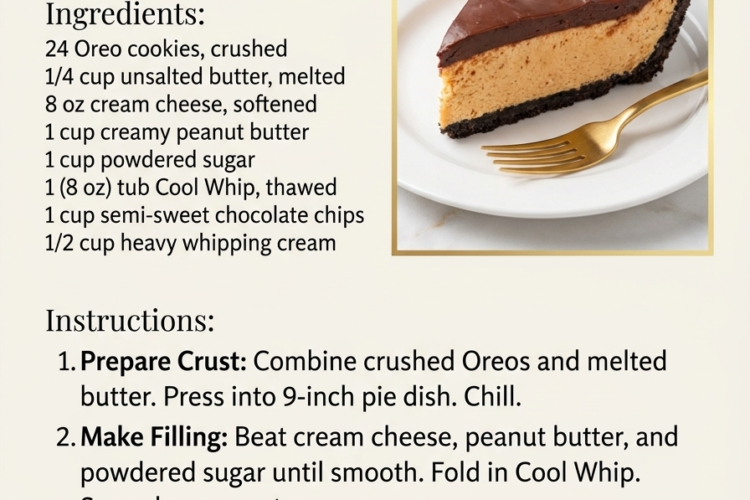
If you love the classic combination of chocolate and peanut butter, this Buckeye Pie is about to become your new favorite dessert! Inspired by traditional buckeye candies, this irresistible no-bake pie features a crunchy homemade Oreo cookie crust, a rich and creamy peanut butter filling, and a smooth layer of decadent chocolate ganache.
Every bite delivers the perfect balance of sweet chocolate and salty peanut butter, with a silky, cheesecake-like filling that melts in your mouth.
Best of all, there’s no oven required! This impressive dessert is perfect for holidays, birthdays, potlucks, family gatherings, or whenever you’re craving something extra chocolatey.
Recipe Details
- Prep Time: 25 minutes
- Chilling Time: 4–6 hours
- Total Time: Approximately 6 hours 25 minutes
- Servings: 10–12 slices
- Difficulty: Easy
- Category: No-Bake Dessert / Pie
- Method: No-Bake
Ingredients
For the Oreo Crust
- 24 Oreo cookies (approximately 270 g), including the filling
- 5 tablespoons (70 g) unsalted butter, melted
For the Peanut Butter Filling
- 1 cup (250 g) creamy peanut butter
- 8 oz (225 g) cream cheese, softened
- ½ cup (60 g) powdered sugar
- 1 teaspoon vanilla extract
- 1 cup (240 ml) heavy whipping cream, cold
- ¼ cup (30 g) powdered sugar, for whipping the cream
For the Chocolate Ganache
- 1 cup (170 g) semi-sweet chocolate chips or chopped chocolate
- ½ cup (120 ml) heavy whipping cream
- 1 tablespoon unsalted butter, optional, for extra shine
Optional Toppings
- Mini chocolate chips
- Chopped peanut butter cups
- Crushed Oreo cookies
- Melted peanut butter for drizzling
- Chocolate shavings
- A pinch of flaky sea salt
Instructions
1. Prepare the Oreo Crust
Place the Oreo cookies in a food processor and pulse until they become fine, even crumbs.
If you don’t have a food processor, place the cookies in a sealed food bag and crush them with a rolling pin.
Transfer the crumbs to a mixing bowl and pour in the melted butter. Stir until the mixture resembles damp sand and holds together when pressed.
Press the mixture firmly into the bottom and up the sides of a 9-inch pie dish. Use the bottom of a measuring cup to create a compact, even crust.
Refrigerate for at least 20–30 minutes while preparing the filling.
2. Make the Peanut Butter Filling
In a large mixing bowl, beat the softened cream cheese with an electric mixer until smooth and creamy.
Add the peanut butter, powdered sugar, and vanilla extract. Beat until fully combined, scraping down the sides of the bowl as needed.
The mixture should be thick, fluffy, and free of cream cheese lumps.
3. Whip the Cream
In a separate chilled bowl, combine the cold heavy whipping cream with ¼ cup powdered sugar.
Beat on medium-high speed until stiff peaks form. The whipped cream should hold its shape when the beaters are lifted.
Be careful not to overbeat, or the cream may become grainy.
4. Fold the Filling Together
Gently fold the whipped cream into the peanut butter mixture in two or three additions.
Use a rubber spatula and fold until the filling is light, fluffy, and evenly blended.
Avoid overmixing to preserve the airy texture.
5. Fill the Oreo Crust
Remove the chilled Oreo crust from the refrigerator.
Spoon the peanut butter filling into the crust and spread it evenly with a spatula.
Smooth the top and refrigerate while preparing the chocolate ganache.
6. Prepare the Chocolate Ganache
Place the chocolate chips or chopped chocolate in a heatproof bowl.
Heat the heavy whipping cream in a small saucepan over medium-low heat until steaming and just beginning to simmer around the edges. Do not let it boil vigorously.
Pour the hot cream over the chocolate and let it stand for 3–5 minutes.
Stir gently from the center outward until the chocolate melts and the mixture becomes smooth and glossy.
Add the optional tablespoon of butter and stir until incorporated.
Allow the ganache to cool for about 10–15 minutes, until slightly thickened but still pourable.
7. Add the Chocolate Layer
Remove the pie from the refrigerator.
Carefully pour the cooled ganache over the peanut butter filling, spreading it gently to cover the entire surface.
For a decorative finish, create gentle swirls with a spoon or spatula.
8. Chill Until Set
Return the pie to the refrigerator and chill for at least 4–6 hours, or preferably overnight.
The chocolate ganache should be set, and the peanut butter filling should be firm enough to hold its shape when sliced.
9. Decorate and Serve
Before serving, decorate with chopped peanut butter cups, crushed Oreos, chocolate shavings, or a drizzle of melted peanut butter.
Slice with a sharp knife warmed under hot water and wiped dry between cuts.
Serve chilled and enjoy every creamy, chocolatey bite!
Tips for the Perfect Buckeye Pie
- Use creamy peanut butter: Traditional creamy peanut butter gives the filling a smooth, rich texture. Avoid natural peanut butter that separates easily.
- Soften the cream cheese: Room-temperature cream cheese blends more easily and prevents lumps.
- Use cold whipping cream: Cold cream whips faster and holds its shape better.
- Press the crust firmly: A tightly packed Oreo crust is less likely to crumble when sliced.
- Cool the ganache: Let it cool slightly before pouring so it doesn’t melt the peanut butter filling.
- Chill overnight: An overnight rest gives the pie the best texture and makes slicing easier.
- Use good-quality chocolate: Semi-sweet chocolate balances the sweetness of the peanut butter filling beautifully.
- Warm your knife: A warm, clean knife creates neat, professional-looking slices.
Delicious Variations
- Extra Chocolate Buckeye Pie: Add a thin layer of melted chocolate between the Oreo crust and peanut butter filling.
- Crunchy Peanut Butter Pie: Replace half the creamy peanut butter with crunchy peanut butter for extra texture.
- Dark Chocolate Ganache: Use dark chocolate for a richer, less-sweet finish.
- Chocolate Peanut Butter Cup Pie: Fold ½ cup chopped peanut butter cups into the filling.
- Pretzel Oreo Crust: Mix ½ cup finely crushed pretzels into the Oreo crumbs for a sweet-and-salty crust.
- Mini Buckeye Pies: Divide the crust and filling among individual mini pie dishes or muffin cups.
- Salted Chocolate Buckeye Pie: Sprinkle flaky sea salt over the ganache before chilling.
What to Serve with Buckeye Pie
This rich dessert pairs wonderfully with:
- Fresh strawberries or raspberries.
- A scoop of vanilla ice cream.
- Hot coffee or espresso.
- Cold milk.
- Whipped cream.
- A drizzle of salted caramel sauce.
Because this pie is quite rich, small slices are often perfect!
Make-Ahead Instructions
Buckeye Pie is an excellent make-ahead dessert for holidays and special occasions.
Prepare the pie completely, including the ganache, and refrigerate overnight. Add any decorative toppings just before serving for the freshest appearance.
This gives the filling plenty of time to firm up and allows the chocolate and peanut butter flavors to come together.
Storage Instructions
- Refrigerator: Cover the pie and store for up to 4 days.
- Freezer: Freeze the pie without delicate toppings for up to 2 months in a freezer-safe container.
- Thawing: Transfer frozen pie to the refrigerator and thaw overnight before serving.
- Serving: Keep refrigerated until ready to serve. Do not leave the cream cheese and whipped cream filling at room temperature for more than 2 hours.
Frequently Asked Questions
1. Why is it called Buckeye Pie?
Buckeye Pie is inspired by classic buckeye candies, which feature a sweet peanut butter center partially dipped in chocolate. This pie transforms those beloved flavors into a creamy, layered dessert.
2. Do I need to bake the Oreo crust?
No! This is a completely no-bake pie. The melted butter helps bind the Oreo crumbs together, and refrigeration firms the crust.
3. Can I use store-bought Oreo crust?
Absolutely! A prepared 9-inch Oreo crust is a convenient shortcut. Keep in mind that it may hold slightly less filling than a homemade deep-dish crust.
4. Can I use Cool Whip instead of homemade whipped cream?
Yes. Replace the 1 cup heavy whipping cream and ¼ cup powdered sugar with approximately 2 cups thawed Cool Whip. Gently fold it into the peanut butter mixture.
5. Why is my peanut butter filling too soft?
The filling may need more chilling time, or the whipped cream may not have reached stiff peaks. Make sure to use softened cream cheese, cold whipping cream, and the correct ingredient quantities.
6. Can I make Buckeye Pie a day ahead?
Yes! In fact, making it the day before serving is recommended. Overnight chilling helps the layers become firm and makes the pie easier to slice.
7. Can I use milk chocolate instead of semi-sweet chocolate?
Yes, but milk chocolate is sweeter and produces a softer, sweeter ganache. Semi-sweet or dark chocolate provides a better balance with the sweet peanut butter filling.
Approximate Nutrition Information
Per serving, assuming 12 slices:
- Calories: 540 kcal
- Carbohydrates: 47 g
- Protein: 9 g
- Fat: 37 g
- Saturated Fat: 17 g
- Sugar: 33 g
- Fiber: 3 g
- Sodium: 320 mg
Nutrition information is an estimate and will vary depending on the brands of cookies, chocolate, peanut butter, and cream used.
A Chocolate Peanut Butter Dream! 🍫🥜
This No-Bake Buckeye Pie is the ultimate dessert for anyone who loves chocolate and peanut butter. With its crunchy Oreo crust, fluffy peanut butter cheesecake filling, and smooth chocolate ganache, every layer is pure indulgence.
It’s easy to prepare, beautiful enough for a holiday dessert table, and perfect for making ahead. One slice will have everyone asking for the recipe!