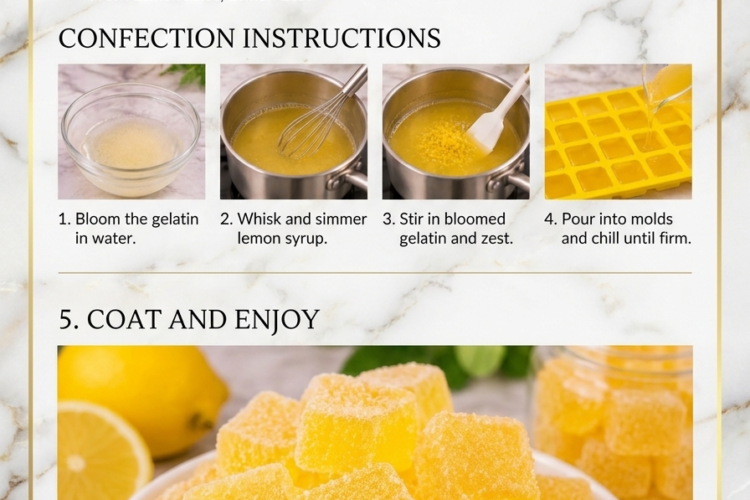
Bright, tangy homemade lemon candies with a sweet sugar coating and refreshing citrus flavor!
If you love the perfect balance of sweet and sour, these homemade Lemon Citrus Candies are a must-try! Made with fresh lemon juice, fragrant lemon zest, sugar, and gelatin, these little treats have a deliciously chewy texture and a refreshing citrus kick. Each piece is coated in sparkling sugar for a beautiful finish that makes them look just like old-fashioned homemade fruit candies.
They’re perfect for holiday candy trays, homemade gifts, party favors, or whenever you crave something sweet and lemony!
Prep Time: 15 minutes
Cook Time: 15–20 minutes
Setting Time: 4–6 hours
Total Time: Approximately 5–7 hours
Yield: 35–45 small candies
Course: Dessert, Candy
Difficulty: Moderate
Ingredients
For the Lemon Candy
- ½ teaspoon finely grated lemon zest
- ¾ cup (180 ml) fresh lemon juice
- 1 tablespoon unflavored powdered gelatin
- 1¼ cups (250 g) granulated sugar
- ¼ cup (60 ml) water
- ½ cup (120 ml) light corn syrup
For Coating
- ½–¾ cup granulated sugar, as needed
Instructions
1. Prepare the Gelatin
Pour the fresh lemon juice into a small bowl. Sprinkle the unflavored gelatin evenly over the surface and allow it to bloom for approximately 5–10 minutes.
The gelatin will absorb the liquid and become thick and spongy. Set aside.
2. Prepare the Candy Mixture
In a medium, heavy-bottomed saucepan, combine the granulated sugar, water, and light corn syrup.
Stir gently over medium heat until the sugar dissolves. Once the mixture begins boiling, stop stirring to prevent crystallization.
3. Cook the Sugar Syrup
Attach a candy thermometer to the saucepan, making sure the tip does not touch the bottom.
Continue cooking until the syrup reaches approximately 240°F (116°C), the soft-ball stage.
This temperature helps produce a firm, chewy candy rather than a soft gelatin dessert.
4. Add the Lemon Gelatin
Remove the saucepan from the heat and allow the bubbling to settle briefly.
Carefully add the bloomed lemon gelatin, stirring gently until completely dissolved.
If the mixture becomes difficult to dissolve, return the saucepan to very low heat briefly, stirring gently. Do not allow it to boil vigorously after adding the gelatin.
5. Add the Lemon Zest
Stir in the finely grated lemon zest until evenly distributed.
Taste only after the mixture has cooled enough to be safe. The candy mixture will be extremely hot, so never taste it directly from the saucepan.
6. Pour into the Mold
Lightly grease a small square or rectangular heatproof pan, approximately 8 × 8 inches, or line it with lightly oiled parchment paper.
Carefully pour the lemon candy mixture into the prepared pan. Gently tilt the pan to spread it evenly.
Allow it to cool at room temperature for approximately 20–30 minutes.
7. Let the Candy Set
Transfer the pan to the refrigerator and chill for 4–6 hours, or until the candy is completely firm and easy to cut.
8. Cut into Pieces
Remove the set candy from the pan and place it on a clean cutting board.
Use a lightly greased, sharp knife to cut it into small squares, rectangles, or bite-sized pieces.
9. Coat with Sugar
Place the extra granulated sugar in a shallow bowl.
Roll each candy piece in the sugar until all sides are lightly coated. Shake off any excess.
Arrange the candies on parchment paper and allow the coating to settle.
10. Serve and Enjoy
Transfer the finished Lemon Citrus Candies to a candy dish or package them in small treat bags.
Enjoy their bright lemon flavor and sweet, chewy texture!
Helpful Tips for Perfect Lemon Citrus Candy
- Use fresh lemon juice: Freshly squeezed juice gives the candies their natural citrus flavor.
- Measure the gelatin accurately: Too much can make the candy rubbery, while too little may prevent it from setting properly.
- Use a candy thermometer: Accurate temperature is important for achieving the intended chewy consistency.
- Avoid vigorous stirring: Once the sugar syrup boils, excessive stirring can encourage sugar crystallization.
- Dissolve the gelatin completely: Undissolved gelatin can create an uneven texture.
- Cut with a warm knife: Briefly dip the knife in warm water and dry it before cutting for cleaner edges.
- Coat shortly before serving: Sugar can absorb moisture from the candy and become wet or sticky, especially in humid conditions.
Delicious Variations
- Orange Citrus Candy: Replace the lemon juice with fresh orange juice for a sweeter, milder flavor.
- Lemon-Lime Candy: Replace ¼ cup of the lemon juice with fresh lime juice.
- Grapefruit Citrus Candy: Use a combination of grapefruit and lemon juice for a slightly bitter, refreshing flavor.
- Extra Sour Lemon Candy: Mix a little citric acid into the coating sugar for a stronger sour finish. Start with ¼ teaspoon per ½ cup of sugar and adjust to taste.
- Honey Lemon Candy: Replace a small portion of the corn syrup with honey for a subtle floral flavor.
- Lemon Mint Candy: Add a tiny amount of food-grade peppermint extract for a refreshing twist.
Serving and Packaging Ideas
These homemade candies are wonderful for:
- Christmas and holiday candy trays.
- Homemade edible gifts.
- Birthday party favor bags.
- Baby showers and bridal showers.
- Dessert tables and candy buffets.
- Afternoon tea and coffee treats.
For gifting, place the completely set and sugar-coated candies in small food-safe bags or candy boxes.
Make-Ahead and Storage
Make Ahead: Prepare the candy a day before serving to allow plenty of time for it to set properly.
Storage: Because this recipe contains fresh lemon juice and gelatin, store the candies in an airtight container in the refrigerator.
Refrigerator: Keep refrigerated for up to 1 week. Separate layers with parchment paper to prevent sticking.
Freezing: Freezing is not recommended because condensation during thawing can make the sugar coating wet and sticky.
Important: If the candies become moist or sticky, avoid leaving them at room temperature for extended periods. Refrigerate them promptly.
Frequently Asked Questions
Why didn’t my lemon candies set?
The sugar syrup may not have reached the correct temperature, or the gelatin may not have dissolved completely. Make sure to measure the ingredients accurately and use a candy thermometer.
Can I make these candies without corn syrup?
Corn syrup helps prevent unwanted sugar crystallization and gives the candy a smoother texture. Replacing it may change the final consistency, so it is best to use it for this recipe.
Can I use bottled lemon juice?
Fresh lemon juice is recommended for the best flavor, but bottled juice can work if it is 100% lemon juice without added sweeteners.
Why is the sugar coating becoming wet?
Moisture can migrate from the candy into the sugar, especially in humid environments. Make sure the candies are fully set and cool before coating them. Store them refrigerated and coat closer to serving time if necessary.
Are these candies hard or soft?
This recipe is intended to produce a firm, chewy, jelly-style candy rather than a brittle hard candy. The gelatin contributes to its characteristic texture.
Approximate Nutrition Information
Per candy, assuming 40 pieces:
- Calories: 35
- Carbohydrates: 9 g
- Protein: Less than 1 g
- Fat: 0 g
- Sugar: 8 g
- Sodium: 2 mg
Nutrition values are estimates and will vary depending on the size of the candies and the amount of coating sugar used.
A Little Sunshine in Every Bite! 🍋
These Lemon Citrus Candies are bursting with refreshing lemon flavor, a lovely chewy texture, and just the right amount of sweetness. Their sparkling sugar coating makes them beautiful enough for gifting and delicious enough to keep all to yourself.
Make a batch whenever you want a homemade citrus treat that brings a little sunshine to your candy table!