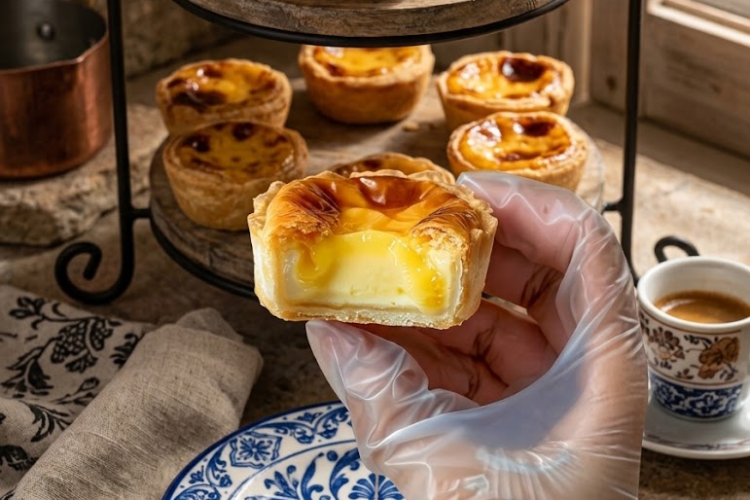
🧀🇯🇵 Tokyo’s Famous Molten Cheese Tart
Buttery almond pastry shells filled with an ultra-creamy cheese custard that bakes golden around the edges while staying irresistibly molten in the center.
Inspired by the famous Japanese cheese tarts found in Tokyo bakeries, these individual treats combine a lightly crisp, tender crust with a rich, tangy cheese filling.
The secret is baking the tarts just until the filling is set around the edges while the middle remains soft and creamy.
⏱️ Recipe Information
Prep Time: 35 minutes
Chill Time: 1 hour
Bake Time: 12–15 minutes
Total Time: About 2 hours
Yield: 8 tarts
Difficulty: Intermediate
Method: Oven-Baked
Pan: 8 small tart molds or 8 individual tart rings
🛒 Ingredients
🥧 For the Crust
- 60 g unsalted butter, softened
- 50 g powdered sugar
- 1 g salt
- 1 egg yolk
- 30 g almond flour
- 110 g low-gluten flour or cake flour
🧀 For the Molten Cheese Filling
- 150 g cream cheese, softened
- 50 g mascarpone cheese
- 40 g granulated sugar
- 1 large egg
- 60 ml heavy cream
- 20 ml whole milk
- 10 g cornstarch
- 1 teaspoon lemon juice
- ½ teaspoon vanilla extract
- Pinch of salt
Optional
- 15 g grated Parmesan cheese for a slightly more savory, bakery-style cheese flavor
- Powdered sugar, for dusting
👩🍳 Instructions
🥧 Make the Tart Crust
1. Cream the Butter and Sugar
Place the softened butter in a mixing bowl.
Beat until smooth and creamy.
Add the powdered sugar and salt.
Mix for approximately 1–2 minutes, until pale and well combined.
2. Add the Egg Yolk
Add the egg yolk and mix until fully incorporated.
Scrape down the sides of the bowl as needed.
3. Add the Almond Flour
Mix in the almond flour until evenly combined.
The mixture should be smooth and creamy.
4. Add the Flour
Sift in the low-gluten flour.
Mix gently with a spatula until a soft dough forms.
Do not overwork the dough.
5. Chill the Dough
Shape the dough into a flat disc and wrap it tightly in plastic wrap.
Refrigerate for 30–45 minutes.
Chilling helps reduce spreading and makes the dough easier to roll and shape.
🥧 Shape the Tart Shells
6. Prepare the Molds
Lightly grease 8 small tart molds or rings.
Set them on a parchment-lined baking sheet.
7. Roll Out the Dough
Place the chilled dough on a lightly floured surface.
Roll it to approximately 3 mm (⅛ inch) thick.
8. Line the Molds
Cut circles slightly larger than your tart molds.
Gently press each dough circle into a mold, working it into the corners and sides without stretching the dough.
Trim away excess pastry from the top.
9. Prick the Bases
Use a fork to gently prick the bottom of each tart shell several times.
This helps prevent the bases from puffing during baking.
10. Chill Again
Place the lined tart shells in the refrigerator for 15–20 minutes before baking.
🔥 Blind-Bake the Crust
11. Bake the Shells
Preheat the oven to 350°F (175°C).
Place parchment paper inside each shell and fill with pie weights, dry beans, or uncooked rice.
Bake for 10–12 minutes.
Remove the weights and parchment.
Return the shells to the oven for another 2–3 minutes, just until the bottoms are lightly golden.
Don’t overbake—the shells will bake again with the filling.
Allow them to cool slightly.
🧀 Make the Molten Cheese Filling
12. Beat the Cream Cheese
Place the softened cream cheese and mascarpone in a mixing bowl.
Beat until completely smooth and lump-free.
13. Add the Sugar
Add the granulated sugar and mix until incorporated.
14. Add the Egg
Add the egg and mix gently until just combined.
Avoid whipping excessive air into the filling.
15. Add the Dairy
Pour in the heavy cream and milk.
Mix until smooth.
16. Add the Remaining Ingredients
Sift in the cornstarch.
Add the lemon juice, vanilla extract, and salt.
If using Parmesan, add it now.
Mix until completely smooth.
For the silkiest filling, pass the mixture through a fine-mesh sieve.
🧀 Fill the Tarts
17. Fill the Shells
Pour or pipe the cheese filling into the cooled tart shells.
Fill each shell to approximately 90% full, leaving a little room for the filling to expand during baking.
18. Chill the Filled Tarts
Place the filled tarts in the refrigerator for approximately 20–30 minutes.
This helps the filling bake more evenly and encourages a creamy center.
🔥 Bake to Molten Perfection
19. Increase the Oven Temperature
Preheat the oven to 425°F (220°C).
20. Bake
Bake the filled tarts for approximately 6–8 minutes, then check them carefully.
Continue baking for another 3–5 minutes, depending on your oven and tart size.
The edges should be puffed and set, while the center should remain visibly soft and slightly jiggly.
For a more deeply browned top, briefly use the broiler/grill during the final 30–60 seconds.
Watch constantly.
21. Cool Briefly
Remove the tarts from the oven.
Allow them to cool for approximately 5–10 minutes.
The filling will continue setting slightly while remaining soft and creamy.
For the classic molten effect, serve while still warm.
🍽️ Serve
Carefully remove the tarts from their molds.
Serve warm with a light dusting of powdered sugar if desired.
The center should be rich, creamy, and soft enough to spoon or gently ooze when cut.
⭐ Chef’s Tips
Use room-temperature cream cheese
Softened cream cheese creates a much smoother filling with fewer lumps.
Don’t overmix the filling
Excessive mixing incorporates air, which can cause the filling to puff and then collapse.
Strain the filling
Passing the cheese mixture through a sieve produces an exceptionally smooth bakery-style texture.
Keep the crust thin
A thin pastry shell creates the ideal contrast between crisp pastry and creamy cheese filling.
Don’t overbake
The key to a molten cheese tart is removing it while the center is still jiggly. It will continue to set from residual heat.
Chill before the final bake
Cold filled tarts are easier to bake to a set edge and soft center.
Serve warm
The filling is at its most molten and luxurious shortly after baking.
🧀 Easy Variations
Extra-Cheesy Tart
Add 20–30 g additional cream cheese for an even richer filling.
Parmesan Cheese Tart
Add another 10 g grated Parmesan for a slightly sharper savory note.
Lemon Cheese Tart
Increase the lemon juice to 2 teaspoons and add a little lemon zest.
Vanilla Cheese Tart
Add an additional ½ teaspoon vanilla for a sweeter, more pronounced vanilla flavor.
Chocolate Cheese Tart
Add 20 g melted dark chocolate to the filling.
Matcha Cheese Tart
Whisk 1 teaspoon matcha powder into the filling for a Japanese-inspired variation.
🍓 Serving Suggestions
Serve these warm cheese tarts with:
- Fresh strawberries
- Raspberries
- Blueberries
- Powdered sugar
- Strawberry sauce
- Raspberry coulis
- Vanilla ice cream
- Fresh whipped cream
A cup of Japanese green tea or coffee makes an excellent pairing.
🧊 Storage
Store baked cheese tarts in an airtight container in the refrigerator for up to 3 days.
Because the filling contains dairy and egg, keep the tarts chilled when not serving.
🔥 Reheating
For a warm, creamy center, reheat individual tarts in a 325°F (165°C) oven for approximately 5–8 minutes.
You can also use an air fryer at 320°F (160°C) for 3–5 minutes.
Avoid overheating, as the filling can become fully set and lose its molten texture.
❄️ Freezing
For best results, freeze the unbaked filled tarts.
Place them on a tray until firm, then transfer to a freezer-safe container.
Bake directly from frozen, adding approximately 3–5 minutes to the baking time.
Baked tarts can also be frozen, though the texture of the filling may change slightly after thawing.
🧀🇯🇵✨ Final Result
These Tokyo’s Famous Molten Cheese Tarts have the perfect contrast of delicate buttery almond pastry and rich, creamy cheese filling.
The outside becomes lightly golden and set while the center stays wonderfully soft, silky, and molten.
One warm bite and you’ll understand why Japanese cheese tarts have become such a beloved bakery treat! 🧀🥧🇯🇵✨