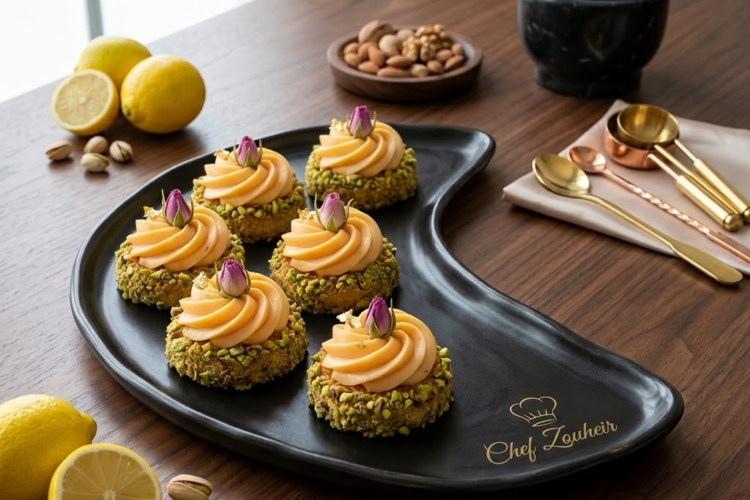
💚🌹 Pistachio Cream Thumbprint Cookies
Delicate, buttery pistachio cookies with crisp nutty edges, tender centers, and a luxurious swirl of silky pistachio cream. Finished with crushed pistachios and a tiny rosebud, these cookies look and taste like they came straight from a high-end bakery.
These beautiful thumbprint cookies combine the rich flavor of real pistachios with a soft, buttery shortbread-style cookie. The center is gently indented before baking, creating the perfect space for a generous swirl of smooth pistachio cream frosting.
They are perfect for holidays, afternoon tea, special occasions, gifting, or whenever you want an elegant homemade cookie.
Recipe Information
- Prep Time: 25 minutes
- Chilling Time: 30 minutes
- Bake Time: 12–15 minutes
- Cooling Time: 30 minutes
- Total Time: About 1 hour 40 minutes
- Yield: 18–22 cookies
- Difficulty: Easy to Intermediate
- Oven Temperature: 350°F (175°C)
🥣 Ingredients
For the Pistachio Cookies
- 1 cup (226 g) unsalted butter, softened
- ¾ cup (90 g) powdered sugar
- 1 large egg yolk
- 1 tsp vanilla extract
- ½ tsp almond extract
- 1½ cups (190 g) all-purpose flour
- ¾ cup (85 g) finely ground pistachios
- ¼ tsp salt
- ½ tsp baking powder
- 1–2 tbsp milk, only if needed
For the Pistachio Cream Topping
- ½ cup (113 g) unsalted butter, softened
- 4 oz (115 g) cream cheese, softened
- 1½ cups (180 g) powdered sugar, sifted
- ⅓ cup pistachio cream or pistachio spread
- ½ tsp vanilla extract
- 1–2 tbsp heavy cream or milk, if needed
For Garnishing
- ¼ cup finely chopped pistachios
- Dried edible rosebuds or edible rose petals, optional
👩🍳 Instructions
1. Prepare the Baking Sheets
Preheat your oven to 350°F (175°C).
Line two baking sheets with parchment paper.
Set them aside while you prepare the cookie dough.
2. Cream the Butter and Sugar
Place the softened butter and powdered sugar in a large mixing bowl.
Beat with an electric mixer on medium speed until the mixture becomes:
- Smooth
- Light
- Creamy
Scrape down the sides of the bowl as needed.
Using powdered sugar helps give these cookies a delicate, tender texture.
3. Add the Egg Yolk and Extracts
Add:
- Egg yolk
- Vanilla extract
- Almond extract
Mix until everything is fully combined.
The almond extract complements the naturally sweet, nutty flavor of the pistachios.
4. Combine the Dry Ingredients
In a separate bowl, whisk together:
- All-purpose flour
- Finely ground pistachios
- Salt
- Baking powder
Make sure the pistachios are finely ground, but avoid processing them too long or they may turn into pistachio butter.
5. Make the Cookie Dough
Gradually add the dry ingredients to the butter mixture.
Mix on low speed just until a soft dough forms.
Do not overmix.
The dough should hold together when pressed between your fingers.
If the Dough Is Too Dry
Add milk, 1 tablespoon at a time, mixing gently after each addition.
Use only enough milk to bring the dough together.
6. Chill the Dough
Shape the dough into a disc or cover the bowl tightly.
Refrigerate for 30 minutes.
Chilling helps prevent the cookies from spreading too much during baking.
7. Shape the Cookies
Remove the dough from the refrigerator.
Scoop approximately 1 tablespoon of dough for each cookie.
Roll the dough into smooth balls.
Place the balls on the prepared baking sheets, leaving about 2 inches of space between them.
8. Make the Thumbprints
Using your thumb, the back of a small measuring spoon, or the rounded end of a utensil, gently press an indentation into the center of each cookie.
Do not press all the way through the dough.
If the edges crack slightly, gently press them back together with your fingers.
The indentation should be large enough to hold a generous swirl of pistachio cream after baking.
9. Bake the Cookies
Bake for 12–15 minutes.
The cookies should be lightly golden around the edges but still pale and tender in the center.
Avoid overbaking, as the cookies will continue to firm up while cooling.
10. Refresh the Indentations
As soon as the cookies come out of the oven, check the centers.
If the indentations have puffed up, gently press them again using the back of a small spoon.
Be gentle—the cookies will be soft while hot.
11. Cool Completely
Allow the cookies to cool on the baking sheet for 5–10 minutes.
Transfer them to a wire rack.
Allow them to cool completely before adding the pistachio cream.
Warm cookies can melt the frosting.
💚 Make the Pistachio Cream Topping
12. Beat the Butter and Cream Cheese
In a medium mixing bowl, beat the softened butter and cream cheese until completely smooth and creamy.
Scrape down the sides of the bowl.
13. Add the Pistachio Cream
Add the pistachio cream or pistachio spread.
Mix until smooth and evenly combined.
The mixture should have a beautiful pale green color and a rich pistachio flavor.
14. Add the Powdered Sugar
Gradually add the sifted powdered sugar.
Mix on low speed at first to prevent the sugar from flying out of the bowl.
Once incorporated, beat until light and fluffy.
15. Adjust the Consistency
Add the vanilla extract.
If the frosting is too thick for piping, add 1 tablespoon of heavy cream or milk at a time until it reaches a smooth, pipeable consistency.
If it becomes too soft, refrigerate it for 10–15 minutes before piping.
🌹 Assemble the Cookies
16. Fill the Centers
Transfer the pistachio cream to a piping bag fitted with a star tip.
Pipe a generous swirl into the center of each completely cooled cookie.
You can also use a spoon if you prefer a more rustic appearance.
17. Garnish
Sprinkle chopped pistachios over the pistachio cream.
For an elegant bakery-style finish, place a tiny food-safe edible dried rosebud or a few edible rose petals on top.
Important Note
Only use flowers specifically labeled edible and food-safe. Decorative flowers should not be eaten.
👩🍳 Chef’s Tips
Use Good-Quality Pistachios
For the best flavor and color, use fresh, unsalted pistachios.
Shelled pistachios with naturally vibrant green centers create especially beautiful cookies.
Grind the Pistachios Carefully
Pulse the pistachios in short bursts.
Stop when they reach a fine, sandy texture.
Overprocessing can release too much oil and turn them into a paste.
Don’t Overbake
These cookies should remain relatively pale.
Remove them when the edges are just beginning to turn golden.
Cool Before Frosting
Make sure the cookies are completely cool before piping the pistachio cream.
Use a Piping Bag
A piping bag with a star tip gives the cookies their elegant, luxury-bakery appearance.
✨ Optional Variations
🍫 Chocolate Pistachio Cookies
Drizzle the finished cookies with melted dark chocolate.
Chocolate and pistachio make a delicious combination.
🍓 Raspberry Pistachio Thumbprints
Add a small spoonful of raspberry jam beneath the pistachio cream.
The tart raspberry flavor beautifully balances the rich pistachios.
🌹 Rose Pistachio Cookies
Add ¼ teaspoon rose water to the pistachio cream for a delicate floral flavor.
Use sparingly, as rose water can be strong.
🍋 Lemon Pistachio Cookies
Add 1 teaspoon finely grated lemon zest to the cookie dough for a bright citrus flavor.
🥡 Storage
Because the pistachio cream topping contains cream cheese, store the finished cookies in an airtight container in the refrigerator.
They will keep well for up to 4–5 days.
For the best flavor and texture, allow the cookies to sit at room temperature for approximately 10–15 minutes before serving.
❄️ Can They Be Made Ahead?
Yes!
The cookies can be baked 1–2 days in advance and stored in an airtight container.
Prepare and pipe the pistachio cream shortly before serving for the freshest presentation.
⭐ Final Result
These Pistachio Cream Thumbprint Cookies are buttery, nutty, delicate, and absolutely stunning. Their crisp edges, tender centers, luxurious pistachio cream swirls, and elegant pistachio-and-rose garnish make every cookie feel like a little piece of luxury.
Perfect for tea parties, holidays, celebrations, cookie boxes, or whenever you want to impress with a truly beautiful homemade dessert. 💚🌹🍪