🍒🍫 Old-Fashioned Martha Washington Candy
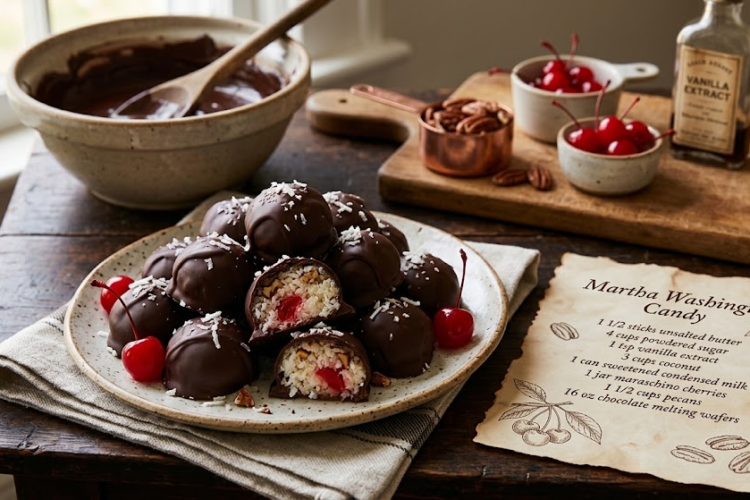
Old-Fashioned Martha Washington Candy is a beloved homemade treat featuring a rich, creamy coconut filling packed with crunchy pecans and sweet maraschino cherries, all wrapped in a smooth chocolate coating. These bite-sized candies are sweet, buttery, nutty, and wonderfully indulgent—the perfect addition to Christmas cookie trays, holiday dessert tables, and homemade candy gift boxes.
This nostalgic holiday favorite requires no baking, making it a wonderful recipe to prepare with family during the festive season. Simply mix the filling, chill until firm, roll into bite-sized balls, and dip into melted chocolate for a beautiful, old-fashioned candy that looks as impressive as it tastes.
Recipe Information
- Prep Time: 35 minutes
- Chilling Time: 2–3 hours
- Chocolate Dipping Time: 25 minutes
- Total Time: Approximately 3 hours
- Yield: About 50–60 candies, depending on size
- Course: Dessert, Homemade Candy
- Cuisine: American
- Difficulty: Easy
Ingredients
For the Coconut-Pecan Filling
- 1½ sticks unsalted butter (170 g), softened
- 4 cups powdered sugar (approximately 480 g), sifted
- 1 teaspoon vanilla extract (5 ml)
- 3 cups sweetened shredded coconut (approximately 240 g)
- 1 can sweetened condensed milk (14 oz / 397 g)
- 1 jar maraschino cherries (approximately 10 oz / 283 g), drained, patted dry, and finely chopped
- 1½ cups chopped pecans (approximately 165 g)
For the Chocolate Coating
- 16 oz chocolate melting wafers (approximately 454 g), milk, dark, or semisweet chocolate
Optional Decorations
- Extra chopped pecans
- A drizzle of contrasting melted white chocolate
- A few finely chopped maraschino cherries for garnish
Instructions
Step 1: Prepare the Maraschino Cherries
Drain the maraschino cherries thoroughly in a colander. Place them on paper towels and gently pat them dry to remove as much excess moisture as possible.
Finely chop the cherries into small pieces, removing any stems or pits if present.
Transfer the chopped cherries to a clean paper towel and blot them again.
Important: Removing excess moisture is essential. Wet cherries can make the filling too soft and difficult to shape.
Step 2: Cream the Butter and Powdered Sugar
Place the softened butter in a large mixing bowl. Beat with an electric mixer or sturdy wooden spoon until smooth and creamy.
Gradually add the sifted powdered sugar, mixing after each addition until incorporated. Add the vanilla extract and continue mixing until the mixture is evenly combined.
The mixture will be thick and sweet, forming the base of the candy filling.
Step 3: Add the Sweetened Condensed Milk
Pour the sweetened condensed milk into the butter and sugar mixture.
Mix thoroughly until smooth and creamy, scraping down the sides of the bowl as needed.
The mixture may look soft at this stage. The coconut and chilling time will help it become firmer and easier to shape.
Step 4: Fold in the Coconut, Pecans, and Cherries
Add the shredded coconut, chopped pecans, and finely chopped maraschino cherries to the bowl.
Using a sturdy spatula or wooden spoon, fold everything together until the ingredients are evenly distributed throughout the mixture.
The filling should be thick, sticky, and packed with coconut, nuts, and cherry pieces.
If it seems unusually soft, add a little extra powdered sugar or coconut, 1 tablespoon at a time, until it becomes easier to handle.
Step 5: Chill the Filling
Cover the bowl with plastic wrap and refrigerate for 1–2 hours, or until the filling is firm enough to shape.
If you are short on time, spread the mixture into a shallow container before chilling so it cools more quickly.
Do not skip this step. A well-chilled filling is much easier to roll and less likely to fall apart during chocolate dipping.
Step 6: Shape the Candy Balls
Line one or two baking trays with parchment paper.
Scoop approximately 1 tablespoon of the chilled filling and roll it gently between your palms to form a smooth ball about 1 inch (2.5 cm) wide.
Place each ball on the prepared tray, leaving a little space between them.
Repeat with the remaining filling. Depending on the size of your candies, you should have approximately 50–60 pieces.
If the filling starts becoming too soft while you work, return it to the refrigerator for 10–15 minutes.
Step 7: Chill the Shaped Candies
Place the trays of candy balls in the refrigerator for another 30–45 minutes, until they are firm.
For easier dipping, you can place them in the freezer for approximately 15–20 minutes instead. They should be cold and firm, but not so frozen that condensation forms on their surface.
Step 8: Melt the Chocolate Wafers
Place the chocolate melting wafers in a microwave-safe bowl.
Microwave in 20–30-second intervals, stirring thoroughly after each interval, until the chocolate is completely melted and smooth.
Alternatively, melt the wafers in a heatproof bowl set over a saucepan of gently simmering water. Make sure the bottom of the bowl does not touch the water and keep all moisture out of the chocolate.
Allow the melted chocolate to cool slightly so it remains fluid but is not excessively hot.
If the chocolate becomes too thick while dipping, warm it gently in short intervals, stirring well between each one.
Step 9: Dip the Candy Balls
Remove a few chilled candy balls from the refrigerator at a time, keeping the rest cold.
Using a fork or dipping tool, lower one candy ball into the melted chocolate. Turn it carefully until fully coated, then lift it out and allow the excess chocolate to drip back into the bowl.
Gently tap the fork against the side of the bowl to remove excess coating.
Place the dipped candy onto the parchment-lined tray. Use a toothpick or another fork to help slide it off if necessary.
Repeat with the remaining candies.
Tip: Work in small batches so the filling remains firm while dipping. Cold filling and smoothly melted chocolate help create a neat, even coating.
Step 10: Decorate the Candies
While the chocolate coating is still wet, sprinkle a few candies with chopped pecans if desired.
For a more elegant finish, allow the chocolate to set, then drizzle the candies with melted white chocolate using a spoon or a small piping bag.
You can also add a tiny piece of cherry to the top of each candy for a festive presentation.
Step 11: Allow the Chocolate to Set
Place the dipped candies in the refrigerator for approximately 20–30 minutes, or until the chocolate coating is completely firm.
Once set, transfer the candies to an airtight container, separating layers with parchment paper to prevent sticking.
Let them stand at room temperature briefly before serving if you prefer a softer filling.
Chef’s Tips for Perfect Martha Washington Candy
- Drain the cherries thoroughly: Excess liquid can make the filling too soft and interfere with the chocolate coating.
- Use softened, not melted, butter: Softened butter blends smoothly into the filling without making it greasy.
- Sift the powdered sugar: This prevents lumps and helps create a more uniform texture.
- Chill before shaping and dipping: Cold candy balls hold together much better when coated in chocolate.
- Choose good-quality melting wafers: They are formulated to melt smoothly and set without the extra tempering steps often needed for ordinary chocolate.
- Keep water away from the chocolate: Even a small amount of water can cause melted chocolate to seize and become thick or grainy.
- Use a fork for dipping: Allowing excess chocolate to drip away prevents thick pools from forming around the bottoms of the candies.
- Work in small batches: Keep most of the filling refrigerated while dipping.
- Adjust the filling gradually: If the mixture is too soft, add powdered sugar or coconut a little at a time rather than making a large adjustment all at once.
Delicious Variations
Dark Chocolate Martha Washington Candy
Use dark chocolate melting wafers for a less-sweet coating that balances the rich coconut and condensed milk filling.
Milk Chocolate Pecan Candy
Use milk chocolate wafers for a sweeter, creamier chocolate coating that pairs beautifully with the pecans.
Almond Martha Washington Candy
Replace some or all of the pecans with chopped toasted almonds for a slightly different nutty flavor.
Coconut Chocolate Truffles
Shape the filling into smaller balls and coat them with dark chocolate, then sprinkle with extra shredded coconut.
Festive Christmas Candy
Decorate the set chocolate coating with white chocolate drizzle and a small sprinkle of red and green sugar decorations.
Extra-Pecan Candy
Increase the chopped pecans slightly and reduce the coconut by the same volume for a nuttier, crunchier filling. Keep the mixture firm enough to shape.
Make-Ahead Instructions
Martha Washington Candy is excellent for preparing ahead of the holidays.
The filling can be mixed and refrigerated for up to 24 hours before shaping. You can also shape the balls, place them on a parchment-lined tray, cover them, and refrigerate them until you are ready to dip.
For holiday gifting, prepare the candies a day in advance so the chocolate has plenty of time to set. Once firm, arrange them in decorative paper candy cups and pack them into gift boxes.
Storage Instructions
Refrigerator: Store the finished candies in an airtight container in the refrigerator for up to 1–2 weeks for best quality. Keep parchment paper between layers to prevent the chocolate coatings from sticking together.
Room Temperature: Because the filling contains butter and sweetened condensed milk, refrigerator storage is the safest general choice, especially in warm weather. The candies can be brought out shortly before serving, but avoid leaving them unrefrigerated for extended periods.
Freezer: Freeze the fully set candies in a freezer-safe airtight container for up to 2–3 months for best quality. Separate the layers with parchment paper.
Thawing: Thaw the candies in the refrigerator while still covered. This helps reduce condensation forming on the chocolate surface.
Frequently Asked Questions
Why is my candy filling too soft?
The cherries may contain too much moisture, or the mixture may not have chilled long enough. Pat the cherries dry, refrigerate the filling thoroughly, and add a small amount of powdered sugar or coconut if needed.
Can I use unsweetened coconut?
Yes, but the filling will be less sweet and may have a slightly different texture. Since the recipe is designed around sweetened coconut, you may need to adjust the powdered sugar to taste.
Do I have to use pecans?
No. Pecans provide the classic nutty texture, but chopped walnuts or almonds can be substituted. You can also omit the nuts, although the filling will be softer and have less crunch.
Can I use regular chocolate chips instead of melting wafers?
Yes, but chocolate chips may melt more thickly and might not set as smoothly. You can stir a small amount of neutral coconut oil into the melted chocolate if needed, though this will change the coating slightly. For the easiest dipping, melting wafers are recommended.
Why is my chocolate coating too thick?
The chocolate may have cooled too much or may not be fully melted. Warm it gently in short intervals while stirring. Avoid overheating it, which can make the texture difficult to work with.
Can I make the candies without a mixer?
Absolutely. A sturdy spoon and some patience are enough to combine the softened butter and powdered sugar, especially if the butter is at the right temperature.
How do I prevent chocolate puddles beneath the candy?
Allow excess chocolate to drip off before placing each candy on the parchment paper. You can also gently slide the dipping fork along the rim of the bowl to remove excess coating.
Serving Suggestions
Serve these classic candies alongside:
- Christmas sugar cookies
- Chocolate fudge
- Peanut butter balls
- Pecan pralines
- Peppermint bark
- Coffee, hot chocolate, or tea
For holiday entertaining, arrange them in small paper candy cups on a dessert platter or package them in a decorative tin for homemade Christmas gifts.
Final Result
These Old-Fashioned Martha Washington Candies feature a rich, sweet coconut filling studded with crunchy pecans and colorful maraschino cherries, all wrapped in a smooth chocolate shell. Every bite offers a delicious balance of creamy, chewy, nutty, fruity, and chocolatey textures.
They’re nostalgic, festive, and perfect for sharing during the holidays—or keeping in the refrigerator for a special homemade treat.
The secret to success: dry the cherries thoroughly, chill the filling until firm, and dip the candies in smoothly melted chocolate. These simple steps help create beautiful, delicious homemade candies that look as good as they taste.