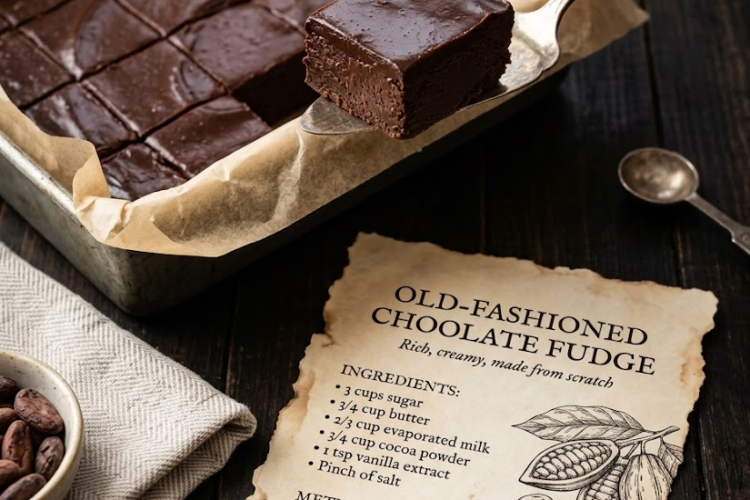
🍫 Old-Fashioned Chocolate Fudge
Rich, smooth, and intensely chocolatey, this Old-Fashioned Chocolate Fudge is a timeless homemade treat made with simple pantry ingredients. It has that classic firm-yet-creamy texture, a deep cocoa flavor, and a melt-in-your-mouth finish that makes every little square irresistible.
Made the traditional way on the stovetop, this nostalgic fudge brings back the comforting taste of old-fashioned homemade candy. It’s perfect for Christmas gift boxes, holiday dessert trays, bake sales, special occasions, or whenever you’re craving a rich chocolate treat.
Recipe Information
- Prep Time: 10 minutes
- Cook Time: 15–25 minutes
- Cooling and Setting Time: 2–3 hours
- Total Time: Approximately 3 hours
- Yield: 36 small squares
- Course: Dessert, Candy
- Cuisine: American
- Difficulty: Moderate
Ingredients
- 3 cups granulated sugar (600 g)
- ¾ cup unsalted butter (170 g)
- ⅔ cup evaporated milk (160 ml)
- ¾ cup unsweetened cocoa powder (approximately 65–75 g, depending on the brand)
- 1 teaspoon vanilla extract (5 ml)
- A pinch of salt
Instructions
Step 1: Prepare the Baking Pan
Line an 8 × 8-inch (20 × 20 cm) square baking pan with parchment paper, leaving a little overhang on two sides to make the fudge easier to lift out later.
Lightly butter the parchment if desired. Set the pan aside before beginning the cooking process, as the fudge will need to be transferred promptly once it reaches the correct consistency.
Step 2: Combine the Dry Ingredients
In a medium, heavy-bottomed saucepan, whisk together the granulated sugar, cocoa powder, and salt until evenly combined.
Breaking up the cocoa lumps now helps create a smoother fudge without pockets of dry cocoa.
Add the evaporated milk and butter. Place the saucepan over medium heat and stir gently until the butter melts and the sugar begins to dissolve.
Step 3: Bring the Mixture to a Boil
Continue heating the mixture, stirring regularly and scraping the bottom and corners of the pan to prevent scorching.
Once the mixture reaches a full, rolling boil, stop stirring continuously. Allow it to boil steadily, adjusting the heat as necessary to prevent it from bubbling over.
Cook until the mixture reaches the soft-ball stage, approximately 234°F (112°C), on a candy thermometer.
This temperature is important for achieving traditional fudge that sets firmly but remains creamy.
Without a candy thermometer: Carefully drop a small amount of the mixture into a cup of cold water. If it forms a soft, flexible ball that can be picked up and flattened between your fingers, it is approaching the soft-ball stage. Use extreme caution because the sugar mixture is extremely hot.
Cooking time varies depending on the pan, stove, and room conditions, so temperature is a more reliable guide than time alone.
Step 4: Remove from the Heat
As soon as the mixture reaches the correct temperature, remove the saucepan from the heat.
Let it rest undisturbed until it cools to approximately 110°F (43°C). This may take around 20–40 minutes, depending on the pan and surroundings.
Do not stir or scrape the mixture during this cooling period. Allowing it to cool before beating helps produce the fine, creamy sugar crystals characteristic of traditional fudge.
Step 5: Add the Vanilla
Once the mixture has cooled sufficiently, add the vanilla extract.
Stir it in gently, then prepare to beat the fudge until it begins to thicken.
Step 6: Beat Until Thick and Matte
Using a sturdy wooden spoon, beat the mixture vigorously until it thickens, loses its glossy appearance, and begins to hold its shape. This can take several minutes.
The fudge is ready when it looks less shiny and a small amount dropped from the spoon briefly holds its shape rather than flowing immediately back into the pan.
Do not continue beating once the fudge becomes noticeably thick, as it may begin setting before you can spread it.
Step 7: Transfer to the Pan
Immediately spoon the thickened fudge into the prepared baking pan.
Spread it evenly with a spatula, pressing gently into the corners. Work quickly because traditional fudge can set rapidly at this stage.
If desired, smooth the top with the back of a lightly buttered spoon.
Step 8: Allow the Fudge to Set
Leave the fudge at room temperature for approximately 2–3 hours, or until completely firm.
Once set, use the parchment overhang to lift it out of the pan. Place it on a cutting board and slice into small squares with a sharp knife.
For cleaner cuts, wipe the knife between slices.
Chef’s Tips for Perfect Old-Fashioned Fudge
- Use a heavy-bottomed saucepan: It distributes heat more evenly and helps prevent the chocolate mixture from scorching.
- Measure the ingredients accurately: Traditional fudge depends on the right balance of sugar and liquid to set properly.
- Use unsweetened cocoa powder: This gives the fudge its rich chocolate flavor without adding extra sugar.
- Watch the temperature carefully: Reaching the soft-ball stage is one of the most important steps.
- Avoid stirring while cooling: Premature agitation can encourage unwanted sugar crystallization.
- Beat at the right time: Beating while the mixture is still too hot can affect its texture; waiting too long can make it difficult to spread.
- Work quickly once it thickens: Traditional fudge can firm up rapidly after beating.
- Let it set completely: Cutting too early can leave the squares soft and uneven.
Delicious Variations
Chocolate Walnut Fudge
Fold in ½–¾ cup chopped toasted walnuts just before transferring the fudge to the pan.
Chocolate Pecan Fudge
Add ½ cup chopped pecans for a buttery, nutty crunch that pairs beautifully with the cocoa.
Peanut Butter Chocolate Fudge
Once the fudge has thickened, gently swirl in ¼ cup smooth peanut butter before spreading it in the pan.
Chocolate Marshmallow Fudge
Fold in 1 cup mini marshmallows just before spreading the fudge. The marshmallows will soften slightly and create a sweeter, softer texture.
Sea Salt Chocolate Fudge
Sprinkle a small amount of flaky sea salt over the top immediately after spreading the fudge in the pan.
Mint Chocolate Fudge
Add ¼ teaspoon peppermint extract along with the vanilla for a refreshing chocolate-mint variation. Use peppermint extract sparingly, as its flavor can become strong quickly.
Make-Ahead Instructions
This fudge is excellent for preparing in advance. Make it 1–2 days before a gathering to give it plenty of time to set and make portioning easier.
Once completely firm, cut it into squares and arrange them in an airtight container with parchment paper between the layers.
Storage Instructions
Room Temperature: Store the fudge in an airtight container in a cool, dry place for about 1–2 weeks. Keep it away from direct sunlight and heat.
Refrigerator: For warmer climates, refrigerate the fudge in a tightly sealed container for up to 3 weeks for best quality. Let individual pieces stand briefly at room temperature before serving for a softer bite.
Freezer: Wrap the fudge tightly and place it in a freezer-safe container for up to 2–3 months. Separate layers with parchment paper to prevent sticking.
Thawing: Thaw frozen fudge in the refrigerator, still wrapped, before bringing it to room temperature. This helps minimize condensation on the surface.
Frequently Asked Questions
Why didn’t my fudge set?
The mixture may not have reached the soft-ball stage, or the sugar-to-liquid balance may have been affected by inaccurate measurements. Use a candy thermometer when possible and cook to approximately 234°F (112°C).
Why is my fudge grainy?
Graininess often results from unwanted sugar crystals forming during cooking or cooling. Avoid scraping crystallized sugar from the sides of the pan back into the mixture, and let the fudge cool undisturbed before beating.
Why did my fudge become too hard?
The mixture may have been cooked beyond the target temperature, causing too much water to evaporate. A candy thermometer helps prevent overcooking.
Can I use sweetened condensed milk instead of evaporated milk?
Not as a direct substitute. Sweetened condensed milk contains added sugar and has a different concentration, which changes the recipe’s balance and cooking behavior.
Can I use salted butter?
Yes. If using salted butter, omit the additional pinch of salt or add it only after tasting the mixture’s balance.
Can I make fudge without a candy thermometer?
Yes. The cold-water soft-ball test is the traditional alternative, but it takes practice. A candy thermometer provides more consistent results.
Serving Suggestions
Cut the fudge into bite-sized squares and arrange them on a dessert platter with cookies, brownies, or homemade candy.
It is especially lovely packaged in small gift boxes for Christmas, birthdays, and holiday celebrations. Serve it alongside coffee, hot chocolate, or a cold glass of milk for a classic chocolate treat.
Final Result
This Old-Fashioned Chocolate Fudge delivers rich cocoa flavor, a smooth, creamy bite, and that nostalgic homemade-candy texture. Each little square is sweet, chocolatey, and satisfying—perfect for sharing or enjoying as a special treat.
The secret to traditional fudge: cook the mixture to the correct temperature, let it cool undisturbed, and beat only until it thickens and loses its glossy finish. With careful timing, you’ll have beautiful homemade chocolate fudge that sets into delicious, neatly cut squares.