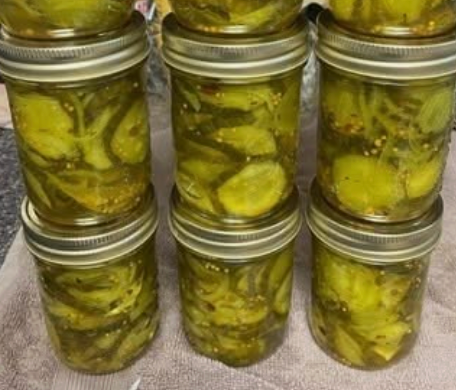
Crisp, vibrant, and bursting with sweet, aromatic tang, Old-Fashioned Bread and Butter Pickles remain the gold standard of heritage home canning. Unlike garlic-heavy sour dills, bread and butter pickles balance tender-crisp cucumber chips with thinly sliced sweet onions in an amber brine seasoned with whole mustard seeds, earthy celery seeds, warm cloves, and golden turmeric.
By utilizing the traditional ice-and-salt bath technique, this expanded recipe pulls out excess cellular water before canning, ensuring that every bite stays snappy and crisp long after sealing.
Recipe Overview
- Prep Time: 35 minutes
- Salting & Ice-Chilling Time: 3 hours (essential for crispness)
- Cook Time: 8–10 minutes
- Processing Time (Water Bath): 10 minutes (0–1,000 ft altitude)
- Yield: Approximately 4 to 5 pint jars (16 oz / 500 ml each)
- Curing Time: 1 to 2 weeks (for peak flavor development)
- Skill Level: Beginner to Intermediate Home Canner
Why the Ice-and-Salt Method Works
- Osmotic Dehydration: Cucumbers consist of over 95% water. The heavy salt application draws out internal moisture through osmosis, preventing the preserving brine from becoming diluted and watery inside the jar.
- Cell Wall Preservation: Layering the salted vegetables beneath crushed ice keeps the tissue temperature near freezing. This rapid cold shock strengthens the vegetable pectin, ensuring the cucumber rounds do not turn soft or mushy when submerged in hot vinegar brine.
- Deep Flavor Permeation: Once the cellular water is expelled and drained away, the vegetable tissue acts like a clean sponge, quickly absorbing the hot, spiced vinegar and sugar infusion.
Equipment Checklist
- 5 clean pint (16 oz) glass mason jars with fresh, unused lids and screw bands
- Boiling water bath canner (or a deep 12-quart stockpot fitted with an elevated wire rack)
- Mandoline slicer, food processor with slicing disc, or a sharp chef’s knife
- Large colander
- Heavy 5-to-6-quart stainless steel or enameled Dutch oven (avoid non-enameled cast iron or aluminum)
- Jar lifter tongs, wide-mouth canning funnel, and non-metallic bubble remover/headspace tool
- Clean kitchen towels and damp paper towels
Detailed Ingredient Breakdown
- 8 cups Pickling Cucumbers (approx. 2.5 to 3 lbs): Use firm, fresh pickling varieties (such as Kirby, Boston Pickling, or National Pickling). Wash thoroughly and slice into uniform ⅛-inch to ¼-inch rounds. Avoid waxed supermarket slicing cucumbers, which have excess seeds and soft flesh.
- 2 medium Sweet or Yellow Onions (approx. 2 cups sliced): Sweet Vidalia, Walla Walla, or yellow onions sliced into thin rings or half-moons.
- ⅓ cup Pure Kosher Salt or Canning/Pickling Salt: Use pure salt without anti-caking additives or iodine, both of which cause cloudy brine and dark, discolored pickles.
- 4 to 5 cups Crushed Ice or Ice Cubes: For packing over the salted vegetables during the crisping stage.
- 2 cups Granulated White Sugar: Balances the high acidity of the vinegar to create the signature sweet-sour profile.
- 2 cups Apple Cider Vinegar or White Distilled Vinegar (5% Acidity): Must have at least 5% acidity to ensure safe preservation against bacteria. Apple cider vinegar yields a warm, mellow fruity note, while white distilled vinegar provides a sharp, clear tang.
- 1 tbsp Yellow Mustard Seeds: Delivers classic nutty crunch and mild pungency.
- 1 tsp Celery Seeds: Adds warm, savory, aromatic undertones.
- 1 tsp Ground Turmeric: Imparts a bright, classic neon-gold hue and subtle earthy warmth.
- 1 tsp Ground Cloves: Provides the characteristic old-fashioned holiday spice note.
Step-by-Step Instructions
1. Prep, Salt, and Ice the Vegetables
Thoroughly wash the cucumbers in cold water. Trim off and discard 1/16-inch from both the stem and blossom ends. (The blossom end contains enzymes that can break down pectin and cause soft pickles).
Slice the cucumbers and peeled onions into uniform ⅛-inch to ¼-inch thick rounds using a mandoline or sharp knife.
In a large glass, stainless steel, or ceramic bowl, combine the sliced cucumbers and onions. Sprinkle the ⅓ cup of kosher salt evenly over the vegetables and toss gently with your hands to distribute.
Cover the entire surface of the vegetables with 4 to 5 cups of crushed ice. Let the bowl sit undisturbed on the counter (or in the refrigerator) for 3 hours. As the ice melts, it will create an ice-cold brine bath.
2. Drain and Rinse
After 3 hours, dump the cucumber and onion mixture into a large colander set in your sink. Discard any remaining unmelted ice chunks.
Rinse the vegetable slices under cold running water for 30 to 45 seconds to wash away excess surface salt. Let the colander drain thoroughly for 15 minutes, gently pressing the top with your hands to expel trapped liquid.
3. Prepare the Water Bath Canner & Jars
Fill your water bath canner halfway with water, place your clean pint jars on the interior rack, and heat to a simmer (180°F / 82°C). Jars must remain hot to prevent thermal shock when filled with hot brine.
Wash your canning lids and rings in warm soapy water and set aside.
4. Simmer the Spiced Sweet Brine
In a large non-reactive pot (stainless steel or enameled), combine the 2 cups of granulated sugar, 2 cups of 5% vinegar, 1 tbsp mustard seeds, 1 tsp celery seeds, 1 tsp ground turmeric, and 1 tsp ground cloves.
Bring the brine mixture to a rolling boil over medium-high heat, stirring frequently with a wooden spoon until the sugar granules are completely dissolved.
5. Heat the Vegetables
Add the drained cucumber and onion slices directly into the boiling brine. Stir gently to submerge all the slices.
Reduce the heat to medium-low and simmer the mixture for 5 minutes, stirring occasionally. The cucumber slices should turn slightly translucent and hot throughout while maintaining a firm snap. Do not allow them to boil vigorously or cook too long.
6. Pack the Hot Jars
Using a jar lifter, remove one hot pint jar from the canner and place it onto a clean kitchen towel on the counter. Insert your wide-mouth canning funnel.
Using slotted tongs or a slotted spoon, pack the hot cucumber and onion slices firmly into the jar. Ladle the hot spiced brine over the pickles, leaving exactly ½-inch of headspace between the liquid and the rim of the jar.
7. Remove Air Bubbles & Seal
Slide a non-metallic bubble remover or silicone chopstick down around the inside perimeter of the jar to dislodge trapped air pockets. Check and adjust the brine level if needed to maintain the ½-inch headspace.
Wipe the jar rim thoroughly with a clean, damp paper towel to eliminate any traces of sugar syrup or spices. Center a clean lid onto the jar and screw the metal band down until fingertip-tight (do not overtighten, as air needs to escape during boiling). Repeat the packing process for all remaining jars.
8. Water Bath Processing
Place the filled, sealed jars onto the elevated rack inside the canner. Lower the rack into the water, ensuring the tops of the jars are submerged under at least 1 to 2 inches of boiling water. (Add boiling kettle water if the level is low).
Place the lid on the canner and bring the water to a full rolling boil. Once boiling, set a timer and process pint jars for 10 minutes (adjust for elevation if you live over 1,000 feet above sea level: +5 minutes for 1,001–3,000 ft; +10 minutes for 3,001–6,000 ft).
9. Cool and Verify the Seal
When the timer expires, turn off the heat, remove the canner lid, and allow the jars to sit undisturbed in the hot water for 5 minutes (this prevents siphoning/liquid loss).
Using a jar lifter, lift the jars straight up out of the canner without tilting and place them onto a towel-lined counter, leaving 1 inch of space between each jar.
Allow the jars to cool undisturbed at room temperature for 12 to 24 hours. As they cool, you will hear a series of distinct popping/pinging sounds. Check the seals after 24 hours: the center button on the lid should be pressed down firmly and show zero flex when tapped.
Home Canner’s Master Secrets
- Blossom End Removal is Essential: The small blossom scar on raw pickling cucumbers harbors active pectinase enzymes that will soften pickles over time in the jar. Trimming just 1/16-inch completely eliminates this risk.
- Always Maintain 5% Acidity: Never dilute the vinegar with water unless following an officially tested canning formula. The 1:1 ratio of 5% vinegar to sugar provides the critical pH balance required to safely inhibit bacterial growth during shelf storage.
- The 1 to 2 Week Curing Rule: Although the pickles are safe to eat right away, their flavor profile deepens dramatically after resting. Allow the sealed jars to sit in a dark cupboard for at least 7 to 14 days so the spices can penetrate to the center of each cucumber slice.
Storage, Shelf Life, and Serving
- Unopened Storage: Label and date your sealed jars. Store them in a cool, dark, and dry pantry for up to 12 to 18 months.
- Opened / Refrigerated Storage: Once a jar is unsealed, store it in the refrigerator. The pickles will maintain their crisp texture and robust flavor for up to 2 to 3 months.
- Quick Refrigerator Pickle Alternative: If you prefer not to water-bath can, pack the simmered pickles and hot brine into clean glass jars, let them cool to room temperature on the counter, and place them straight into the refrigerator. They will be ready to eat in 48 hours and keep for up to 4 weeks.