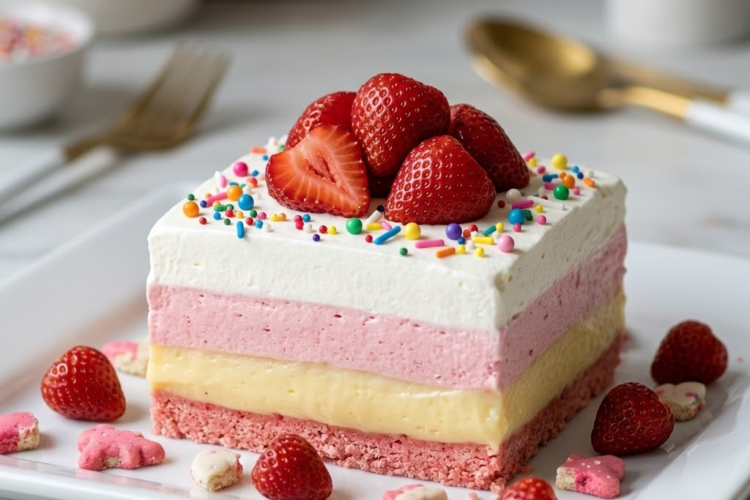
No-Bake Circus Animal Cookie Dream Bars
Creamy, colorful, crunchy, and completely irresistible, these No-Bake Circus Animal Cookie Dream Bars are a fun dessert that tastes like childhood in every bite.
A buttery Circus Animal Cookie crust is layered with a silky cheesecake-style pudding filling and plenty of colorful cookies. No oven is required, making these bars perfect for parties, birthdays, potlucks, holidays, or those days when you want an impressive dessert without turning on the oven.
⏱ Recipe Information
Prep Time: 25 minutes
Chill Time: 4–6 hours
Total Time: About 6 hours 25 minutes
Servings: 16 bars
Difficulty: Easy
Method: No-Bake
Ingredients
Circus Animal Cookie Crust
- 2 packages (12 oz each) Circus Animal Cookies, divided
- 4 tablespoons unsalted butter, melted
Creamy Pudding Layer
- 1 package (3.4 oz) instant cheesecake pudding mix
- 1 package (3.4 oz) instant vanilla pudding mix
- 3 cups cold whole milk
- 8 oz cream cheese, softened
- ½ cup powdered sugar
- 1 teaspoon vanilla extract
- 8 oz frozen whipped topping, thawed
Optional Topping
- ½–1 cup whipped topping
- Additional Circus Animal Cookies
- Rainbow sprinkles
- Crushed Circus Animal Cookies
- White chocolate drizzle
Instructions
1. Prepare the Pan
Line a 9×13-inch baking dish with parchment paper.
Leave some parchment hanging over the sides. This will make it much easier to lift the chilled bars out of the pan later.
Lightly grease the parchment if desired.
2. Make the Cookie Crumbs
Place approximately 18–20 oz of the Circus Animal Cookies into a food processor.
Pulse until the cookies become fine crumbs.
Reserve the remaining cookies for layering and decorating.
3. Add the Butter
Transfer the cookie crumbs to a large bowl.
Pour in the melted butter.
Stir until the crumbs are evenly moistened and resemble wet sand.
4. Form the Crust
Pour the cookie mixture into the prepared baking dish.
Press the crumbs firmly and evenly across the bottom of the pan.
Use the flat bottom of a measuring cup or glass to create a compact, even crust.
Refrigerate the crust while preparing the filling.
Make the Creamy Filling
5. Prepare the Pudding
Pour the cold milk into a large mixing bowl.
Add the cheesecake pudding mix and vanilla pudding mix.
Whisk vigorously for approximately 2 minutes, until the pudding begins to thicken.
Allow it to sit for another 2–3 minutes.
6. Make the Cream Cheese Mixture
In a separate bowl, beat the softened cream cheese and powdered sugar until completely smooth.
Add the vanilla extract and beat until combined.
There should be no large lumps of cream cheese remaining.
7. Combine the Mixtures
Add the cream cheese mixture to the prepared pudding.
Beat on low speed just until combined.
Do not overmix.
8. Fold in the Whipped Topping
Add the thawed whipped topping.
Gently fold it into the pudding mixture using a rubber spatula.
Continue folding until the filling is smooth, creamy, and fluffy.
Assemble the Dream Bars
9. Add the First Filling Layer
Remove the chilled crust from the refrigerator.
Spread approximately half of the creamy pudding mixture evenly over the cookie crust.
Smooth the surface with an offset spatula.
10. Add Circus Animal Cookies
Roughly chop or break some of the reserved Circus Animal Cookies.
Scatter a generous layer over the pudding.
Keep some cookies whole for decorating the finished bars.
11. Add the Remaining Filling
Spread the remaining pudding mixture over the cookie layer.
Smooth the top carefully.
12. Add the Final Topping
Top the dessert with additional whipped topping if desired.
Scatter crushed Circus Animal Cookies and whole cookies over the surface.
Add rainbow sprinkles for an extra colorful finish.
For an especially indulgent dessert, drizzle lightly with melted white chocolate.
13. Chill
Cover the pan tightly with plastic wrap.
Refrigerate for at least 4–6 hours.
For the best texture, chill the dessert overnight.
The cookie crust and layers will firm up while the flavors meld together.
14. Slice
Once fully chilled, use the parchment paper to lift the dessert from the pan.
Place it on a cutting board.
Using a sharp knife, cut into 16 bars.
For clean slices, wipe the knife between cuts.
Serve cold.
Chef’s Tips
Crush the Cookies Finely for the Crust
Fine crumbs create a sturdy crust that holds together when sliced.
Press the Crust Firmly
A well-packed crust will make the bars much easier to cut and serve.
Use Softened Cream Cheese
Room-temperature cream cheese blends much more smoothly into the pudding.
Don’t Skip the Chill Time
The dessert needs several hours in the refrigerator to set properly.
Keep Some Cookies Whole
Whole Circus Animal Cookies make the finished bars instantly recognizable and give them a fun bakery-style appearance.
Make-Ahead Instructions
These bars are perfect for making ahead.
Assemble the entire dessert the day before serving, cover tightly, and refrigerate overnight.
Add the final decorative cookies and sprinkles shortly before serving if you want them to remain especially crisp.
Storage
Store the bars covered in the refrigerator.
Refrigerator: Up to 4 days.
Because the cookies soften over time, the texture will become more cake-like after a day or two.
Freezing Instructions
For longer storage, freeze the bars without delicate decorative toppings.
Place the chilled bars in an airtight freezer-safe container.
Freezer: Up to 1 month.
Thaw overnight in the refrigerator before serving.
Add fresh cookies and sprinkles after thawing.
Flavor Variations
Strawberry Circus Animal Bars
Add a layer of strawberry preserves between the pudding layers.
Chocolate Circus Animal Bars
Replace the vanilla pudding mix with chocolate pudding mix.
Birthday Cake Dream Bars
Add ½ teaspoon almond extract and plenty of rainbow sprinkles to the filling.
White Chocolate Circus Bars
Add melted and cooled white chocolate to the cream cheese mixture.
Extra Crunch
Fold chopped Circus Animal Cookies directly into the pudding filling.
Serving Suggestions
Serve these bars chilled with:
- Whipped cream
- Extra Circus Animal Cookies
- Rainbow sprinkles
- Strawberry sauce
- White chocolate drizzle
- Vanilla ice cream
They’re especially fun for children’s birthday parties, baby showers, bake sales, and colorful dessert tables.
Recipe Summary
These No-Bake Circus Animal Cookie Dream Bars are everything a fun dessert should be: creamy, sweet, colorful, crunchy, and ridiculously easy to make.
A buttery Circus Animal Cookie crust supports layers of fluffy cheesecake-vanilla pudding, more cookies, and a festive topping.
No oven, no complicated techniques—just chill, slice, and enjoy.
Buttery cookie crust + creamy pudding filling + colorful Circus Animal Cookies = the ultimate no-bake dream bar.