🍪🤎 No-Bake Biscoff Cheesecake
Creamy, rich, and completely oven-free, this No-Bake Biscoff Cheesecake features a buttery spiced cookie crust, luscious cookie-butter cheesecake filling, and irresistible Biscoff flavor in every bite. It’s an excellent make-ahead dessert for holidays, dinner parties, or warm days when you don’t want to turn on the oven.
⏱ Recipe Information
Prep Time: 25 minutes
Chill Time: 6 hours
Total Time: About 6½ hours
Yield: 10–12 slices
Difficulty: Easy
Method: No-Bake
🛒 Ingredients
🍪 Biscoff Crust
- 2½ cups (250 g) Biscoff cookies, finely crushed
- 6 tablespoons (85 g) unsalted butter, melted
🤎 Cheesecake Filling
- 16 oz (450 g) cream cheese, softened to room temperature
- 1 cup (240 g) Biscoff cookie butter
- ½ cup (60 g) powdered sugar
- 1 teaspoon vanilla extract
- 1½ cups (360 ml) cold heavy whipping cream
✨ Optional Topping
- ½ cup (120 g) Biscoff cookie butter, melted
- 4–6 Biscoff cookies, roughly broken
- Extra whipped cream
- Biscoff cookie crumbs
Instructions
🍪 1. Prepare the Biscoff Crust
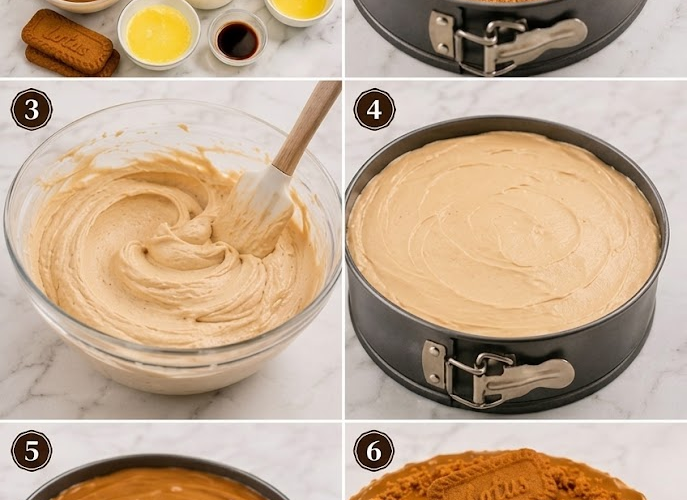
Place the Biscoff cookies in a food processor and pulse until they become very fine crumbs.
Transfer the crumbs to a bowl.
Add the melted butter and mix until the crumbs are evenly coated and resemble wet sand.
🥧 2. Press the Crust Into the Pan
Line the bottom of a 9-inch (23 cm) springform pan with parchment paper.
Pour the Biscoff mixture into the pan.
Press it firmly and evenly across the bottom using the back of a measuring cup or glass.
For a slightly thicker crust, press some of the mixture about 1 inch up the sides.
Refrigerate for at least 20–30 minutes while preparing the filling.
Press the crust firmly. A well-packed crust makes slicing much easier.
🤎 3. Make the Cookie Butter Cheesecake Base
Place the softened cream cheese in a large mixing bowl.
Beat until completely smooth and creamy, about 2 minutes.
Add the Biscoff cookie butter, powdered sugar, and vanilla.
Beat again until smooth and evenly combined.
Scrape down the sides of the bowl as needed.
🥛 4. Whip the Heavy Cream
Pour the cold heavy cream into a separate chilled bowl.
Beat on medium-high speed until stiff peaks form.
Don’t overwhip—the cream should be thick and hold its shape without looking grainy.
🍰 5. Fold the Cream Into the Filling
Add about one-third of the whipped cream to the Biscoff cream cheese mixture.
Gently fold it in to lighten the mixture.
Add the remaining whipped cream in two additions, folding gently after each addition.
Continue until the filling is smooth, fluffy, and evenly combined.
Fold rather than vigorously stirring to keep the cheesecake light and airy.
🥄 6. Fill the Crust
Remove the chilled crust from the refrigerator.
Spoon the cheesecake filling over the crust.
Spread the top evenly with an offset spatula.
Gently tap the pan on the counter a couple of times to remove large air pockets.
🍪 7. Add the Biscoff Topping
For an extra layer of cookie-butter flavor, gently melt ½ cup Biscoff cookie butter.
Microwave in short 10–15 second intervals, stirring between each, until pourable.
Allow it to cool slightly.
Drizzle it over the cheesecake.
Spread gently if you want a smooth layer.
Top with Biscoff cookie crumbs or broken cookies.
❄️ 8. Chill Until Firm
Cover the cheesecake and refrigerate for at least 6 hours.
For the firmest texture and cleanest slices, refrigerate overnight.
Don’t rush this step. A proper chilling time is what allows the no-bake cheesecake to set.
🔪 9. Remove From the Pan
Run a thin knife around the edge of the cheesecake.
Carefully release the springform pan.
Transfer the cheesecake to a serving platter.
For especially clean slices, dip a sharp knife in hot water, wipe it dry, and cut.
Repeat between slices.
✨ 10. Decorate & Serve
Finish with:
- Whipped cream swirls
- Biscoff crumbs
- Whole Biscoff cookies
- A drizzle of melted cookie butter
Serve chilled.
⭐ Chef’s Tips
Use Full-Fat Cream Cheese
Full-fat cream cheese provides the best structure and creamiest texture.
Soften the Cream Cheese
Room-temperature cream cheese blends much more smoothly and prevents lumps.
Keep the Heavy Cream Cold
Cold cream whips faster and holds its shape better.
Chill Overnight
Although 6 hours works, overnight chilling gives the cheesecake the most reliable texture.
Don’t Skip the Springform Pan
A springform pan makes releasing this delicate no-bake cheesecake much easier.
🍪 Delicious Variations
Biscoff Chocolate Cheesecake
Add ½ cup melted and cooled chocolate to the cheesecake filling.
Biscoff Caramel
Drizzle caramel sauce over the cookie-butter topping.
Biscoff Banana
Add thin banana slices between the crust and cheesecake filling.
Mini Biscoff Cheesecakes
Divide the crust and filling between a lined muffin tin and chill until firm.
White Chocolate Biscoff
Fold ½ cup melted and cooled white chocolate into the cheesecake mixture.
🧊 Storage
Keep the cheesecake covered and refrigerated.
Refrigerator: Up to 4–5 days.
For the best texture, keep the cookies used for decoration on top until shortly before serving so they stay crisp.
❄️ Freezing
Freeze the cheesecake without the fresh cookie decorations.
Wrap tightly in plastic wrap and then foil.
Freeze: Up to 1 month.
Thaw overnight in the refrigerator before decorating and serving.
🍪🤎 Recipe Summary
This No-Bake Biscoff Cheesecake delivers layers of buttery Biscoff cookie crust, fluffy cookie-butter cheesecake, and a rich Biscoff topping without turning on the oven.
It’s creamy, indulgent, make-ahead friendly, and packed with that unmistakable caramelized Biscoff flavor.
No oven, no fuss—just pure Biscoff cheesecake bliss. 🍪🤎✨