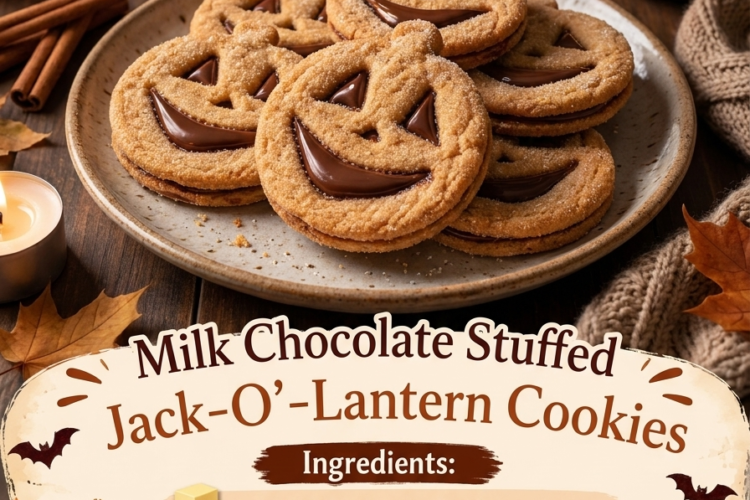
🎃🍫 Milk Chocolate Stuffed Jack-O’-Lantern Cookies
Get ready for the cutest Halloween baking project! These Milk Chocolate Stuffed Jack-O’-Lantern Cookies feature buttery brown sugar cookie dough, a deliciously sweet milk chocolate center, and adorable pumpkin faces that make every cookie look like a little Halloween masterpiece.
The cookies bake up golden around the edges, soft in the middle, and filled with creamy melted chocolate. Each one is shaped like a pumpkin, with little eyes, a nose, and a spooky smile cut into the top cookie so the chocolate filling peeks through.
They’re perfect for Halloween parties, trick-or-treat gatherings, festive dessert tables, or baking with the family. Serve them slightly warm for that irresistible gooey chocolate center!
Recipe Information
- Prep Time: 35 minutes
- Chilling Time: 30–45 minutes
- Bake Time: 12–15 minutes per batch
- Total Time: Approximately 1 hour 45 minutes
- Yield: 12–16 stuffed cookies, depending on cutter size
- Course: Dessert, Halloween Treat
- Difficulty: Intermediate
- Baking Temperature: 350°F (175°C)
Ingredients
For the Cookie Dough
- 3 sticks (1½ cups / 340 g) salted butter, softened
- 1¼ cups (250 g) light brown sugar, packed
- 1 tablespoon pure vanilla extract
- 2 large eggs, at room temperature
- 4½ cups (560–570 g) all-purpose flour
- 1 teaspoon baking powder
- 1 tablespoon milk, only if needed
- Orange gel food coloring, optional, for a brighter pumpkin color
For the Milk Chocolate Filling
- 12–16 oz (340–450 g) milk chocolate, broken into small squares or pieces
- 1 teaspoon butter, optional, to help keep the filling smooth
For Decorating (Optional)
- Melted dark chocolate for extra facial details
- Black or orange Halloween sprinkles
- Mini chocolate chips for decoration
Instructions
Step 1: Prepare the Cookie Dough
In a large mixing bowl, beat the softened butter and brown sugar with an electric mixer for 2–3 minutes until creamy and well combined.
Add the vanilla extract and eggs, one at a time, beating after each addition until incorporated. Scrape down the sides of the bowl as needed.
If you’d like brightly colored pumpkin cookies, mix in a small amount of orange gel food coloring at this stage.
Step 2: Add the Dry Ingredients
In a separate bowl, whisk together the flour and baking powder.
Gradually add the dry ingredients to the butter mixture, mixing on low speed until a soft dough forms. Stop mixing as soon as the flour is incorporated.
The dough should be firm enough to roll and cut into shapes. If it seems unusually dry or crumbly, add the optional tablespoon of milk a little at a time.
Because this dough contains a substantial amount of flour, avoid adding extra flour unnecessarily; too much can make the cookies hard rather than tender.
Step 3: Chill the Dough
Divide the dough into two portions and flatten each into a disc. Wrap them separately and refrigerate for 30–45 minutes.
Chilling firms the butter and makes the dough easier to roll, cut, and assemble. It also helps the pumpkin shapes hold their definition during baking.
Step 4: Roll and Cut the Pumpkin Shapes
Preheat the oven to 350°F (175°C). Line two baking sheets with parchment paper.
Lightly flour your work surface and rolling pin. Roll one portion of dough to approximately ⅛–¼ inch (3–6 mm) thick.
Using a pumpkin-shaped cookie cutter, cut out an even number of pumpkin shapes. These will form the top and bottom of your stuffed cookies.
For half of the shapes, use a small sharp knife or miniature cutters to create two eyes, a nose, and a smiling mouth. These cutouts will allow the chocolate center to show through.
Transfer the shapes carefully to the prepared baking sheets. Gather any dough scraps, gently reroll, and cut additional cookies.
Step 5: Add the Milk Chocolate Filling
Place the plain pumpkin shapes on a parchment-lined baking sheet, leaving space between them.
Break the milk chocolate into small pieces and arrange a portion in the center of each plain pumpkin. Leave a border of approximately ¼ inch (6 mm) around the edges so the chocolate doesn’t leak out during baking.
If desired, add a tiny dab of butter to the chocolate to help it soften smoothly.
Don’t overfill the cookies. A modest chocolate layer makes sealing easier and reduces the chance of the filling escaping.
Step 6: Assemble the Jack-O’-Lantern Cookies
Carefully place a pumpkin cookie with a cut-out face over each chocolate-topped base.
Align the pumpkin edges, then press firmly around the perimeter to seal the two layers together. Use your fingertips or the tines of a fork to press the edges gently, keeping the filling enclosed.
Be careful not to press the face cutouts closed. The eyes, nose, and mouth should remain open so the chocolate can be seen.
If the dough becomes too soft while you work, refrigerate the assembled cookies for 10–15 minutes before baking.
Step 7: Bake Until Lightly Golden
Bake the cookies for 12–15 minutes, depending on their size and thickness.
The edges should look set and may become lightly golden. The centers should remain relatively pale.
Avoid overbaking, as the cookies will continue to firm up slightly as they cool.
If the chocolate begins to bubble out of a seam, don’t worry; small imperfections give homemade cookies their charm.
Step 8: Cool Before Moving
Remove the baking sheets from the oven and let the cookies rest for about 5–10 minutes.
The cookies will be delicate while hot, and the chocolate filling will be very soft. Allowing them to settle helps the cookie layers firm up before you transfer them to a wire rack.
Cool for another 10–15 minutes before serving, or let them cool completely for a firmer filling.
Step 9: Add the Finishing Touches
For an extra festive appearance, drizzle a little melted dark chocolate over the pumpkin stems or around the edges.
You can also use tiny chocolate details to emphasize the eyes and smiles, or scatter a few Halloween sprinkles around the serving platter.
Arrange the finished cookies on a Halloween-themed plate, making sure the pumpkin faces are visible.
Step 10: Serve and Enjoy
Serve the cookies slightly warm for a soft cookie and melted milk chocolate center. For the best gooey texture, warm a cookie briefly in the microwave for approximately 5–8 seconds, checking carefully because the chocolate can become very hot.
Enjoy them with a glass of milk, hot chocolate, or your favorite autumn drink!
Tips for Perfect Chocolate Stuffed Jack-O’-Lantern Cookies
- Use softened, not melted, butter. This makes the dough easier to cream and helps maintain the pumpkin shapes.
- Chill the dough before rolling. Cold dough is less sticky and easier to cut precisely.
- Make the face cutouts before assembly. Cutting the eyes and mouth while the top cookies are flat gives you much cleaner details.
- Leave space around the filling. A clear border makes it easier to seal the cookies and prevent chocolate leaks.
- Don’t overfill. Too much chocolate can cause the cookies to separate during baking.
- Keep the dough thickness consistent. Even thickness helps the cookies bake at the same rate.
- Let the cookies cool briefly on the tray. Moving them too soon can cause the soft chocolate-filled cookies to break.
- Use gel food coloring. If you want orange cookies, gel coloring provides a more vibrant color without adding much moisture.
Delicious Variations
Peanut Butter Chocolate Jack-O’-Lantern Cookies
Add a small amount of creamy peanut butter alongside each piece of milk chocolate for a delicious chocolate-peanut butter filling.
Dark Chocolate Stuffed Cookies
Replace the milk chocolate with dark chocolate for a richer, less-sweet center that balances the brown sugar cookie dough.
White Chocolate Pumpkin Cookies
Use white chocolate pieces for the filling and add a little orange food coloring to the cookie dough for a bright Halloween look.
Salted Caramel Chocolate Cookies
Add a small amount of thick caramel sauce alongside the chocolate. Use only a little, as excess liquid can leak out during baking.
Spiced Pumpkin Cookies
Add ½ teaspoon cinnamon and a pinch of nutmeg to the dough for a warm autumn flavor. These spices complement the brown sugar and chocolate beautifully.
Mini Jack-O’-Lantern Cookies
Use a smaller pumpkin cutter and reduce the baking time slightly. Mini cookies are perfect for Halloween party platters and treat bags.
What to Serve with Halloween Cookies
These cookies are delicious on their own, but they’re even more fun as part of a festive Halloween dessert spread.
Serve them with hot chocolate, warm apple cider, milk, or a pumpkin spice latte. They also pair wonderfully with vanilla ice cream, chocolate milkshakes, and other Halloween-themed treats.
For a party, arrange the cookies beside chocolate-covered pretzels, brownies, popcorn, and small bowls of colorful candies.
Make-Ahead and Storage Instructions
Make ahead: Prepare the cookie dough up to 2 days in advance and keep it tightly wrapped in the refrigerator. Let it soften slightly if it becomes too firm to roll.
Refrigerator: Store fully cooled cookies in an airtight container for up to 4–5 days. Because the chocolate filling is enclosed and the recipe contains no cream-based filling, refrigeration is generally unnecessary in a cool environment; however, refrigerating them is a sensible option in warm weather.
Freezer: Freeze the assembled, unbaked cookies on a tray until firm, then transfer them to a freezer-safe container with parchment between layers. Bake from frozen, adding a few extra minutes and checking for doneness. Alternatively, freeze fully baked and cooled cookies for up to 2 months for best quality.
Reheating: Warm an individual cookie in the microwave for approximately 5–8 seconds to soften the chocolate center. Avoid overheating.
Frequently Asked Questions
Can I make these cookies without orange food coloring?
Absolutely! The cookies will have a natural golden-brown appearance from the butter and brown sugar. The pumpkin shape and cut-out faces will still make them festive.
Why is my cookie dough too crumbly?
The flour may have been packed into the measuring cups, or the dough may need a little moisture. Add milk a teaspoon at a time until the dough holds together. Weighing the flour is the most reliable way to get the right consistency.
Why did the chocolate leak out?
The cookies may have been overfilled or the edges may not have been sealed tightly enough. Leave a clear border around the chocolate and press the cookie edges together securely.
Can I use chocolate chips instead of a chocolate bar?
Yes. Milk chocolate chips work well. However, since chocolate chips are designed to hold their shape, the filling may be less fluid than when using chopped milk chocolate bars.
How do I keep the pumpkin faces neat?
Cut the faces while the dough is chilled but still workable. Use small cutters or a sharp paring knife and keep the details simple. Chill the assembled cookies briefly before baking to help preserve their shapes.
Can children help make these cookies?
Yes! Children can help mix ingredients, cut pumpkin shapes with supervision, and decorate the cooled cookies. Adults should handle sharp knives, hot baking trays, and melted chocolate.
Final Thoughts
Milk Chocolate Stuffed Jack-O’-Lantern Cookies are a delightful combination of buttery brown sugar cookies, sweet melted chocolate, and playful Halloween faces. They’re festive enough for parties yet simple enough to make with the family on a cozy autumn afternoon.
Prepare the dough ahead, cut out your favorite pumpkin expressions, and enjoy the fun of revealing the creamy chocolate center with every bite.
Crisp-edged, chocolate-filled, and adorably spooky—these Jack-O’-Lantern Cookies are a Halloween treat worth sharing! 🎃🍫