🍓 Homemade Strawberry Jam
Sweet, Fruity, Glossy, and Bursting with Fresh Strawberry Flavor!
There’s something special about homemade strawberry jam! Made with fresh strawberries, sugar, and a splash of lemon juice, this classic preserve captures the beautiful flavor of ripe berries in a thick, glossy jam that’s perfect for spreading, spooning, and sharing.
As the strawberries simmer, they soften into a fragrant, ruby-red mixture that fills your kitchen with the delicious aroma of homemade goodness. The lemon juice brightens the flavor and helps the jam set, while the sugar brings out the strawberries’ natural sweetness.
Spread it over warm toast, swirl it into yogurt, spoon it over pancakes, or use it as a filling for cakes and pastries. Once you discover how easy homemade strawberry jam can be, you’ll want to keep a jar in your refrigerator all the time!
Recipe Information
- Prep Time: 15 minutes
- Cook Time: 25–40 minutes
- Cooling Time: 1–2 hours
- Total Time: Approximately 1 hour 40 minutes
- Yield: About 3–4 cups, depending on evaporation
- Course: Breakfast, Spread, Condiment
- Difficulty: Easy
- Method: Stovetop
Ingredients
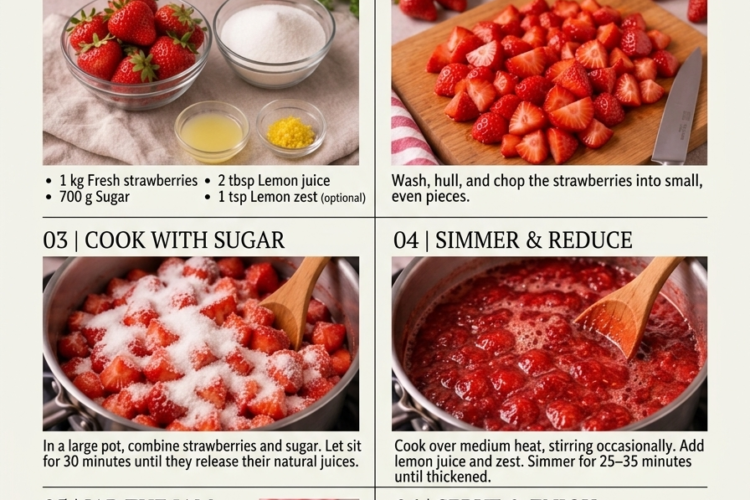
- 1 kg fresh strawberries, washed, hulled, and chopped
- 700 g granulated sugar
- 2 tablespoons fresh lemon juice
- 1 teaspoon finely grated lemon zest, optional
Instructions
Step 1: Prepare the Strawberries
Rinse the strawberries under cool running water and drain them thoroughly. Remove the green stems and leaves, then chop the berries into small pieces.
For a smoother jam, cut the strawberries into smaller chunks. If you enjoy a rustic jam with visible pieces of fruit, leave some pieces a little larger.
Place the prepared strawberries in a large, heavy-bottomed saucepan.
Step 2: Combine the Strawberries and Sugar
Add the granulated sugar to the strawberries and stir gently until the berries are evenly coated.
Let the mixture sit for 15–20 minutes. During this time, the strawberries will begin releasing their natural juices, helping the sugar dissolve more easily during cooking.
For a more pronounced citrus aroma, add the optional lemon zest.
Step 3: Add the Lemon Juice
Pour the fresh lemon juice into the saucepan and stir to combine.
The lemon juice adds brightness to the flavor and contributes acidity that helps the jam set. It also balances the sweetness of the sugar and brings out the natural fruit flavor.
Step 4: Bring the Mixture to a Boil
Place the saucepan over medium heat and cook, stirring gently, until the sugar dissolves and the strawberries release more juice.
Increase the heat until the mixture reaches a steady boil. Stir regularly, scraping the bottom and sides of the pan to prevent the fruit and sugar from sticking.
As the mixture heats, pink foam may develop on the surface. This is normal.
Step 5: Simmer Until Thickened
Reduce the heat slightly to maintain a steady simmer. Cook for approximately 20–35 minutes, stirring frequently as the jam begins to thicken.
Use a spoon to break up some of the strawberries if you prefer a smoother consistency. For a chunkier jam, leave more of the fruit intact.
As the water evaporates, the jam will become darker, glossier, and thicker. Stir more frequently toward the end of cooking, since thick jam can stick to the bottom of the pan.
Cooking time depends on the water content of the strawberries, the width of the saucepan, and the heat level.
Step 6: Test the Jam for Doneness
For a reliable test, place a small plate in the freezer for several minutes.
Spoon a little hot jam onto the cold plate and wait about 30 seconds. Push the edge of the sample gently with your fingertip. If the surface wrinkles slightly and the jam doesn’t immediately flow back into the space, it may be ready.
If the sample remains very runny, continue cooking for a few more minutes and test again.
For greater precision, a jam thermometer can help. Many traditional jams set near 220°F (104°C) at sea level, though the exact temperature varies with altitude, sugar concentration, and fruit acidity.
Remember that the jam will thicken further as it cools, so avoid cooking it until it looks completely firm in the saucepan.
Step 7: Remove from the Heat
Once the jam reaches your preferred consistency, remove the saucepan from the heat.
If there is a noticeable layer of foam, skim it off with a clean spoon. Let the jam stand for approximately 5 minutes, stirring gently to distribute the fruit evenly.
Be careful when handling the hot jam, as boiling sugar syrup can cause serious burns.
Step 8: Transfer to Clean Jars
For refrigerator storage, carefully spoon the hot jam into clean, heat-safe jars, leaving a little space at the top. Wipe the rims and allow the jam to cool briefly before covering.
Once cooled, refrigerate promptly.
Important: This recipe is intended for refrigerator or freezer storage. Simply pouring hot jam into jars and closing the lids does not make it shelf-stable. For pantry storage, use a tested water-bath canning recipe with the appropriate jar preparation and processing time.
Step 9: Chill Until Set
Let the jam cool, then place the jars in the refrigerator. The jam will continue to thicken as it chills.
For the best texture and flavor, allow it to rest overnight before serving.
Enjoy your homemade strawberry jam on toast, pancakes, waffles, biscuits, or anywhere you want a burst of sweet berry flavor!
Tips for the Best Homemade Strawberry Jam
- Use ripe strawberries: Sweet, fragrant berries give the jam the best flavor.
- Measure accurately: The ratio of fruit to sugar affects sweetness, texture, and preservation.
- Choose a wide saucepan: A larger surface area encourages faster evaporation and more even thickening.
- Stir regularly: Jam can stick or scorch as it becomes thicker, especially near the end of cooking.
- Don’t overcook it: The jam will become firmer as it cools, so stop when it passes the set test.
- Adjust the fruit texture: Mash the berries during cooking for a smoother jam or leave some pieces intact for a rustic finish.
- Use fresh lemon juice: Freshly squeezed juice adds brightness and helps balance the sweetness.
- Keep everything clean: Clean jars and utensils help maintain good quality during refrigerator storage.
Delicious Variations
🍋 Strawberry Lemon Jam
Add a little extra lemon zest for a bright citrus aroma that balances the sweetness of the strawberries.
🍓 Strawberry Vanilla Jam
Stir in 1 teaspoon vanilla extract after removing the jam from the heat for a soft, fragrant vanilla finish.
🍇 Strawberry Raspberry Jam
Replace 250 g of the strawberries with raspberries for a slightly tangier berry combination.
🌿 Strawberry Basil Jam
Add a few small basil leaves during the final minutes of cooking, then remove them before transferring the jam to jars.
🥄 Rustic Chunky Strawberry Jam
Mash only a portion of the berries during cooking, leaving plenty of soft fruit pieces throughout the finished jam.
🍰 Strawberry Cake-Filling Jam
Cook the jam until it reaches a firmer set so it holds its shape better between cake layers. Cool completely before spreading it over frosting or cream.
What to Serve with Strawberry Jam
Homemade strawberry jam is wonderfully versatile. Enjoy it with:
- Toast, croissants, or warm bread
- Pancakes and waffles
- Scones and biscuits
- Yogurt and oatmeal
- Cheesecake and sponge cake
- Peanut butter sandwiches
- Vanilla ice cream
- Cream-filled pastries
For a simple breakfast treat, spread it over warm buttered toast or swirl a spoonful into plain yogurt.
Storage Instructions
Refrigerator: Store the cooled jam in clean, covered jars in the refrigerator and use within about 3 weeks for best quality. Always use a clean spoon when serving.
Freezer: For longer storage, freeze the jam in freezer-safe containers for up to 6 months for best quality. Leave sufficient headspace for expansion, and thaw in the refrigerator.
Room temperature: Do not store this recipe in the pantry or at room temperature for extended periods without following a tested canning procedure.
Signs of spoilage: Discard the jam if you notice mold, fermentation, an unusual smell, or other signs of spoilage. Do not taste it to determine whether it is safe.
Frequently Asked Questions
Why is my strawberry jam runny?
It may need more cooking time, or the strawberries may have contained a lot of water. Continue simmering briefly and repeat the chilled-plate test. Remember that jam thickens more as it cools.
Why did my jam become too thick?
It may have cooked too long, allowing too much moisture to evaporate. Once cooled, overly thick jam can often be loosened by warming a portion gently with a small splash of water.
Can I reduce the sugar?
You can, but reducing sugar significantly changes how the jam sets and keeps. This recipe uses a traditional amount of sugar. For a lower-sugar version, use a tested recipe designed specifically for reduced-sugar jam.
Do I need pectin?
Not necessarily. Strawberries contain some natural pectin, and the sugar, acidity, and cooking process help the mixture thicken. However, strawberries are relatively low in pectin, so this recipe may produce a softer set than jams made with added pectin.
Can I use frozen strawberries?
Yes. Thaw the strawberries and include their juices. The cooking time may vary because frozen berries can release additional liquid.
Can I make the jam completely smooth?
Yes. Mash the fruit thoroughly while it cooks, or carefully blend the mixture before transferring it to clean jars. Be cautious with hot jam, as it can splatter.
How can I tell when the jam is ready?
Use the chilled-plate wrinkle test or a jam thermometer. The mixture should be glossy and thickened, but remember it will become firmer as it cools.
A Little Jar of Strawberry Happiness! 🍓❤️
This Homemade Strawberry Jam captures the sweet, fragrant flavor of fresh strawberries in a simple, delicious spread you can enjoy in countless ways. With just four ingredients, you can make a beautiful batch for breakfast, baking, desserts, or sharing with family and friends.
Simmer those berries, let the kitchen fill with the aroma of fresh strawberries, and enjoy homemade sweetness one spoonful at a time!