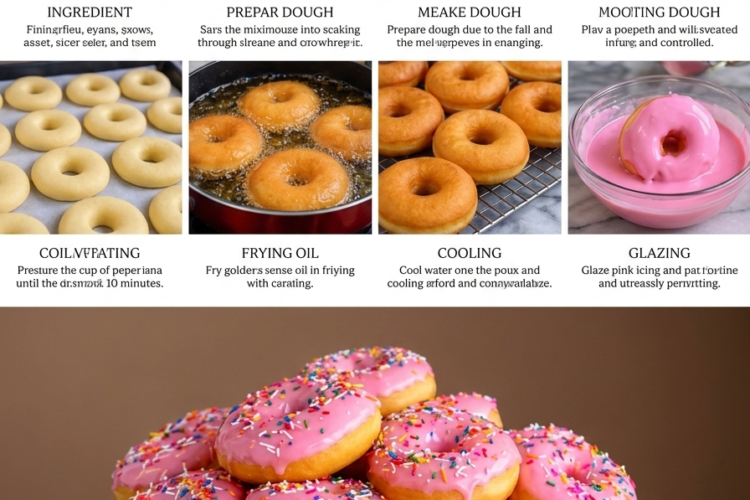
🍩 Homemade Pink Glazed Doughnuts with Rainbow Sprinkles
Soft, fluffy, golden doughnuts topped with glossy pink icing and colorful rainbow sprinkles—these Homemade Pink Glazed Doughnuts are pure happiness in every bite! With a tender, pillowy center and a sweet vanilla glaze, they’re just as beautiful as the doughnuts you’d find in your favorite bakery.
The dough is made from simple ingredients, including warm milk, eggs, butter, and yeast, creating a light, enriched dough that fries to golden perfection. A smooth pink glaze adds a lovely sweetness, while rainbow sprinkles give these homemade treats a fun, colorful finish.
Perfect for birthday parties, weekend breakfasts, afternoon treats, bake sales, or whenever you want to make something special at home, these doughnuts are sure to bring smiles to the table!
Recipe Information
- Prep Time: 30 minutes
- Proofing Time: 1½–2 hours
- Cook Time: 15–20 minutes per batch
- Total Time: Approximately 2½–3 hours
- Yield: 12–14 doughnuts, depending on cutter size
- Course: Breakfast, Dessert, Snack
- Difficulty: Intermediate
- Cooking Method: Deep-frying
Ingredients
For the Doughnuts
- 4 cups (500 g) all-purpose flour
- ½ cup (120 ml) warm milk
- ¼ cup (50 g) granulated sugar
- 2¼ teaspoons (7 g) instant yeast
- 2 large eggs (approximately 100 g without shells)
- ¼ cup (57 g) unsalted butter, softened
- ½ teaspoon (3 g) salt
- 1 teaspoon (5 ml) vanilla extract
- ¼ cup (60 ml) warm water, as needed
- Vegetable, canola, or sunflower oil, for deep-frying
For the Pink Glaze
- 2 cups (240 g) powdered sugar, sifted
- 3–4 tablespoons (45–60 ml) milk, plus more if needed
- ½ teaspoon vanilla extract
- A few drops of pink gel food coloring
- 1–2 teaspoons light corn syrup, optional, for extra gloss
For Decoration
- Rainbow sprinkles, as desired
Instructions
Step 1: Prepare the Dough
In a large mixing bowl, combine the flour, granulated sugar, instant yeast, and salt. Mix briefly to distribute the ingredients evenly.
Add the warm milk, eggs, vanilla extract, and approximately half of the warm water. Mix with a wooden spoon or the dough hook of a stand mixer until a rough dough begins to form.
Add the softened butter and continue mixing until incorporated.
Gradually add the remaining warm water as needed. You may not need every drop, depending on your flour and the size of your eggs.
The dough should be soft and slightly tacky, but not excessively sticky or wet.
Tip: The milk and water should be comfortably warm, not hot. Liquid that is too hot can damage the yeast.
Step 2: Knead Until Smooth
Transfer the dough to a lightly floured work surface and knead for approximately 8–10 minutes by hand, or 5–7 minutes using a stand mixer fitted with a dough hook.
At first, the dough may feel sticky, but it should gradually become smoother, more elastic, and easier to handle.
Avoid adding too much extra flour. A slightly soft dough helps produce light, fluffy doughnuts rather than dense ones.
To check whether the dough is ready, gently stretch a small piece. It should stretch without immediately tearing.
Step 3: Let the Dough Rise
Place the dough in a lightly greased bowl and turn it once to coat the surface.
Cover with a clean kitchen towel or plastic wrap and leave it in a warm, draft-free place for approximately 60–90 minutes, or until it has roughly doubled in size.
The exact time depends on the warmth of your kitchen and the activity of the yeast.
Do not rush this step. Proper proofing helps create the soft, airy texture that makes homemade doughnuts so delicious.
Step 4: Roll Out the Dough
Once the dough has risen, gently press it down to release excess air.
Transfer it to a lightly floured work surface and roll it out to approximately ½ inch (1.25 cm) thick.
Try to keep the thickness even so the doughnuts cook uniformly.
If the dough springs back while rolling, let it rest for 5–10 minutes before continuing. This allows the gluten to relax and makes the dough easier to shape.
Step 5: Cut the Doughnuts
Use a doughnut cutter or two round cutters—a larger one for the outside and a smaller one for the center—to cut out the doughnuts.
Place each shaped doughnut on a small square of parchment paper or a lightly floured tray.
Gather the dough scraps gently, let them rest briefly if needed, and reroll once to cut additional doughnuts.
Arrange the doughnuts with enough space between them so they can expand without sticking together.
Step 6: Proof the Cut Doughnuts
Cover the shaped doughnuts loosely with a clean kitchen towel.
Let them rise for another 30–45 minutes, or until visibly puffy and light.
Avoid overproofing, which can cause the doughnuts to deflate during frying. They should feel airy but still hold their shape when lifted carefully.
Meanwhile, prepare your frying station and glaze ingredients.
Step 7: Heat the Frying Oil
Pour vegetable oil into a deep, heavy-bottomed pot to a depth of approximately 2–3 inches (5–7.5 cm). Leave plenty of room at the top to allow the oil to bubble safely.
Heat the oil to 350°F (175°C), using a cooking thermometer to monitor the temperature.
Maintain the oil around 340–350°F (170–175°C) while frying.
- Oil that is too cool can make the doughnuts greasy.
- Oil that is too hot can brown the outside before the inside cooks.
Never leave the hot oil unattended, and keep water away from the pot to prevent splattering.
Step 8: Fry Until Golden
Carefully lower 2–3 doughnuts into the oil at a time, depending on the size of your pot.
Fry for approximately 1–2 minutes per side, turning once, until both sides are evenly golden brown.
The doughnuts should puff up as they cook and develop a delicate golden crust.
Avoid overcrowding the pot, as adding too many doughnuts can lower the oil temperature.
Use a slotted spoon or spider strainer to remove the cooked doughnuts, allowing excess oil to drain back into the pot.
Transfer them to a wire rack set over a baking tray. Allow them to cool until warm or nearly at room temperature before glazing.
Step 9: Make the Pink Glaze
In a medium bowl, sift the powdered sugar to remove lumps.
Add 3 tablespoons of milk and the vanilla extract. Whisk until smooth, adding the remaining milk a little at a time until the glaze reaches a thick but pourable consistency.
If desired, stir in the optional corn syrup for a glossier finish.
Add a tiny drop of pink gel food coloring and mix thoroughly. Continue adding a little at a time until you achieve your preferred shade of pastel pink or vibrant pink.
The glaze should be thick enough to coat the doughnuts without running off completely. If it is too thick, add milk a few drops at a time. If too thin, whisk in a little additional powdered sugar.
Step 10: Glaze the Doughnuts
Once the doughnuts have cooled sufficiently, dip the top of each doughnut into the pink glaze.
Lift it out, allow excess glaze to drip back into the bowl, and gently turn it upright.
Place the glazed doughnut on a wire rack with a baking tray underneath to catch drips.
For a smooth, even coating, dip each doughnut in one steady motion rather than repeatedly moving it through the glaze.
Step 11: Add the Rainbow Sprinkles
While the glaze is still wet, sprinkle each doughnut generously with rainbow sprinkles.
Work one or two doughnuts at a time so the sprinkles adhere before the icing begins to set.
You can use classic rainbow jimmies, tiny confetti sprinkles, or pastel decorations for a softer look.
Allow the glaze to set for approximately 15–30 minutes before serving or arranging the doughnuts on a platter.
Step 12: Serve and Enjoy
Arrange the finished doughnuts on a serving plate or cake stand.
Enjoy them fresh, while the dough is soft and fluffy and the pink glaze is sweet and slightly crisp.
Serve with coffee, tea, hot chocolate, or a glass of cold milk for a delicious homemade bakery-style treat.
Tips for Perfect Homemade Doughnuts
- Measure the flour accurately. Weighing your flour helps prevent dense doughnuts caused by adding too much.
- Keep the dough soft. A slightly tacky dough generally produces a lighter, fluffier result.
- Allow enough time for both rises. Proper proofing creates the pillowy interior that makes yeast doughnuts special.
- Maintain the oil temperature. Use a thermometer whenever possible for evenly cooked doughnuts.
- Fry in small batches. This helps maintain the oil temperature and gives the doughnuts enough room to expand.
- Let excess oil drain. A wire rack helps prevent the bottoms from becoming greasy.
- Glaze when warm, not piping hot. Very hot doughnuts can thin the icing too much, while completely cold doughnuts may not hold the glaze as evenly.
- Add sprinkles immediately. They stick best while the glaze is still wet.
- Use gel coloring for vivid pink. Gel coloring adds less liquid than many liquid food colorings.
Delicious Variations
Strawberry Pink Glazed Doughnuts
Replace 1 tablespoon of the milk in the glaze with strained strawberry puree or strawberry juice. Add gradually, adjusting the powdered sugar to maintain a thick glaze.
Chocolate Glazed Doughnuts
Mix 2 tablespoons cocoa powder into the powdered sugar and add milk gradually until smooth. Finish with chocolate sprinkles or mini chocolate chips.
Vanilla Sprinkle Doughnuts
Leave the glaze white and use colorful rainbow sprinkles for a classic bakery-style look.
Raspberry Glazed Doughnuts
Add a small amount of strained raspberry puree to the glaze for natural fruity flavor and a soft pink color.
Cinnamon Sugar Doughnuts
Skip the glaze and toss the warm doughnuts in a mixture of ½ cup granulated sugar and 1 teaspoon ground cinnamon.
Filled Pink Doughnuts
Once cooled, use a piping bag to fill the doughnuts with strawberry jam, vanilla pastry cream, or chocolate hazelnut spread. Dip the tops in pink glaze and finish with sprinkles.
Birthday Cake Doughnuts
Add extra rainbow sprinkles to the glaze and use pastel food coloring for a cheerful birthday-party treat.
What to Serve with Pink Glazed Doughnuts
These colorful doughnuts are delicious on their own but pair wonderfully with a range of drinks and treats.
- Hot chocolate: A cozy match for a sweet breakfast or afternoon snack.
- Coffee or cappuccino: Balances the sweetness of the glaze.
- Cold milk: A classic pairing for soft, sugary doughnuts.
- Fresh strawberries: Add a refreshing fruity contrast.
- Vanilla ice cream: Turns the doughnuts into an indulgent dessert.
- Fresh fruit platter: Makes a colorful addition to a brunch table.
For parties, arrange the doughnuts on a tiered stand with fresh berries and a few extra bowls of rainbow sprinkles for a playful presentation.
Storage Instructions
Best enjoyed fresh: These doughnuts are at their softest on the day they’re made.
Room temperature: Once the glaze has set, store the doughnuts in a single layer in an airtight container in a cool place for up to 1–2 days. Warm, humid conditions can cause the glaze to become sticky.
Refrigerator: Refrigeration can make the doughnuts firmer and less fluffy, so it is generally unnecessary for plain glazed doughnuts. If your kitchen is very warm, use a cool storage location and consume them promptly.
Freezing: For the best texture, freeze the fried doughnuts without the glaze. Once completely cool, freeze in an airtight container for up to 2 months. Thaw at room temperature, warm briefly if desired, and prepare fresh glaze before serving.
Reheating: Warm an unfilled doughnut for a few seconds in the microwave. Check carefully to prevent overheating, which can make the dough tough.
Frequently Asked Questions
Why are my doughnuts dense instead of fluffy?
The dough may contain too much flour, may not have risen sufficiently, or may have been overworked. Measure accurately, allow both rises to finish, and avoid adding excess flour while kneading.
Why are my doughnuts greasy?
The frying oil may have been too cool, or too many doughnuts may have been added at once. Maintain a temperature of approximately 350°F (175°C) and fry in small batches.
Why are my doughnuts dark outside but raw inside?
The oil is likely too hot. Reduce the heat and allow the temperature to stabilize before continuing with the next batch.
Can I make the dough the night before?
Yes. Place the dough in a covered bowl and refrigerate after kneading. The dough will rise slowly overnight. The next day, let it sit briefly until workable, shape the doughnuts, and allow them to complete their final proof before frying.
Can I bake these doughnuts instead of frying them?
Yes, but the texture will be more like a soft baked yeast roll than a traditional fried doughnut. Place the shaped doughnuts on a lined baking tray, proof until puffy, and bake at approximately 350°F (175°C) for 10–15 minutes, checking for a lightly golden surface. Glaze after cooling slightly.
How do I get a smooth, shiny pink glaze?
Sift the powdered sugar, add the milk gradually, and whisk until no lumps remain. A small amount of light corn syrup can improve the gloss, while gel coloring provides a vibrant pink shade without thinning the mixture too much.
Can I use active dry yeast instead of instant yeast?
Yes. Dissolve the active dry yeast in the warm milk with a little of the measured sugar and allow it to stand for about 5–10 minutes until foamy. Then continue with the recipe. The rising times may vary depending on the yeast and kitchen temperature.
Why did my glaze slide off the doughnuts?
The doughnuts may have been too hot, or the glaze may have been too thin. Let the doughnuts cool until warm or nearly at room temperature, then adjust the glaze to a thick but pourable consistency.
Final Thoughts
These Homemade Pink Glazed Doughnuts with Rainbow Sprinkles are a delightful way to bring bakery-style sweetness into your kitchen. With their fluffy yeast-raised centers, golden exterior, glossy pink icing, and cheerful rainbow sprinkles, they’re perfect for celebrations or simply making an ordinary day feel special.
Take your time with the dough’s two rises, keep the frying oil at the right temperature, and finish with plenty of colorful sprinkles for the most beautiful results.
Soft, fluffy, golden, and topped with sweet pink glaze and rainbow sprinkles—these homemade doughnuts are pure joy in every bite! 🍩💗🌈