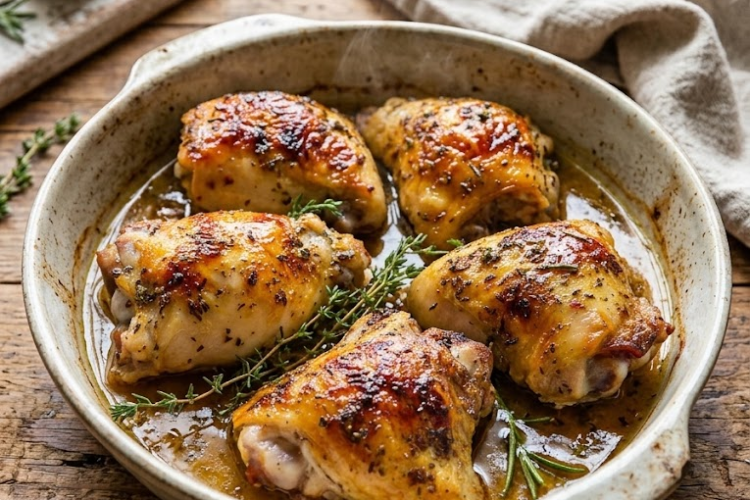
🍗 Golden Garlic Butter Chicken Thighs with Fresh Thyme and Rich Pan Juices
These Golden Garlic Butter Chicken Thighs are beautifully seared until the skin turns irresistibly crispy, then roasted with garlic, fresh thyme, and rich butter until tender and juicy. As the chicken cooks, its natural juices combine with the melted butter, fragrant herbs, and caramelized pan drippings to create a simple yet luxurious sauce.
This comforting, restaurant-style chicken dinner is perfect for family meals, weekend cooking, or an elegant dinner served with roasted potatoes, rice, or crusty bread to soak up every drop of the delicious pan juices.
Recipe Information
- Prep Time: 15 minutes
- Cook Time: 40–50 minutes
- Total Time: About 1 hour
- Servings: 4
- Difficulty: Easy
- Method: Stovetop + oven
- Equipment: Oven-safe skillet or roasting pan
Ingredients
For the Chicken
- 4 bone-in, skin-on chicken thighs, approximately 325 g each
- Sea salt, to taste
- Freshly ground black pepper, to taste
- 1 tablespoon olive oil
- ½ teaspoon paprika, optional
For the Garlic Thyme Butter
- 3 tablespoons (42 g) unsalted butter, softened
- 6 garlic cloves, finely minced
- 1 tablespoon fresh thyme leaves, chopped
- 5 fresh thyme sprigs
For the Rich Pan Juices
- ¼–½ cup (60–120 ml) low-sodium chicken broth, as needed
- 1 teaspoon fresh lemon juice, optional
- 1 tablespoon cold butter, optional, for finishing the sauce
Instructions
1. Prepare the Chicken
Preheat your oven to 400°F (200°C).
Remove the chicken thighs from the refrigerator about 15–20 minutes before cooking.
Pat the chicken thoroughly dry with paper towels, especially the skin. Removing excess moisture is essential for achieving crispy, golden skin.
Season both sides generously with sea salt and freshly ground black pepper. Sprinkle the optional paprika over the skin for a deeper golden color and a subtle smoky flavor.
2. Make the Garlic Thyme Butter
In a small bowl, combine the softened butter, minced garlic, and chopped fresh thyme.
Mash everything together with a fork until evenly distributed.
Set aside about 1 tablespoon of the garlic butter for finishing the pan juices, if desired.
3. Sear the Chicken Thighs
Heat the olive oil in a large oven-safe skillet over medium-high heat.
Once the oil is hot, arrange the chicken thighs skin-side down in the skillet.
Sear for approximately 6–8 minutes, without moving the chicken too frequently, until the skin becomes deeply golden and crisp.
If the chicken sticks, give it another moment to release naturally rather than forcing it.
Turn the thighs over and cook the underside for another 2–3 minutes.
Transfer the chicken briefly to a plate.
4. Prepare the Pan for Roasting
Reduce the heat to medium-low.
Carefully drain off excess rendered fat if there is a large amount, leaving about 1 tablespoon in the skillet for flavor.
Return the chicken thighs to the skillet, skin-side up.
Spread the garlic thyme butter over the meat side and underneath the skin where accessible. Avoid piling large amounts of minced garlic on the exposed skin, as it can burn during roasting.
Arrange the five fresh thyme sprigs around the chicken.
5. Add the Chicken Broth
Pour approximately ¼ cup (60 ml) chicken broth around the chicken, not directly over the crispy skin.
The broth helps loosen the flavorful browned bits from the skillet and creates delicious pan juices as the chicken roasts.
Use a little more broth if needed, but avoid adding so much that the chicken skin becomes submerged.
6. Roast Until Tender
Transfer the skillet to the preheated oven.
Roast for approximately 25–35 minutes, depending on the size and thickness of the thighs.
During cooking, the garlic butter will melt into the chicken, while the thyme infuses the pan juices with a fragrant herbal flavor.
The chicken is ready when the thickest part of the meat reaches at least 165°F (74°C) on an instant-read thermometer, without touching the bone.
For large, bone-in thighs, the cooking time may be longer. Dark meat often becomes especially tender when cooked beyond the minimum safe temperature, provided it does not dry out.
7. Baste with the Garlic Butter Juices
About halfway through roasting, carefully spoon some of the melted garlic butter and pan juices over the exposed meat.
Avoid pouring the liquid over the skin if you want to preserve its crispness.
Return the skillet to the oven and continue roasting until the chicken is fully cooked and the juices run clear.
8. Crisp the Skin if Needed
If the chicken is cooked through but the skin needs extra color, switch the oven to broil for 1–3 minutes.
Watch carefully to prevent the garlic from burning or the skin from becoming too dark.
Remove the skillet from the oven using oven mitts, as the handle will be extremely hot.
9. Rest the Chicken
Transfer the chicken thighs to a warm serving plate.
Let them rest for 5–10 minutes before serving.
Resting allows the juices to redistribute through the meat while giving you time to finish the pan sauce.
10. Make the Rich Pan Sauce
Place the skillet on the stovetop over medium-low heat.
Remove the thyme sprigs if desired.
Add another splash of chicken broth if the pan juices are too concentrated or the browned bits need loosening.
Scrape the bottom of the skillet with a wooden spoon to release all the flavorful caramelized bits.
Let the juices simmer gently for 2–3 minutes, until slightly concentrated.
Stir in the reserved tablespoon of garlic thyme butter, if using, until melted and glossy.
For a brighter finish, add the optional teaspoon of fresh lemon juice.
Taste and adjust the salt and black pepper as necessary.
11. Plate and Serve
Arrange one chicken thigh on each plate.
Spoon the warm garlic butter pan juices around the chicken and over the exposed meat.
Garnish with fresh thyme leaves and a little cracked black pepper.
Serve immediately while the skin is crisp and the garlic butter is fragrant.
Chef’s Tips
- Dry the chicken skin thoroughly: Moisture prevents proper browning and crispness.
- Start skin-side down: This renders the fat and creates the golden crust that makes this dish special.
- Don’t rush the sear: Let the skin develop color before turning the chicken.
- Use softened butter: It makes the garlic and thyme easier to distribute beneath the skin.
- Protect the garlic from burning: Apply the garlic butter after searing rather than putting minced garlic directly into very hot oil.
- Keep broth off the skin: Adding liquid around the chicken helps retain a crispy top.
- Use fresh thyme: Its aromatic flavor pairs beautifully with garlic and rich chicken juices.
- Check temperature near the bone: The thickest part is the most reliable place to check doneness.
- Rest before serving: Even a short rest helps keep the meat juicy.
Delicious Variations
Lemon Garlic Butter Chicken
Add the zest of ½ lemon to the garlic butter and finish the pan sauce with 1–2 teaspoons fresh lemon juice.
Honey Garlic Butter Chicken
Mix 1 tablespoon honey into the garlic butter and brush a little over the chicken during the final 5 minutes of roasting. Watch closely because the honey can brown quickly.
Parmesan Herb Chicken
Sprinkle 2 tablespoons finely grated Parmesan over the chicken during the final 5 minutes of cooking for an extra savory finish.
Creamy Garlic Thyme Chicken
After removing the cooked chicken, stir ¼ cup heavy cream into the pan juices and simmer gently for 2–3 minutes to make a creamy garlic-thyme sauce.
Mushroom Garlic Butter Chicken
Sauté 200 g sliced mushrooms in the skillet after searing the chicken. Return the chicken to the pan, then add the garlic butter, thyme, and broth before roasting.
Spicy Garlic Butter Chicken
Add ¼–½ teaspoon crushed red pepper flakes or cayenne pepper to the garlic butter for a gentle spicy kick.
Make-Ahead Instructions
The garlic thyme butter can be prepared up to 2 days ahead and stored in a covered container in the refrigerator.
You can also season the chicken several hours ahead and keep it refrigerated. For the best skin, pat it dry again before searing.
Cook the chicken shortly before serving for the best texture.
Storage
Store leftover chicken and pan juices in an airtight container in the refrigerator for up to 3–4 days.
Reheat gently in a covered baking dish at 325°F (165°C) until thoroughly hot, adding a little chicken broth if the pan juices have thickened.
For crispier skin, uncover the chicken during the final few minutes of reheating.
Freezing
Allow the chicken to cool completely before transferring it to a freezer-safe container with the pan juices.
Freeze for up to 3 months for best quality.
Thaw overnight in the refrigerator and reheat thoroughly. The skin may be softer after freezing, but the garlic-thyme flavor remains delicious.
Serving Suggestions
These garlic butter chicken thighs pair beautifully with:
- Crispy roasted baby potatoes
- Creamy mashed potatoes
- Garlic butter rice
- Buttered egg noodles
- Roasted carrots
- Green beans
- Steamed broccoli
- Sautéed mushrooms
- Crusty bread
- A fresh garden salad
For the ultimate comfort-food dinner, serve the chicken over creamy mashed potatoes and spoon the rich garlic butter pan juices over everything.
Final Result
Beautifully golden, crispy-skinned chicken thighs with juicy, tender meat infused with garlic, butter, and fragrant fresh thyme. The rich pan juices capture all the caramelized flavors from the skillet, creating a simple yet luxurious sauce that makes every bite irresistible. It’s an easy, comforting, restaurant-style chicken dinner perfect for sharing.