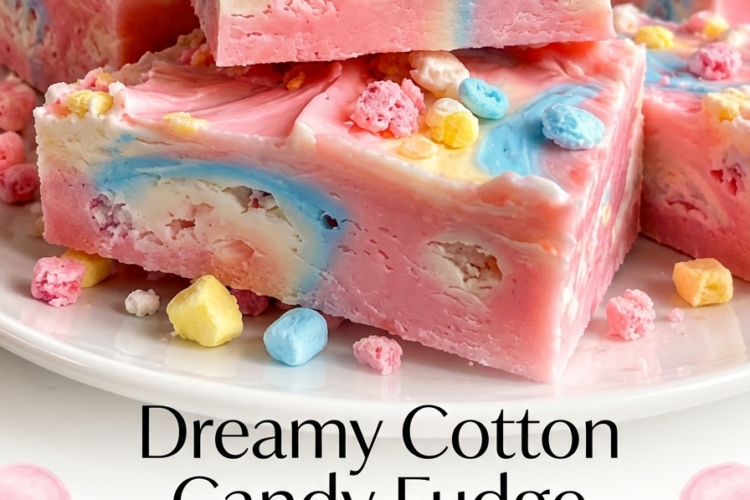
🍭 Dreamy Cotton Candy Fudge
Step into a world of sweetness with this Dreamy Cotton Candy Fudge! Soft, creamy, and bursting with nostalgic cotton candy flavor, this easy no-bake treat combines silky white chocolate, rich sweetened condensed milk, and delightful cotton candy flavoring to create a melt-in-your-mouth dessert.
With its pretty pink and blue colors, this fudge looks just like a fluffy cloud of carnival cotton candy. Best of all, you need only four main ingredients and no candy thermometer! It’s perfect for birthday parties, baby showers, holiday dessert trays, Valentine’s Day treats, or whenever you want something colorful and magical. 🍬💗💙
Recipe Details
- Prep Time: 10 minutes
- Cook Time: 5–10 minutes
- Chilling Time: 3–4 hours
- Total Time: Approximately 4 hours
- Yield: 25–36 small squares
- Course: Dessert, Candy
- Difficulty: Easy
- Method: No-bake, stovetop or microwave
Ingredients
For the Cotton Candy Fudge
- 3 cups white chocolate chips (approximately 510 g)
- 1 can (14 oz / 397 g) sweetened condensed milk
- 2 tablespoons unsalted butter (28 g)
- 2 teaspoons cotton candy flavoring, or the amount recommended by the manufacturer
Optional Decorations
- Pink gel food coloring
- Blue gel food coloring
- 1–2 tablespoons colorful sprinkles
- Cotton candy pieces for garnish, added just before serving
Tip: Use food-grade cotton candy flavoring intended for baking or confectionery. Some flavorings are more concentrated than others, so follow the manufacturer’s dosage instructions.
Instructions
Step 1: Prepare the Pan
Line an 8 × 8-inch (20 × 20 cm) square baking pan with parchment paper, leaving a little overhang on two sides. This will make it easy to lift the fudge out once it has set.
Lightly grease the parchment paper if necessary.
Step 2: Combine the Ingredients
Place the white chocolate chips, sweetened condensed milk, and butter in a medium microwave-safe bowl.
The sweetened condensed milk provides sweetness and creaminess, while the white chocolate helps the fudge firm up as it chills.
Step 3: Melt the Mixture
Microwave method: Microwave the mixture in 20–30-second intervals, stirring thoroughly after each interval. Continue until the chocolate has melted and the mixture is smooth and glossy. This usually takes about 1–2 minutes of total heating, depending on your microwave.
Stovetop method: Add the ingredients to a heatproof bowl set over a saucepan of gently simmering water. Stir continuously until smooth, making sure the bottom of the bowl does not touch the water. Alternatively, use a heavy-bottomed saucepan over very low heat, stirring constantly.
Avoid overheating the white chocolate, as it can scorch or become grainy.
Step 4: Add the Cotton Candy Flavoring
Remove the melted mixture from the heat and allow it to cool for about 1 minute.
Stir in the cotton candy flavoring until it is evenly distributed. Taste only if the flavoring is approved for direct food tasting, and remember that its flavor may become more noticeable as the fudge sets.
The mixture should be thick, creamy, and fragrant with sweet cotton candy flavor.
Step 5: Create the Pretty Pink and Blue Swirls (Optional)
For a dreamy carnival-inspired appearance, divide the fudge mixture between two bowls.
Add a tiny amount of pink gel food coloring to one bowl and blue gel food coloring to the other. Stir each mixture until the color is evenly distributed.
Work quickly, as the fudge can begin to thicken as it cools.
For a pastel effect, use very small amounts of coloring. Gel food coloring is preferable because it adds less moisture than liquid coloring.
Step 6: Transfer to the Pan
Pour the fudge mixture into the prepared pan. If using two colors, alternate spoonfuls of pink and blue fudge across the pan.
Gently swirl the colors together with a toothpick or skewer to create a soft marbled pattern. Avoid excessive swirling, which can blend the colors into one shade.
Sprinkle colorful sprinkles over the top, if desired, and press them very gently into the surface so they adhere.
Step 7: Chill Until Firm
Cover the pan loosely and refrigerate for 3–4 hours, or until the fudge is completely firm.
For the best texture, allow enough time for the center to set. Larger or deeper batches may need additional chilling time.
Step 8: Slice into Squares
Once firm, lift the fudge out of the pan using the parchment paper overhang.
Place it on a cutting board and use a sharp knife to cut it into small squares. For cleaner cuts, warm the knife under hot water, wipe it completely dry, and slice. Repeat as needed.
If the fudge feels too soft, return it to the refrigerator for another 30–60 minutes before cutting.
Step 9: Serve and Enjoy
Arrange the fudge squares on a colorful serving platter or in small paper candy cups.
For an extra-magical presentation, garnish with a few tiny pieces of cotton candy immediately before serving. Cotton candy absorbs moisture quickly, so don’t add it until the last moment.
Enjoy every creamy, sweet, cotton-candy-inspired bite! 🍭
Tips for Perfect Cotton Candy Fudge
- Use good-quality white chocolate chips. White chocolate can be sensitive to heat, so choose a brand that melts smoothly.
- Heat slowly and gently. Short microwave intervals and frequent stirring help prevent scorching.
- Use the right flavoring. Cotton candy flavoring creates the signature taste; vanilla alone will not produce the same flavor.
- Avoid adding too much liquid coloring. Excess liquid can affect the texture of the fudge.
- Don’t skip chilling. The fudge needs time for the chocolate to set properly.
- Cut into small squares. This fudge is rich and sweet, so bite-sized portions are ideal.
- Add cotton candy decorations last. Cotton candy dissolves and becomes sticky when exposed to moisture.
- Keep the fudge cool. Chilling helps the squares retain their shape, particularly in warm weather.
Delicious Variations
💗 Pink Cotton Candy Fudge
Color the entire batch pastel pink and top it with white sprinkles for a sweet, elegant finish.
💙 Blue Carnival Fudge
Use pastel blue coloring and pearl sprinkles for a fun carnival-inspired dessert.
🌈 Rainbow Cotton Candy Fudge
Divide the mixture into three or four portions, tint each portion a different pastel color, and layer them gently before chilling.
🍓 Cotton Candy Strawberry Fudge
Add a small amount of food-grade strawberry flavoring along with the cotton candy flavoring for a fruity twist. Use the flavorings according to their manufacturer’s recommendations.
🍫 Cotton Candy Chocolate Drizzle
Once the fudge has set, drizzle it with a little melted white or milk chocolate and allow the drizzle to firm before serving.
✨ Party Sprinkle Fudge
Fold a small handful of colorful sprinkles into the mixture just before pouring it into the pan. Use nonpareils sparingly if you want to minimize color bleeding.
Serving Suggestions
Dreamy Cotton Candy Fudge is especially lovely on colorful dessert tables. Serve it alongside:
- White chocolate truffles
- Marshmallow pops
- Sugar cookies
- Chocolate-covered strawberries
- Mini cupcakes
- Popcorn and other carnival-inspired sweets
For birthday parties, arrange the pink and blue squares in alternating rows on a white platter. For gifts, place the chilled pieces in mini paper candy cups inside a decorative tin or food-safe gift box.
Make-Ahead and Storage
Refrigeration: Store the fudge in an airtight container in the refrigerator for up to 1–2 weeks for best quality. Separate layers with parchment paper to prevent sticking.
Room temperature: The fudge may soften in warm conditions, so refrigeration is recommended. If serving at room temperature, allow only a short period for it to soften slightly before serving.
Freezing: Freeze the plain fudge in an airtight, freezer-safe container for up to 2 months for best quality. Separate the layers with parchment paper. Thaw overnight in the refrigerator before serving.
Make ahead: Prepare the fudge 1–2 days before your event and refrigerate it until needed. Add any cotton candy garnish immediately before serving.
Frequently Asked Questions
Why didn’t my fudge set?
The chocolate may not have been fully melted and incorporated, or the proportions may have been altered. Make sure to measure the white chocolate and condensed milk accurately, then refrigerate the fudge until completely firm.
Can I make this fudge without food coloring?
Absolutely! The fudge will have a creamy ivory color and the same cotton candy flavor. Food coloring is purely decorative.
Can I use a different pan size?
Yes. An 8 × 8-inch pan creates relatively thick squares. A 9 × 9-inch pan will produce thinner fudge that may set a little faster. Larger pans can make the pieces thinner, so adjust the presentation and chilling time accordingly.
Can I use sweetened condensed milk instead of evaporated milk?
This recipe specifically requires sweetened condensed milk. Evaporated milk is thinner and unsweetened, so it will not give the same texture or sweetness.
Can I use white chocolate bars instead of chips?
Yes. Chop the white chocolate bars into small, uniform pieces so they melt more evenly. Use approximately 510 g of white chocolate to match the recipe.
Why is my white chocolate mixture grainy?
White chocolate can seize or scorch if it becomes too hot. Melt it gently in short intervals or over low heat, stirring frequently. Avoid letting water or steam enter the chocolate mixture.
Can I use real cotton candy instead of cotton candy flavoring?
Real cotton candy can be used as a decoration, but it is not a reliable substitute for flavoring in the fudge mixture. It dissolves quickly when exposed to moisture and won’t provide the same consistent flavor.
🍭 A Sweet Little Taste of Carnival Magic
Dreamy Cotton Candy Fudge is creamy, colorful, and wonderfully easy to make. With just four main ingredients, you can create a delightful homemade candy that captures the nostalgic sweetness of cotton candy in every bite.
Whether you choose pretty pink swirls, dreamy blue layers, or a colorful rainbow effect, these little squares are guaranteed to brighten your dessert table. Chill, slice, share, and enjoy a little carnival magic at home! 💗💙✨