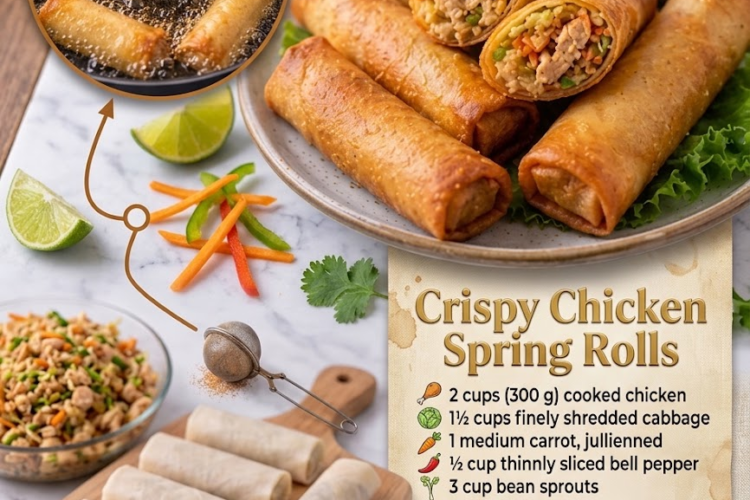
🥢🍗 Crispy Chicken Spring Rolls
Golden, crispy, and packed with savory shredded chicken and crunchy vegetables, these homemade Chicken Spring Rolls make an irresistible appetizer or snack.
The filling combines tender chicken, cabbage, carrots, bell peppers, bean sprouts, spring onions, and garlic, all tossed in a flavorful soy-oyster sauce mixture. Wrapped in delicate spring-roll wrappers and fried until beautifully crisp, they’re perfect served hot with sweet chili sauce.
⏱️ Recipe Information
- Prep Time: 25 minutes
- Cook Time: 20 minutes
- Total Time: 45 minutes
- Servings: 12–16 spring rolls
- Difficulty: Easy
- Method: Stovetop Frying
🛒 Ingredients
🍗 For the Filling
- 2 cups (300 g) cooked chicken, finely shredded
- 1½ cups finely shredded cabbage
- 1 medium carrot, julienned
- ½ cup bell pepper, thinly sliced
- ½ cup bean sprouts
- 3 spring onions, sliced
- 3 garlic cloves, minced
- 1 tbsp vegetable oil
- 1½ tbsp soy sauce
- 1 tbsp oyster sauce
- 1 tsp sesame oil
- ½ tsp black pepper
🥟 For Assembling
- 12–16 spring-roll wrappers
- 2 tbsp all-purpose flour
- 2–3 tbsp water, for sealing
- Vegetable oil, for deep-frying
For Serving
- Sweet chili sauce
- Soy sauce
- Spicy chili sauce
- Garlic dipping sauce
👩🍳 Instructions
🥬 Prepare the Filling
1. Prepare the Vegetables
Make sure all the vegetables are sliced and ready before you begin cooking.
Finely shred the cabbage, julienne the carrot, slice the bell pepper and spring onions, and mince the garlic.
If the bean sprouts are particularly wet, gently pat them dry with paper towels.
Excess moisture can make the spring rolls soggy.
2. Heat the Pan
Heat 1 tablespoon vegetable oil in a large wok or skillet over medium-high heat.
Once hot, add the minced garlic.
Stir-fry for approximately 20–30 seconds, until fragrant.
3. Cook the Vegetables
Add the shredded cabbage, carrot, bell pepper, and bean sprouts.
Stir-fry over medium-high heat for approximately 2–3 minutes.
Keep the vegetables slightly crisp rather than cooking them until soft.
4. Add the Chicken
Add the finely shredded cooked chicken.
Toss everything together and cook for another 2–3 minutes, until the chicken is heated through.
5. Season the Filling
Add:
- Soy sauce
- Oyster sauce
- Sesame oil
- Black pepper
Stir-fry for another 1–2 minutes, making sure the seasonings are evenly distributed.
Add the sliced spring onions and toss briefly.
6. Cool the Filling Completely
Remove the pan from the heat.
Transfer the filling to a wide plate or baking sheet and spread it out into a thin layer.
Allow it to cool completely before assembling the spring rolls.
Important:
Do not fill the wrappers with hot filling. Steam from the warm filling can make the wrappers soft and difficult to seal.
🥟 Assemble the Spring Rolls
7. Prepare the Sealing Paste
In a small bowl, mix:
- 2 tbsp all-purpose flour
- 2–3 tbsp water
Stir until you have a smooth, thick paste.
This will be used to seal the spring rolls.
8. Position a Wrapper
Place one spring-roll wrapper on a clean work surface in a diamond shape, with one corner pointing toward you.
Keep the remaining wrappers covered with a slightly damp kitchen towel so they don’t dry out.
9. Add the Filling
Place approximately 2–3 tablespoons of cooled filling near the lower third of the wrapper.
Do not overfill.
Leaving enough space around the edges makes rolling and sealing much easier.
10. Roll the Spring Roll
Fold the bottom corner up and over the filling.
Tuck it snugly underneath the filling.
Fold the left and right corners toward the center.
Then continue rolling upward into a tight cylinder.
Brush the top corner with a small amount of flour paste.
Finish rolling and press gently to seal.
Repeat with the remaining wrappers and filling.
🔥 Fry the Spring Rolls
11. Heat the Oil
Pour enough vegetable oil into a deep, heavy-bottomed pan to submerge the spring rolls.
Heat the oil to approximately 350°F (175°C).
The oil should be hot enough that a small piece of wrapper sizzles immediately when added.
12. Fry in Batches
Carefully lower the spring rolls into the hot oil.
Do not overcrowd the pan.
Fry in batches for approximately 3–5 minutes, turning occasionally, until:
- The wrappers are golden brown.
- The exterior is crisp.
- The spring rolls are heated through.
13. Drain
Transfer the cooked spring rolls to a wire rack or paper towel-lined plate.
Allow excess oil to drain.
For maximum crispiness, a wire rack is preferable because it allows air to circulate underneath the spring rolls.
🍽️ Serve
14. Enjoy While Hot
Arrange the crispy spring rolls on a serving platter.
Serve immediately with sweet chili sauce, soy sauce, or your favorite dipping sauce.
For a beautiful presentation, garnish the platter with sliced spring onions, fresh herbs, or sesame seeds.
👩🍳 Chef’s Tips
Keep the Filling Dry
Moisture is the enemy of crispy spring rolls. Cook off excess liquid and cool the filling completely before wrapping.
Don’t Overfill
Too much filling can cause the wrappers to split during frying.
Keep Wrappers Covered
Spring-roll wrappers dry out quickly. Keep unused wrappers covered with a slightly damp towel.
Roll Tightly
A snug roll gives you a crisp exterior and helps prevent oil from entering the spring roll.
Maintain the Oil Temperature
If the oil is too cool, the spring rolls absorb excess oil. If it’s too hot, the outside can brown before the wrapper becomes properly crisp.
Fry in Small Batches
Overcrowding lowers the oil temperature and can result in greasy spring rolls.
🌬️ Air-Fryer Method
For a lighter option, brush or lightly spray the assembled spring rolls with oil.
Place them in a single layer in an air fryer.
Cook at 375°F (190°C) for 10–14 minutes, turning halfway through, until golden and crisp.
Cooking time may vary depending on the air fryer and thickness of the rolls.
🔥 Oven-Baked Method
Preheat the oven to 425°F (220°C).
Place the spring rolls on a parchment-lined baking sheet.
Lightly brush or spray them with oil.
Bake for 18–22 minutes, turning halfway through, until golden and crisp.
🌶️ Delicious Variations
🔥 Spicy Chicken Spring Rolls
Add ½–1 tsp chili flakes, sliced fresh chili, or a spoonful of chili garlic sauce to the filling.
🧀 Chicken & Cheese Spring Rolls
Add ½ cup shredded mozzarella or cheddar to the cooled filling before wrapping.
🍤 Chicken & Shrimp Spring Rolls
Replace part of the chicken with finely chopped cooked shrimp.
🥬 Extra Vegetable Spring Rolls
Add shredded mushrooms, snow peas, baby corn, or finely sliced bok choy.
🧄 Garlic-Chili Spring Rolls
Add extra garlic and 1 tsp chili crisp to the filling for a punchier flavor.
🥢 Best Dipping Sauces
These spring rolls pair especially well with:
- Sweet chili sauce
- Garlic chili sauce
- Soy-ginger dipping sauce
- Spicy mayonnaise
- Hoisin sauce
- Sweet-and-sour sauce
🥡 Storage
Store cooled cooked spring rolls in an airtight container in the refrigerator for up to 3 days.
For best texture, reheat rather than microwaving.
🔥 Reheating
Air Fryer
Reheat at 375°F (190°C) for 4–7 minutes until hot and crisp.
Oven
Reheat at 400°F (200°C) for 8–12 minutes.
Avoid the microwave if you want to preserve the crispy wrapper.
❄️ Freezing
For the best results, freeze the assembled but uncooked spring rolls.
Place them in a single layer on a parchment-lined tray and freeze until firm.
Transfer to a freezer-safe bag or container.
They can be frozen for up to 2 months.
When ready to cook, fry them directly from frozen—do not thaw first. Add a few extra minutes to the frying time and ensure the filling is heated through.
⭐ Final Result
These Crispy Chicken Spring Rolls are packed with tender shredded chicken, crunchy cabbage, sweet carrot, fresh bell pepper, bean sprouts, spring onions, and aromatic garlic, all wrapped in a delicate golden shell.
They’re wonderfully crisp on the outside, savory and flavorful inside, and absolutely irresistible dipped into sweet chili sauce.
Crunchy. Savory. Golden. Homemade perfection in every bite! 🥢🍗✨