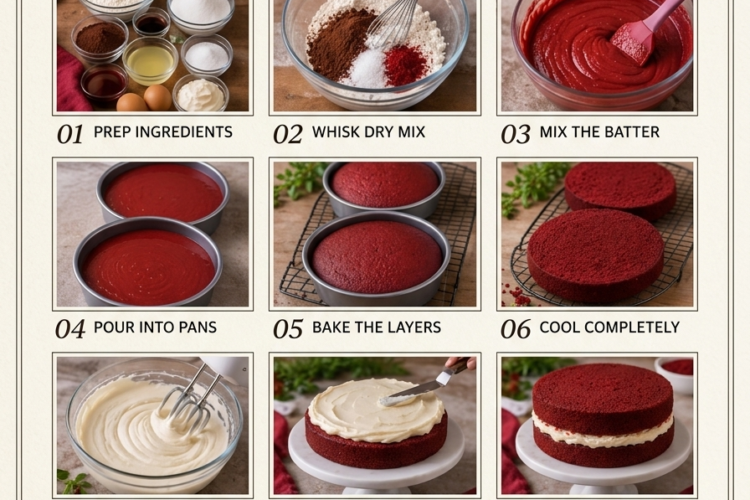
❤️ Classic Red Velvet Cake with Cream Cheese Frosting
Soft, Velvety, Beautifully Red, and Topped with Rich Cream Cheese Frosting!
Few desserts are as stunning and irresistible as a homemade Red Velvet Cake! With its beautiful deep-red color, delicate cocoa flavor, and soft, tender crumb, this timeless favorite is as delicious as it is elegant.
Each layer is moist and fluffy, with a subtle tang from buttermilk and vinegar that gives red velvet its signature flavor. Finished with a thick layer of smooth, tangy cream cheese frosting, this cake is perfect for birthdays, Valentine’s Day, Christmas celebrations, anniversaries, or any occasion that calls for something truly special.
The best part? You can make this bakery-style classic right in your own kitchen using simple ingredients and straightforward steps.
Recipe Information
- Prep Time: 25 minutes
- Bake Time: 25–30 minutes
- Cooling Time: 1 hour
- Frosting and Assembly: 20 minutes
- Total Time: Approximately 2 hours 15 minutes
- Servings: 10–12
- Course: Dessert
- Cuisine: American
- Difficulty: Moderate
- Pan Size: Two 9-inch (23 cm) round cake pans
Ingredients
For the Red Velvet Cake
- 2½ cups (about 313 g) all-purpose flour
- 1½ cups (300 g) granulated sugar
- 2 tablespoons unsweetened cocoa powder
- 1 teaspoon baking soda
- ½ teaspoon salt
- 2 large eggs, at room temperature
- 1 cup (240 ml) buttermilk, at room temperature
- ½ cup (120 ml) vegetable oil
- 1 tablespoon red food coloring, or as needed for the desired color
- 1 teaspoon vanilla extract
- 1 teaspoon white vinegar
For the Cream Cheese Frosting
- 16 oz (450 g) full-fat cream cheese, softened but still cool
- ½ cup (113 g) unsalted butter, softened
- 4 cups (480 g) powdered sugar, sifted
- 2 teaspoons vanilla extract
- Pinch of salt, optional, to balance the sweetness
Optional Decoration
- Red velvet cake crumbs
- Fresh strawberries or raspberries
- White chocolate shavings
- A light dusting of powdered sugar
Instructions
Step 1: Prepare the Oven and Cake Pans
Preheat your oven to 350°F (175°C).
Grease two 9-inch round cake pans with butter or cooking spray. Line the bottoms with parchment paper and lightly grease the parchment as well.
This helps the cakes release easily and prevents the delicate red velvet layers from breaking when removed.
Step 2: Combine the Dry Ingredients
In a large mixing bowl, whisk together the flour, granulated sugar, cocoa powder, baking soda, and salt.
Mix thoroughly to distribute the cocoa and baking soda evenly throughout the flour. Break up any lumps in the cocoa powder before proceeding.
Set the bowl aside.
Step 3: Mix the Wet Ingredients
In a separate bowl, whisk together the eggs, buttermilk, vegetable oil, red food coloring, and vanilla extract until smooth.
Add the white vinegar and mix briefly.
The mixture should be evenly colored, with no streaks of egg or concentrated food coloring remaining.
Tip: Room-temperature eggs and buttermilk combine more easily and help produce a smoother cake batter.
Step 4: Make the Cake Batter
Gradually pour the wet ingredients into the dry ingredients.
Mix on low speed with an electric mixer or gently whisk by hand until the flour is incorporated and the batter is smooth.
Scrape down the sides and bottom of the bowl with a spatula, making sure no dry flour remains hidden at the bottom.
Avoid overmixing once the flour has been added, as this can make the finished cake dense rather than tender.
The batter should be pourable and evenly red.
Step 5: Divide the Batter
Divide the batter evenly between the two prepared cake pans.
Use a spatula to spread it into an even layer. Gently tap each pan on the countertop once or twice to release any large air pockets.
If you want evenly sized layers, weigh the batter and divide it equally between the pans.
Step 6: Bake the Cakes
Place the pans on the center rack of the preheated oven.
Bake for approximately 25–30 minutes, or until the cake layers are set and a toothpick inserted into the center comes out clean or with a few moist crumbs.
Begin checking at around 25 minutes because oven temperatures and pan materials can affect baking time.
Avoid opening the oven repeatedly during the first 20 minutes, as sudden temperature changes can affect how the cakes rise.
Step 7: Cool the Cake Layers
Remove the pans from the oven and place them on a wire rack.
Allow the cakes to cool in the pans for 10–15 minutes. Carefully run a thin knife around the edges if necessary, then turn the cakes out onto the rack.
Remove the parchment paper and let the layers cool completely before frosting.
Important: Never spread cream cheese frosting onto warm cake, as the butter and cream cheese can melt and make the frosting slide off.
Step 8: Prepare the Cream Cheese Frosting
Place the softened cream cheese and butter in a large mixing bowl.
Beat with an electric mixer on medium speed until smooth and creamy, approximately 1–2 minutes. Scrape down the sides of the bowl as needed.
Add the vanilla extract and optional pinch of salt.
Gradually add the sifted powdered sugar, mixing on low speed initially to prevent it from scattering. Once incorporated, beat briefly until the frosting is smooth, creamy, and thick enough to spread.
Avoid overbeating, which can make cream cheese frosting too soft.
If the frosting seems loose, refrigerate it for 15–20 minutes before assembling the cake.
Step 9: Level the Cake Layers
Once completely cool, inspect the tops of the cakes.
If either layer has developed a dome, use a serrated knife to trim it level. Save the cake scraps to crumble over the finished cake as decoration.
Place the first layer on a cake stand or serving plate, cut-side up.
Step 10: Add the First Layer of Frosting
Spoon a generous amount of cream cheese frosting onto the first cake layer.
Spread it evenly across the surface using an offset spatula, leaving a small border near the edges to prevent too much frosting from squeezing out when the second layer is added.
The frosting should form a smooth, generous filling between the cake layers.
Step 11: Assemble the Cake
Carefully place the second cake layer on top of the frosting, positioning it as evenly as possible.
Press very gently to help the layers settle.
Check that the cake is level before continuing. If necessary, adjust the top layer slightly while the filling is still soft.
Step 12: Frost the Top and Sides
Spread the remaining cream cheese frosting over the top and sides of the cake.
For a smooth bakery-style finish, use an offset spatula or cake scraper. For a more rustic appearance, create gentle swirls with the back of a spoon.
Reserve a small amount of frosting for decorative piping if desired.
Step 13: Decorate and Chill
Sprinkle the reserved red velvet cake crumbs over the top or around the sides of the cake.
For an elegant finish, add white chocolate shavings, a few fresh berries, or small piped frosting rosettes.
Refrigerate the cake for approximately 30–60 minutes to help the frosting firm up before slicing.
Step 14: Slice and Serve
Use a sharp knife to cut the cake into slices, wiping the blade between cuts for neat layers.
Serve chilled or allow individual slices to stand briefly at room temperature for a softer texture.
Enjoy the combination of tender red velvet cake and rich, tangy cream cheese frosting!
Tips for the Best Red Velvet Cake
- Measure the flour accurately: Too much flour can make the cake dry or heavy. Weighing ingredients gives more consistent results.
- Use unsweetened cocoa powder: Red velvet has a delicate cocoa flavor rather than the intense chocolate taste of a chocolate cake.
- Don’t skip the vinegar: It adds a subtle tang and works with the baking soda to help the cake rise.
- Use good-quality food coloring: Gel food coloring is more concentrated than many liquid varieties, so you may need less to achieve a deep-red shade.
- Avoid overmixing: Once the wet and dry ingredients are combined, mix only until smooth.
- Cool completely before frosting: This is essential for keeping the cream cheese frosting thick and stable.
- Use full-fat cream cheese: It provides a rich flavor and a better frosting texture.
- Chill before slicing: A brief refrigeration period helps the frosting hold its shape and makes serving easier.
Delicious Variations
🍓 Red Velvet Strawberry Cake
Spread a thin layer of strawberry preserves between the cake layers along with the cream cheese frosting for a fruity twist.
🍫 Chocolate Chip Red Velvet Cake
Fold ½ cup mini chocolate chips into the batter for extra chocolate flavor and little pockets of sweetness.
❤️ Red Velvet Cupcakes
Divide the batter among lined muffin cups, filling each about two-thirds full. Bake at 350°F (175°C) for approximately 18–22 minutes, checking for doneness.
🤍 White Chocolate Red Velvet Cake
Add white chocolate shavings between the layers and over the frosting for a beautiful contrast against the red cake.
🍰 Three-Layer Red Velvet Cake
Bake the batter in three 8-inch round pans instead of two 9-inch pans. Check the cakes early because the thinner layers may bake more quickly.
🌰 Red Velvet Pecan Cake
Sprinkle finely chopped toasted pecans over the filling or press them around the sides for a little crunch.
What to Serve with Red Velvet Cake
This cake pairs beautifully with:
- Hot coffee or cappuccino
- Black tea
- Cold milk
- Fresh strawberries or raspberries
- Vanilla ice cream
- White chocolate pieces
For a celebration, serve a slice with fresh berries and a cup of coffee. The tangy cream cheese frosting and delicate cocoa flavor complement both beautifully.
Make-Ahead Instructions
Bake the cake layers ahead: Bake the layers up to 2 days in advance. Allow them to cool completely, wrap tightly, and refrigerate.
Make the frosting ahead: Prepare the cream cheese frosting up to 2 days ahead and store it in a covered container in the refrigerator. Let it soften slightly, then stir or beat briefly until spreadable.
Assemble ahead: Assemble and frost the cake a day before serving. Cover it and refrigerate overnight so the frosting firms up and the flavors settle.
Storage Instructions
Refrigeration: Because the frosting contains cream cheese, store the cake covered in the refrigerator. It will keep for approximately 3–4 days.
Serving: Let individual slices stand at room temperature briefly before serving for the best texture, but do not leave the cake out for more than 2 hours.
Freezing: Freeze unfrosted cake layers tightly wrapped for up to 2 months for best quality. Thaw overnight in the refrigerator before assembling. Individual frosted slices can also be frozen in airtight containers, although the frosting texture may change slightly after thawing.
Frequently Asked Questions
Why is my red velvet cake not bright red?
The amount and type of food coloring, the cocoa powder, and the original batter color all affect the final shade. Use a concentrated red gel coloring if you want a more vivid result.
Is red velvet cake just chocolate cake with red coloring?
Not quite. Red velvet typically has a subtle cocoa flavor, a gentle tang from buttermilk and vinegar, and a distinctive tender crumb. Those characteristics set it apart from ordinary chocolate cake.
Why is my cake dry?
Too much flour, overbaking, or inaccurate measurements can dry out the cake. Measure carefully and begin checking for doneness at the early end of the recommended baking time.
Why is my cream cheese frosting runny?
The butter or cream cheese may have been too warm, or the frosting may have been overbeaten. Refrigerate it briefly to firm it up, and avoid adding extra liquid.
Can I make red velvet cake without buttermilk?
Yes. Mix 1 tablespoon lemon juice or white vinegar into a measuring cup, add enough milk to reach 1 cup, and let it stand for 5–10 minutes before using.
Can I reduce the sugar?
You can reduce it modestly, but sugar affects the moisture, tenderness, and structure of the cake. A substantial reduction may make it less tender, so adjust carefully.
A Stunning Classic for Every Celebration! ❤️🎂
This Classic Red Velvet Cake brings together soft cocoa-kissed cake layers, beautiful red color, and rich cream cheese frosting for a dessert that looks impressive and tastes unforgettable.
Whether you’re baking for a birthday, holiday, romantic celebration, or weekend treat, this timeless cake is guaranteed to make the occasion feel extra special.
Bake it until soft and tender, frost it generously, add a sprinkle of red velvet crumbs, and enjoy a slice of homemade red velvet perfection!