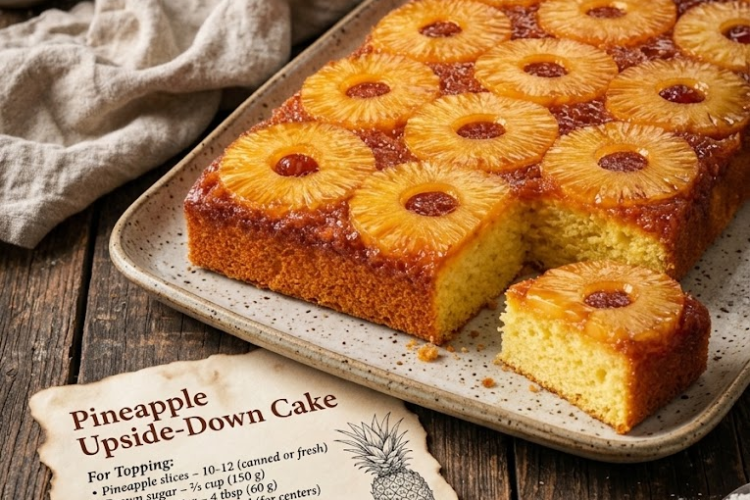
🍍 Classic Pineapple Upside-Down Cake
A Golden, Buttery Cake Topped with Sweet Caramelized Pineapple and Glacé Cherries!
This Classic Pineapple Upside-Down Cake is a timeless homemade dessert that’s as beautiful as it is delicious. Juicy pineapple slices, glossy brown sugar caramel, and bright red cherries create a gorgeous topping that becomes the star of the cake when you flip it over.
Underneath is a soft, tender vanilla butter cake that soaks up the sweet pineapple juices while baking. Every slice delivers a delightful balance of fruity sweetness, rich buttery flavor, and moist, fluffy cake.
Perfect for family gatherings, birthdays, afternoon tea, or a nostalgic weekend baking project, this old-fashioned favorite is guaranteed to make an impression!
Recipe Information
- Prep Time: 20 minutes
- Bake Time: 40–50 minutes
- Cooling Time: 10–15 minutes
- Total Time: Approximately 1 hour 15 minutes
- Servings: 8–10 slices
- Course: Dessert
- Cuisine: Classic American-inspired
- Difficulty: Easy to moderate
- Pan Size: 9-inch (23 cm) round cake pan
Ingredients
For the Pineapple Topping
- 10–12 pineapple slices, canned or fresh
- ½ cup packed brown sugar (about 100 g)
- 4 tablespoons (60 g) unsalted butter
- 6–10 glacé cherries, optional
Note: The original ingredient list gives 150 g for ½ cup of brown sugar. For a standard ½ cup, approximately 100 g is more accurate. Use a kitchen scale if possible for consistent results.
For the Vanilla Butter Cake
- 1½ cups (190 g) all-purpose flour
- 1½ teaspoons baking powder
- ¼ teaspoon baking soda
- ¼ teaspoon salt
- ½ cup (113 g) unsalted butter, softened
- ¾ cup (150 g) granulated sugar
- 2 large eggs, at room temperature
- 1 teaspoon vanilla essence or vanilla extract
- ½ cup (120 ml) milk, at room temperature
Instructions
Step 1: Prepare the Oven and Cake Pan
Preheat your oven to 350°F (175°C). Lightly grease the sides of a 9-inch round cake pan.
For easiest release, use a sturdy metal cake pan rather than a springform pan, which may leak the melted butter and brown sugar topping.
If using canned pineapple, drain the slices thoroughly and gently pat them dry with paper towels. Excess liquid can make the topping watery and affect the cake’s texture.
If using fresh pineapple, remove the skin and core, then cut the fruit into even slices.
Step 2: Make the Caramelized Pineapple Topping
Place the 4 tablespoons of butter in a small saucepan over medium-low heat. Stir until melted.
Add the brown sugar and stir for about 1–2 minutes, until it is moistened and begins to form a smooth, glossy mixture. It does not need to boil or reach a specific candy temperature.
Pour the mixture into the prepared cake pan and spread it evenly across the bottom.
Arrange the pineapple slices in a single layer over the brown sugar mixture. Place the glacé cherries in the centers of the pineapple rings or in any gaps between the slices.
Arrange the fruit carefully, as this will become the decorative top of your cake after it is inverted.
Step 3: Combine the Dry Ingredients
In a medium bowl, whisk together the flour, baking powder, baking soda, and salt.
Mix thoroughly so the raising agents are evenly distributed throughout the flour. Set aside.
Step 4: Cream the Butter and Sugar
In a large mixing bowl, beat the softened butter and granulated sugar with an electric mixer for about 2–3 minutes, until the mixture looks pale, light, and fluffy.
Scrape down the sides and bottom of the bowl as needed.
Properly creaming the butter and sugar helps create a lighter, more tender cake.
Step 5: Add the Eggs and Vanilla
Add the eggs one at a time, beating well after each addition.
Mix in the vanilla essence or extract until combined. If the mixture looks slightly curdled, don’t worry; adding the flour mixture gradually should help bring the batter together.
Step 6: Add the Dry Ingredients and Milk
Add about one-third of the flour mixture to the butter mixture and mix on low speed until just combined.
Pour in half the milk and mix briefly. Continue alternating the remaining flour mixture and milk, ending with the flour mixture.
Mix only until no dry streaks remain. Scrape the bowl gently with a spatula to ensure everything is incorporated.
Important: Avoid overmixing once the flour is added, as this can make the finished cake dense instead of soft and tender.
Step 7: Pour the Batter Over the Pineapple
Carefully spoon the cake batter over the arranged pineapple slices and cherries.
Spread the batter gently with a spatula to create an even layer, taking care not to disturb the fruit arrangement.
Tap the pan lightly against the countertop once or twice to release any large air pockets.
Step 8: Bake Until Golden
Place the cake pan on the center rack of the preheated oven.
Bake for 40–50 minutes, or until the top is golden and a toothpick inserted into the center of the cake comes out clean or with a few moist crumbs.
If the cake begins browning too quickly before the center is cooked, loosely cover the top with aluminum foil for the remainder of the baking time.
Keep in mind that baking time can vary depending on your pan and oven. Start checking around the 38–40 minute mark.
Step 9: Let the Cake Rest Briefly
Remove the cake from the oven and place the pan on a heatproof rack.
Allow it to rest for 10–15 minutes. This gives the caramel topping a chance to settle while keeping it soft enough for the cake to release.
Do not let the cake cool completely in the pan, because the brown sugar topping may harden and stick.
Step 10: Invert the Cake
Run a thin knife carefully around the edge of the cake to loosen it from the pan.
Place a large serving plate upside down over the cake pan. Using oven mitts, hold the plate and pan securely together and carefully flip them over.
Leave the pan in place for about 30 seconds, then lift it away slowly.
If a pineapple slice or cherry stays behind, gently remove it and place it back on the cake while the topping is still warm.
Allow the cake to cool slightly before slicing. The pineapple topping will be glossy, golden, and beautifully arranged over the soft vanilla cake.
Step 11: Slice and Serve
Cut into generous slices with a sharp knife and serve warm or at room temperature.
Enjoy it plain or pair it with a scoop of vanilla ice cream, lightly whipped cream, or a spoonful of crème fraîche for an extra-special dessert.
Tips for the Best Pineapple Upside-Down Cake
- Drain the pineapple well: Excess liquid can make the topping soggy and the cake difficult to invert.
- Use room-temperature ingredients: Butter, eggs, and milk at room temperature combine more evenly for a smoother batter.
- Arrange the fruit carefully: Keep the pineapple slices in a single layer to create a beautiful presentation when flipped.
- Don’t overmix: Mix the batter only until the ingredients are combined for a softer crumb.
- Invert while slightly warm: Waiting 10–15 minutes helps the cake settle, but leaving it in the pan too long can make the caramel stick.
- Choose the right pan: A sturdy 9-inch round metal cake pan generally provides even baking and a reliable release.
- Let the topping settle: The caramelized juices will be very hot after baking, so handle the pan carefully and allow the cake to cool slightly before serving.
Delicious Variations
🍒 Classic Cherry Pineapple Cake
Use glacé cherries generously in the centers of the pineapple rings and between the slices for the traditional retro appearance.
🥥 Pineapple Coconut Cake
Add ¼ cup of shredded coconut to the cake batter for a subtle tropical flavor.
🍋 Pineapple Lemon Cake
Add 1 teaspoon of finely grated lemon zest to the cake batter for a fresh citrus note that balances the sweetness.
🍯 Extra-Caramelized Topping
Add an extra tablespoon of brown sugar to the topping for a slightly richer caramel flavor. Watch the cake closely while baking to prevent the edges from becoming too dark.
🍍 Mini Pineapple Upside-Down Cakes
Divide the topping, pineapple, cherries, and batter among a greased muffin tin. Bake at 350°F (175°C), checking for doneness after approximately 18–25 minutes. Allow to rest briefly before carefully inverting.
What to Serve with Pineapple Upside-Down Cake
This cake is delicious on its own, but these accompaniments make it even more special:
- Vanilla bean ice cream
- Freshly whipped cream
- A drizzle of caramel sauce
- Greek yogurt or crème fraîche
- Fresh pineapple or berries
- A cup of hot coffee or black tea
For the best contrast, serve a slightly warm slice with cold vanilla ice cream. The creamy ice cream complements the buttery cake and sweet pineapple topping beautifully.
Make-Ahead Instructions
You can bake this cake a day before serving. Allow it to cool completely, then cover it and refrigerate.
For the prettiest presentation, invert the cake while it is still slightly warm. If you are baking ahead, cool it after inverting and store it covered.
Bring refrigerated slices close to room temperature before serving, or warm them gently for a few seconds in the microwave.
Storage and Reheating
Room temperature: Because this cake contains moist fruit, refrigerating it is the safer choice for longer storage. It can be kept covered at room temperature for a short serving period, but do not leave it out for more than 2 hours.
Refrigerator: Store the cooled cake in an airtight container or tightly covered for up to 3–4 days.
Reheating: Warm individual slices in the microwave for approximately 10–15 seconds, checking and adding more time as needed.
Freezing: Freeze individual slices or the whole cooled cake, well wrapped and sealed, for up to 2 months. Thaw overnight in the refrigerator. The fruit topping may be a little softer after thawing.
Frequently Asked Questions
Can I use canned pineapple instead of fresh?
Absolutely! Canned pineapple rings are convenient and give the cake its familiar classic appearance. Drain them well and pat them dry before arranging them in the pan.
Why did my pineapple topping stick to the pan?
The cake may have cooled too long in the pan, allowing the brown sugar mixture to harden. Let it rest for about 10–15 minutes after baking, loosen the edges with a knife, and invert while the topping is still warm.
How can I keep my cake from becoming soggy?
Drain the pineapple thoroughly, avoid adding excess liquid to the topping, measure the ingredients accurately, and bake until a toothpick inserted into the center comes out clean or with a few moist crumbs.
Can I make this cake without glacé cherries?
Yes! The cherries are optional. The cake will still look beautiful with pineapple slices alone, or you can add a few pieces of pineapple to fill the gaps.
Why is my cake dense?
Overmixing the batter, using cold ingredients, or measuring too much flour can make the cake dense. Cream the butter and sugar well, bring refrigerated ingredients to room temperature, and mix the flour in gently.
Can I use a different cake pan?
A 9-inch round cake pan works well for these quantities. A similar-sized square pan can also work, although the fruit arrangement will look different. Avoid filling the pan too deeply, and check the cake for doneness as baking time may vary.
A Beautiful Old-Fashioned Favorite! 🍍🍒
This Classic Pineapple Upside-Down Cake brings together everything we love about homemade baking: buttery vanilla cake, sweet caramelized fruit, and a gorgeous finish that makes every slice feel special.
It’s easy enough for a weekend treat yet pretty enough for celebrations, potlucks, and family gatherings. Whether you use canned pineapple for convenience or fresh pineapple for a brighter fruit flavor, the result is a wonderfully moist cake with a sweet, glossy topping.
Bake it until golden, flip it with care, and enjoy a slice of vintage-inspired pineapple perfection!