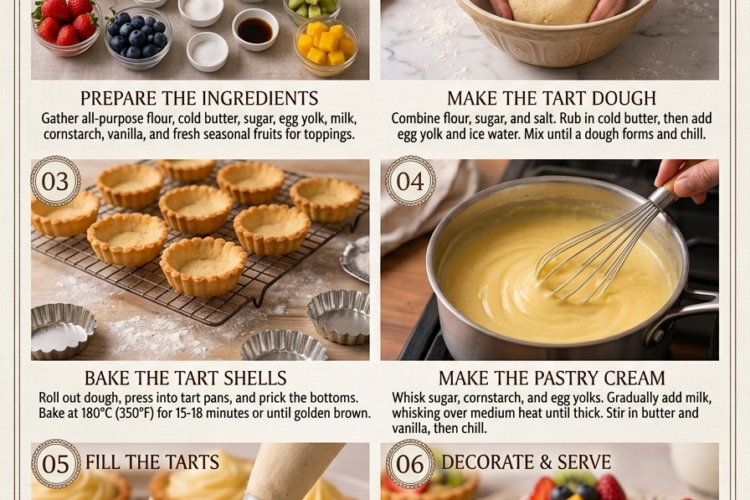
🥧 Classic Cream Tart – Buttery Pastry Crust with Silky Vanilla Cream
A Crisp, Buttery Tart Shell Filled with Luxurious Homemade Pastry Cream!
If you love elegant bakery-style desserts, this Classic Cream Tart is a must-try! It features a delicate, buttery pastry shell filled with smooth, rich vanilla pastry cream and finished with fresh fruit, chocolate curls, or a light dusting of powdered sugar.
The tart shell is wonderfully crisp and tender, while the creamy custard filling adds a luscious contrast in every bite. It’s beautiful enough for birthdays, afternoon tea, holidays, and special celebrations, yet simple enough to make at home with everyday baking ingredients.
Recipe Information
- Prep Time: 30 minutes
- Chilling Time: 1 hour 30 minutes
- Bake Time: 20–25 minutes
- Total Time: Approximately 2 hours 25 minutes
- Servings: 8
- Course: Dessert
- Cuisine: French-inspired
- Difficulty: Moderate
- Tart Pan: 9-inch (23 cm) tart pan with removable bottom
Ingredients
For the Tart Shell
- 2 cups (250 g) all-purpose flour
- ½ cup (100 g) cold unsalted butter, cut into cubes
- ¼ cup (50 g) powdered sugar
- 1 large egg yolk
- 2–3 tablespoons (30–45 ml) ice water
- ¼ teaspoon salt
For the Vanilla Pastry Cream
- 2 cups (480 ml) whole milk
- 4 large egg yolks
- ½ cup (100 g) granulated sugar
- 3 tablespoons (24 g) cornstarch
- 2 tablespoons (28 g) unsalted butter
- 2 teaspoons vanilla extract
- Pinch of salt
For Decoration (Optional)
- Fresh strawberries, blueberries, raspberries, or kiwi
- 2–3 tablespoons powdered sugar, for dusting
- Chocolate shavings or curls
- Fresh mint leaves
- A little warmed apricot jam, for glazing the fruit
Instructions
Step 1: Prepare the Tart Dough
In a large mixing bowl, combine the flour, powdered sugar, and salt.
Add the cold, cubed butter. Using your fingertips, a pastry cutter, or a food processor, work the butter into the flour until the mixture resembles coarse crumbs.
Add the egg yolk and 2 tablespoons of ice water. Mix gently until the dough begins to come together. Add the remaining water a little at a time if necessary.
The dough should hold together when pressed without feeling sticky or wet.
Tip: Avoid kneading the dough excessively. Overworking it can develop too much gluten, making the baked tart shell tough instead of tender.
Step 2: Chill the Dough
Shape the dough into a flat disc and wrap it tightly in plastic wrap.
Refrigerate for at least 30 minutes. Chilling firms the butter and makes the dough easier to roll while helping the tart shell hold its shape during baking.
Step 3: Roll and Shape the Tart Shell
Lightly flour your work surface and rolling pin.
Roll the chilled dough into a circle approximately ⅛ inch (3 mm) thick, turning it occasionally to prevent sticking.
Carefully transfer the dough to a 9-inch tart pan with a removable bottom. Gently press it into the base and sides without stretching it.
Trim the excess dough from the edges and patch any small tears with leftover pastry.
Prick the base several times with a fork to help prevent air pockets from forming.
Refrigerate the shaped shell for another 15–20 minutes while preheating the oven.
Step 4: Blind-Bake the Tart Shell
Preheat your oven to 350°F (175°C).
Line the chilled pastry shell with parchment paper and fill it with pie weights or dried beans.
Bake for approximately 15 minutes. Carefully remove the parchment and weights, then return the shell to the oven for another 5–10 minutes, until the base looks dry and the edges are lightly golden.
Remove from the oven and allow the shell to cool completely in the pan.
The pastry should be crisp and fully baked because the pastry cream will be added after baking.
Step 5: Heat the Milk for the Pastry Cream
Pour the milk into a medium saucepan and place it over medium heat.
Warm until steaming, with small bubbles beginning to appear around the edges. Do not allow it to boil vigorously.
Remove from the heat and set aside briefly.
Step 6: Whisk the Egg Yolks and Sugar
In a separate heatproof bowl, whisk together the egg yolks, granulated sugar, cornstarch, and pinch of salt until smooth, pale, and slightly thickened.
The cornstarch should be fully incorporated without dry lumps.
Step 7: Temper the Egg Mixture
Slowly pour a small amount of the hot milk into the egg mixture while whisking continuously.
Gradually add the remaining milk, whisking constantly. This process gently warms the yolks and reduces the risk of scrambling them.
Pour the mixture back into the saucepan.
Step 8: Cook Until Thick and Creamy
Place the saucepan over medium-low heat and whisk continuously, paying particular attention to the corners and bottom of the pan.
After several minutes, the mixture will begin to thicken into a smooth custard.
Once it reaches a gentle boil, continue cooking and whisking for approximately 30–60 seconds, or according to the cornstarch product’s requirements, to cook out the starchy taste.
The pastry cream should be thick enough to coat the whisk and hold soft ridges when stirred.
Remove from the heat.
Step 9: Add the Butter and Vanilla
Add the unsalted butter and vanilla extract to the hot pastry cream.
Whisk until the butter melts completely and the custard becomes smooth, glossy, and fragrant.
For an especially silky filling, strain the pastry cream through a fine-mesh sieve to remove any small lumps.
Step 10: Cool the Pastry Cream Safely
Transfer the pastry cream to a clean, shallow bowl.
Press plastic wrap directly against the surface to prevent a skin from forming. Cool briefly, then refrigerate until completely cold and thickened, approximately 1–2 hours.
For food safety, refrigerate the pastry cream promptly rather than leaving it at room temperature for an extended period.
Step 11: Fill the Tart Shell
Once the tart shell and pastry cream are both completely cool, remove the shell from the tart pan if it has a removable bottom.
Whisk the chilled pastry cream briefly until smooth and spreadable.
Spoon it into the tart shell and spread evenly with a spatula, filling the base to the edges.
Smooth the surface or create decorative swirls with the back of a spoon.
Step 12: Decorate the Tart
Arrange fresh fruit over the pastry cream in a pattern of your choice.
Try placing strawberry slices in a circle around the edge, then filling the center with blueberries and raspberries. You can also add chocolate curls or a few mint leaves for a more elegant finish.
For a glossy bakery-style appearance, gently brush the fruit with a small amount of warmed apricot jam that has been strained and allowed to cool slightly.
Dust lightly with powdered sugar just before serving, if desired.
Step 13: Chill and Serve
Refrigerate the assembled tart for 30–60 minutes to help the filling settle.
Use a sharp knife to cut it into neat slices. For the cleanest cuts, wipe the knife between slices.
Serve chilled for the best contrast between the crisp pastry shell and the silky vanilla filling.
Tips for the Perfect Cream Tart
- Keep the butter cold: Cold butter gives the tart shell its delicate, crumbly texture.
- Don’t overwork the dough: Mix only until it comes together to avoid a tough crust.
- Chill before baking: A well-chilled tart shell is less likely to shrink in the oven.
- Blind-bake thoroughly: The shell must be crisp and fully baked before adding the moist filling.
- Whisk the pastry cream constantly: This prevents lumps and keeps the custard from sticking or scorching.
- Cover the custard directly: Plastic wrap touching the surface prevents an unwanted skin from forming.
- Cool everything completely: Warm pastry cream can soften the tart shell and make the filling runny.
- Add fruit shortly before serving: This keeps the decoration fresh and attractive.
Delicious Variations
🍓 Strawberry Cream Tart
Fill the baked shell with vanilla pastry cream and arrange fresh strawberries over the top. Finish with a light apricot glaze.
🍫 Chocolate Cream Tart
Whisk 100 g chopped dark chocolate into the hot pastry cream after removing it from the heat, before adding the butter and vanilla.
🍋 Lemon Cream Tart
Add 1–2 teaspoons finely grated lemon zest to the pastry cream for a refreshing citrus note.
🍌 Banana Cream Tart
Arrange thin banana slices over the cooled shell, cover with vanilla pastry cream, and finish with whipped cream and chocolate shavings. For the best appearance, assemble shortly before serving.
🥥 Coconut Cream Tart
Replace ½ cup of the milk with coconut milk and sprinkle toasted shredded coconut over the finished tart.
☕ Coffee Cream Tart
Dissolve 1–2 teaspoons instant espresso powder in the warm milk before tempering the egg mixture for a subtle coffee flavor.
What to Serve with Cream Tart
This elegant dessert pairs beautifully with:
- Fresh berries
- A cup of coffee or cappuccino
- English breakfast tea
- Vanilla ice cream
- Fresh fruit salad
- A drizzle of chocolate sauce
For a special occasion, serve each slice with fresh raspberries and a small spoonful of whipped cream.
Make-Ahead Instructions
Tart shell: Bake the shell up to 1 day ahead. Once completely cool, store it in an airtight container at room temperature in a cool, dry place.
Pastry cream: Prepare up to 2 days ahead. Cover the surface directly and refrigerate.
Assembly: Fill the tart a few hours before serving for the best balance between a set filling and a crisp shell. Add the fruit decoration shortly before serving.
Storage Instructions
- Refrigeration: Store the assembled tart covered in the refrigerator and consume within 2–3 days for the best quality.
- Room temperature: Because pastry cream contains milk and eggs, do not leave the filled tart at room temperature for more than 2 hours.
- Freezing: Freezing the assembled tart is not recommended, as the pastry cream may separate or become watery after thawing.
- Leftovers: Return slices to the refrigerator promptly and keep them covered to prevent the filling from absorbing other food odors.
Frequently Asked Questions
Why did my tart shell shrink during baking?
The dough may have been stretched while fitting it into the pan, or it may not have chilled long enough. Press the dough gently into the pan without stretching it and chill the shaped shell before baking.
Why is my pastry cream lumpy?
The eggs may have heated too quickly, the cornstarch may not have been fully mixed in, or the custard may not have been whisked continuously. Whisk thoroughly and strain the finished cream if needed.
Why is my pastry cream too runny?
It may not have cooked long enough for the cornstarch to thicken, or it may not have chilled sufficiently. Return it to the saucepan, cook while whisking until properly thickened, then cool and refrigerate.
Can I use store-bought tart shells?
Absolutely! A fully baked 9-inch tart shell is a convenient shortcut. Allow it to cool completely before filling.
Can I make the tart without decorating it with fruit?
Yes. The vanilla pastry cream is delicious on its own. Finish the tart with powdered sugar, chocolate shavings, or a light dusting of cinnamon instead.
Can I make mini cream tarts?
Yes. Divide the dough among small tart pans and adjust the blind-baking time according to their size. Once cooled, fill each shell with pastry cream and decorate with individual berries or fruit slices.
A Beautiful Homemade Dessert! 🥧✨
This Classic Cream Tart brings together a crisp, buttery pastry shell and smooth, rich vanilla pastry cream for a dessert that feels both elegant and comforting.
Whether you decorate it with colorful fresh fruit, delicate chocolate curls, or a simple dusting of powdered sugar, it makes a beautiful centerpiece for celebrations and afternoon tea.
Bake the shell until golden, fill it with silky vanilla cream, decorate with your favorite toppings, and enjoy every delicate, creamy bite!