🍫 Chocolate Swiss Roll Cake with Whipped Cream, Chocolate Shavings & Cherries
This Chocolate Swiss Roll Cake is a beautiful, bakery-style dessert featuring a soft, cocoa-rich sponge wrapped around a cloud of fluffy vanilla whipped cream. Finished with silky whipped cream, delicate chocolate shavings, and bright cherries, this elegant chocolate roll looks impressive while remaining surprisingly simple to make at home.
Each slice reveals a lovely spiral of chocolate sponge and creamy filling, delivering the perfect balance of rich chocolate flavor and light, airy sweetness. It’s ideal for birthdays, holidays, dinner parties, afternoon tea, or any occasion that deserves a special homemade dessert.
Recipe Information
- Preparation Time: 30 minutes
- Baking Time: 10–15 minutes
- Cooling Time: 45–60 minutes
- Chilling Time: 30–60 minutes
- Total Time: Approximately 2 hours
- Servings: 8–10 slices
- Course: Dessert
- Cuisine: European-inspired
- Difficulty: Moderate
Ingredients
For the Chocolate Sponge Cake
- 1 cup all-purpose flour (125 g)
- ¼ cup unsweetened cocoa powder (25 g)
- ¾ cup granulated sugar (150 g)
- 4 large eggs, at room temperature
- ¼ cup milk (60 ml)
- 2 tablespoons vegetable oil (30 ml)
- 1 teaspoon vanilla extract (5 ml)
- 1 teaspoon baking powder (4 g)
- ¼ teaspoon salt (1 g)
For the Whipped Cream Filling and Coating
- 2 cups heavy whipping cream (480 ml), cold, with at least 35% fat
- ⅓ cup powdered sugar (40 g), sifted
- 1 teaspoon vanilla extract (5 ml)
For Decoration
- 50 g dark or milk chocolate, shaved or finely grated
- 8–10 cherries, fresh or well-drained maraschino cherries
- 1–2 tablespoons chocolate syrup, optional
- A little extra powdered sugar, optional
Instructions
Step 1: Prepare the Oven and Baking Pan
Preheat the oven to 180°C (350°F), or 170°C (340°F) for a fan-assisted oven.
Line a 10 × 15-inch (25 × 38 cm) jelly roll pan with parchment paper, ensuring the paper covers the bottom and fits neatly into the corners. Lightly grease the parchment if needed.
Using a shallow, appropriately sized pan is important because the sponge needs to bake into a thin, flexible layer that can be rolled without cracking.
Step 2: Combine the Dry Ingredients
In a medium bowl, sift together the flour, cocoa powder, baking powder, and salt.
Whisk gently to distribute the cocoa and baking powder evenly throughout the flour. Set aside.
Sifting is especially helpful for cocoa powder because it can form small lumps that are difficult to incorporate into a light sponge batter.
Step 3: Whip the Eggs and Sugar
Place the eggs and granulated sugar in a large, clean mixing bowl.
Using an electric mixer, beat on medium-high speed for approximately 5–8 minutes, until the mixture becomes pale, thick, and voluminous.
When you lift the beaters, the mixture should fall back in ribbons that remain visible on the surface for a few seconds before disappearing.
This step helps incorporate the air needed for a soft, flexible sponge, so avoid rushing it.
Step 4: Add the Milk, Oil, and Vanilla
In a small bowl, combine the milk, vegetable oil, and vanilla extract.
With the mixer on low speed, gradually add this mixture to the whipped eggs. Mix only until incorporated.
The batter may lose a little volume, which is normal. Avoid beating it for too long after adding the liquids.
Step 5: Fold in the Dry Ingredients
Add the sifted flour mixture in two or three additions.
Using a flexible spatula, gently fold the dry ingredients into the egg mixture. Move the spatula down through the center, across the bottom, and up the side of the bowl, turning the bowl as you work.
Continue just until no large streaks of dry flour remain.
Important: Do not vigorously stir or overmix the batter. Preserving the air incorporated into the eggs helps the cake remain light enough to roll.
Step 6: Spread the Batter and Bake
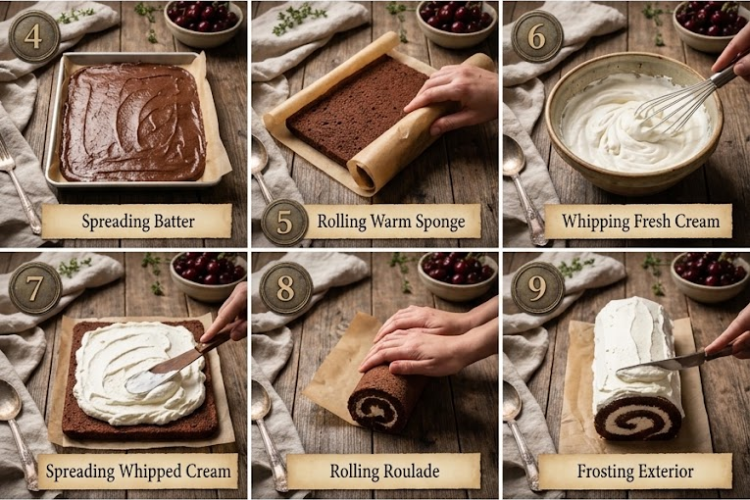
Pour the batter into the prepared pan. Spread it evenly into the corners using an offset spatula or the back of a spoon.
Bake for 10–15 minutes, checking near the end of the baking time.
The sponge is ready when the surface springs back gently when touched and a toothpick inserted into the center comes out without wet batter.
Avoid overbaking. A thin sponge that becomes too dry is much more likely to crack during rolling.
Step 7: Roll the Cake While Warm
While the cake bakes, lay a clean, dry kitchen towel on the countertop and dust it lightly with powdered sugar.
As soon as the cake comes out of the oven, carefully loosen the edges with a thin spatula or knife.
Place the prepared towel over the cake, then invert the pan so the cake rests on the towel. Carefully remove the pan and peel away the parchment paper.
Starting from one short end, gently roll the warm cake together with the towel into a loose, even spiral.
Do not roll too tightly, as this may compress the sponge or cause it to break.
Place the rolled cake seam-side down on a wire rack and leave it to cool completely, approximately 30–45 minutes. The cake will retain its rolled shape, making it easier to fill later.
Step 8: Prepare the Whipped Cream
Ensure the heavy whipping cream is thoroughly chilled. For best results, chill the mixing bowl and beaters for 10–15 minutes before whipping.
Pour the cream into the bowl and add the powdered sugar and vanilla extract.
Beat on medium speed until soft peaks form, then increase the speed slightly and continue until medium-stiff peaks form.
The whipped cream should be fluffy and hold its shape when the beaters are lifted, without becoming grainy.
Reserve approximately one-third of the whipped cream for coating and decoration. Keep it refrigerated while assembling the cake.
Step 9: Unroll and Fill the Sponge
Once the cake is completely cool, carefully unroll it on the towel. Some gentle curling is normal, but avoid forcing the sponge completely flat if it resists.
Spread the remaining whipped cream evenly over the surface, leaving a border of approximately 1–2 cm around the edges. This helps prevent the filling from squeezing out as you roll the cake.
If using maraschino cherries inside the roll, chop a few finely and pat them dry before scattering them over the cream. This is optional.
Step 10: Roll the Cake Again
Starting from the same short end used for the initial roll, gently roll the sponge around the whipped cream filling.
Use the towel to help guide the cake into a neat, even spiral, but do not roll the towel inside the finished cake this time.
Place the cake seam-side down on a serving plate or tray.
If a little filling escapes from the ends, gently remove the excess with a spatula.
Step 11: Chill Until Firm
Cover the cake loosely and refrigerate for 30–60 minutes.
Chilling helps the whipped cream firm up and allows the roll to hold its shape when sliced and decorated.
For the neatest presentation, keep the roll chilled until you are ready to add the final decoration.
Step 12: Coat and Decorate
Spread the reserved whipped cream over the top and sides of the chilled cake using an offset spatula. For a more decorative finish, create soft swirls or ridges.
Sprinkle chocolate shavings or finely grated chocolate over the coating.
Arrange the cherries along the top of the roll, spacing them evenly. Add a light drizzle of chocolate syrup if desired.
Refrigerate for another 10–15 minutes if the cream has softened during decorating.
Step 13: Slice and Serve
Use a sharp knife to cut the roll into 8–10 slices. For clean spirals, wipe the knife between cuts.
Serve chilled, or allow each slice to stand at room temperature for 5–10 minutes before serving for a softer sponge and creamier filling.
Enjoy the combination of tender chocolate cake, fluffy vanilla cream, chocolate shavings, and juicy cherries.
Chef’s Tips for the Perfect Chocolate Swiss Roll
- Beat the eggs thoroughly: Whipping the eggs and sugar until thick and pale is essential for a light sponge.
- Use the correct pan size: A pan that is too small creates a thicker sponge that is more difficult to roll.
- Avoid overbaking: The sponge should spring back gently and remain flexible. Even a few extra minutes in the oven can dry it out.
- Roll while the cake is warm: Rolling the sponge before it cools helps it adapt to the spiral shape with less cracking.
- Cool before adding the cream: Filling a warm cake will melt the whipped cream.
- Keep the whipping cream cold: Cold cream whips more easily and holds its shape better.
- Do not overfill: A thick layer of filling may squeeze out and make the cake difficult to roll neatly.
- Pat wet cherries dry: Excess moisture can soften the sponge and loosen the whipped cream.
- Chill before slicing: A short refrigeration period helps the spiral stay defined and produces cleaner slices.
Delicious Variations
Chocolate Ganache Swiss Roll
Replace some of the outer whipped cream coating with cooled chocolate ganache for a richer, more decadent finish.
Black Forest Swiss Roll
Add well-drained chopped cherries to the whipped cream filling and decorate with dark chocolate shavings and cherries for a Black Forest-inspired dessert.
Chocolate Strawberry Swiss Roll
Spread a thin layer of strawberry jam over the sponge before adding the whipped cream. Decorate with fresh strawberries and chocolate curls just before serving.
Mocha Swiss Roll
Add 1 teaspoon of instant espresso powder to the dry ingredients for a subtle coffee flavor that complements the chocolate.
Cookies and Cream Swiss Roll
Fold 5–6 finely crushed chocolate sandwich cookies into the whipped cream filling for an extra crunchy, cookies-and-cream variation.
Chocolate Hazelnut Swiss Roll
Spread a thin layer of chocolate-hazelnut spread over the cooled sponge before adding the whipped cream. Finish with chopped toasted hazelnuts.
Make-Ahead Instructions
The sponge can be baked and rolled in its clean kitchen towel a day ahead. Once completely cool, wrap it securely and refrigerate until ready to fill.
The assembled, undecorated roll can also be prepared several hours ahead and kept covered in the refrigerator.
For the freshest appearance, add the chocolate shavings and cherries shortly before serving. Fresh fruit toppings are best added close to serving time.
Storage Instructions
Refrigerator: Store the finished Swiss roll in an airtight container or covered cake carrier in the refrigerator for up to 3 days. Because the filling contains whipped cream, keep the cake refrigerated when not serving.
Freezing: The unfilled sponge can be wrapped tightly and frozen for up to 2 months for best quality. Thaw it in the refrigerator before filling. A fully assembled whipped cream roll can also be frozen, although the cream’s texture may change slightly after thawing.
Thawing: Thaw frozen portions in the refrigerator until soft enough to slice. Add fresh cherries or other delicate decorations after thawing.
Serving tip: Avoid leaving the whipped cream-filled cake at room temperature for extended periods, especially in warm weather.
Frequently Asked Questions
Why did my Swiss roll cake crack?
The sponge may have been overbaked, rolled after it had cooled completely, or handled too roughly. Bake only until just set and roll the cake while it is still warm. Small cracks can be covered with whipped cream and chocolate shavings.
Can I make the sponge without baking powder?
The whipped eggs provide much of the lift, but the recipe includes baking powder for added support. Omitting it may produce a slightly denser sponge.
Can I use store-bought whipped topping?
Yes. Thawed whipped topping can be used in place of the homemade whipped cream. Follow the package instructions and keep the cake refrigerated.
How do I stop the cream from squeezing out?
Avoid spreading the cream all the way to the edges, use medium-stiff whipped cream, and roll the cake gently without compressing it too tightly.
Can I decorate the cake with fresh cherries?
Absolutely. Fresh cherries provide a beautiful finish when in season. Wash them, dry them thoroughly, and remove any pits before serving if they will be eaten whole.
How do I get a neat spiral when slicing?
Roll the sponge evenly, use a filling that is firm enough to hold its shape, chill the assembled cake, and wipe a sharp knife clean between slices.
Serving Suggestions
Serve this Chocolate Swiss Roll Cake with a cup of coffee, cappuccino, hot chocolate, or a glass of cold milk.
For an elegant dessert plate, add a few fresh cherries, a small drizzle of chocolate sauce, and a light dusting of cocoa powder. It also makes a lovely centerpiece for holiday dessert tables, birthday celebrations, and afternoon tea.
Final Result
This Chocolate Swiss Roll Cake combines a soft, airy chocolate sponge with fluffy vanilla whipped cream and a beautiful spiral that looks impressive on any dessert table. Finished with chocolate shavings and cherries, every slice offers a delicious balance of rich cocoa, creamy sweetness, and fruity freshness.
The secret to success: whip the eggs until thick and pale, avoid overbaking, roll the sponge while warm, and let the filled cake chill before decorating and slicing. The result is a beautiful homemade Swiss roll that tastes as wonderful as it looks.