🍫 Chocolate-Dipped Butter Cookies
These Chocolate-Dipped Butter Cookies are crisp around the edges, tender in the center, and wonderfully rich with buttery vanilla flavor. Each cookie is dipped into silky melted chocolate, creating the perfect balance of sweet, delicate biscuit and decadent chocolate.
They’re easy to make with everyday baking ingredients and look beautiful on holiday cookie trays, dessert platters, afternoon tea tables, or in homemade gift boxes.
Recipe Information
- Prep Time: 25 minutes
- Chilling Time: 20–30 minutes
- Bake Time: 12–16 minutes
- Chocolate Setting Time: 30–45 minutes
- Total Time: About 1 hour 45 minutes
- Yield: 24–30 cookies
- Difficulty: Easy
- Method: Oven-baked and chocolate-dipped
Ingredients
For the Butter Cookies
- 2 cups (250 g) all-purpose flour
- 1 cup (227 g) unsalted butter, softened
- ½ cup (60 g) icing sugar, sifted
- ¼ cup (30 g) cornflour (cornstarch)
- 1 large egg, at room temperature
- 1 teaspoon (5 ml) vanilla extract
- ½ teaspoon (2 g) baking powder
- ¼ teaspoon (1 g) salt
For the Chocolate Coating
- 200 g milk chocolate or dark chocolate, chopped
- 1 teaspoon (5 ml) vegetable oil, optional, for a smoother coating
Optional Decorations
- White chocolate, melted, for drizzling
- Finely chopped nuts
- Chocolate sprinkles
- Toasted coconut
- Crushed cookies
Instructions
1. Prepare the Oven and Baking Trays
Preheat your oven to 350°F (175°C).
Line two baking trays with parchment paper or silicone baking mats.
Set aside.
2. Combine the Dry Ingredients
In a medium bowl, whisk together the all-purpose flour, cornflour, baking powder, and salt.
Mix thoroughly to distribute the baking powder and salt evenly, then set aside.
3. Cream the Butter and Icing Sugar
Place the softened butter in a large mixing bowl.
Beat with a hand mixer or stand mixer on medium speed for approximately 2 minutes, until smooth and creamy.
Add the sifted icing sugar and beat for another 2–3 minutes, until light and fluffy.
Scrape down the sides of the bowl as needed.
4. Add the Egg and Vanilla
Add the egg and vanilla extract to the butter mixture.
Beat until fully combined and smooth.
If the mixture looks slightly curdled, don’t worry; the flour mixture will help bring the dough together.
5. Make the Cookie Dough
Gradually add the dry ingredients to the butter mixture.
Mix on low speed until a soft dough forms.
Stop mixing as soon as there are no dry flour streaks. Overmixing can make the cookies less tender.
The dough should be soft enough to shape but not greasy or excessively sticky.
6. Shape the Cookies
Choose your preferred shape:
Round cookies: Roll tablespoon-sized portions of dough into balls and gently flatten them.
Fork-pattern cookies: Flatten each ball slightly with a fork to create a simple decorative pattern.
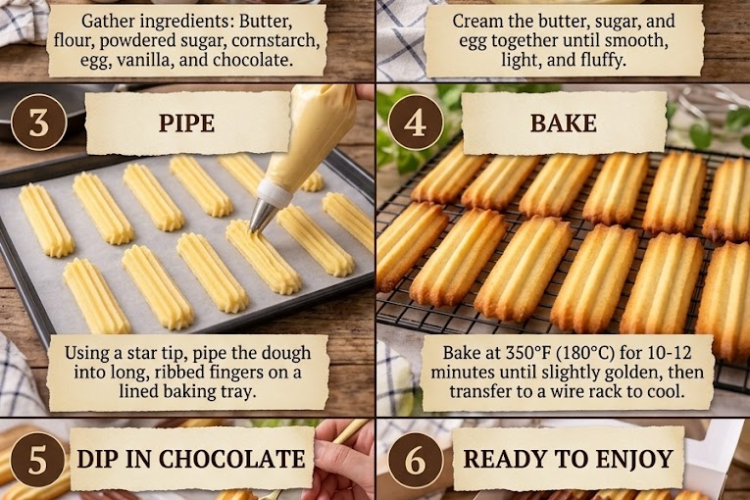
Piped butter cookies: Transfer the dough to a sturdy piping bag fitted with a large star tip and pipe small rosettes or swirls. If the dough is too firm to pipe, let it soften slightly at room temperature rather than adding extra liquid.
Arrange the cookies on the prepared baking trays, leaving about 1 inch (2–3 cm) between them.
7. Chill the Shaped Cookies
Place the trays in the refrigerator for 20–30 minutes.
Chilling helps the butter firm up and reduces spreading during baking, so the cookies retain their shape.
8. Bake the Cookies
Bake for 12–16 minutes, depending on the thickness and shape.
The cookies are ready when the edges are lightly golden and the centers look set. They should remain mostly pale rather than deeply browned.
If baking two trays at once, rotate their positions halfway through if your oven heats unevenly.
9. Cool Completely
Remove the cookies from the oven and allow them to rest on the trays for 5 minutes.
Carefully transfer them to a wire rack and let them cool completely before dipping.
Important: Warm cookies can cause the chocolate coating to slide off or become streaky.
10. Melt the Chocolate
Place the chopped chocolate in a clean, dry, heatproof bowl.
Microwave method: Heat in 20-second intervals, stirring well after each interval, until the chocolate is smooth.
Double-boiler method: Set the bowl over a saucepan of gently simmering water, ensuring the bottom of the bowl does not touch the water. Stir until melted and smooth.
If desired, stir in the vegetable oil to make the coating easier to dip and slightly more fluid.
Avoid allowing water or steam to enter the chocolate, as this can cause it to seize.
11. Dip the Cookies
Line a tray with fresh parchment paper.
Dip one end or half of each cooled cookie into the melted chocolate.
Allow excess chocolate to drip back into the bowl, then place the cookie on the lined tray.
For a more decorative finish, dip the cookies diagonally or coat one entire side.
12. Decorate
While the chocolate is still wet, sprinkle the dipped portion with chopped nuts, toasted coconut, or chocolate sprinkles if desired.
For an elegant finish, drizzle the cookies with melted white chocolate after the first coating has set.
13. Let the Chocolate Set
Allow the cookies to stand at cool room temperature until the chocolate coating firms up, usually 30–45 minutes.
If your kitchen is warm, refrigerate the tray for 10–15 minutes to help the chocolate set.
Once firm, carefully transfer the cookies to a serving plate or airtight container.
14. Serve
Arrange the Chocolate-Dipped Butter Cookies on a platter and serve with coffee, tea, hot chocolate, or a cold glass of milk.
They’re particularly lovely when packed into decorative tins for homemade gifts.
Chef’s Tips
- Use properly softened butter: It should be easy to press but not melted.
- Measure the flour accurately: Too much flour can make the cookies dry and difficult to shape.
- Don’t skip the cornflour: It helps create a delicate, tender texture.
- Chill before baking: This helps the cookies hold their shape.
- Let cookies cool completely: Dipping warm cookies can cause the chocolate to melt unevenly.
- Use good-quality chocolate: Better chocolate produces a smoother coating and richer flavor.
- Keep the chocolate dry: Even a small amount of water can make melted chocolate thick and grainy.
- Don’t overbake: The cookies should be lightly golden at the edges, not dark brown.
- Dip when the chocolate is fluid: If it thickens while working, warm it briefly and stir again.
Delicious Variations
Dark Chocolate Butter Cookies
Use dark chocolate with a higher cocoa percentage for a less-sweet, more intense chocolate finish.
White Chocolate-Dipped Cookies
Replace the milk or dark chocolate with white chocolate for a sweeter, creamy coating.
Chocolate and Almond Cookies
Sprinkle finely chopped toasted almonds over the wet chocolate coating.
Coconut Chocolate Cookies
Roll the freshly dipped chocolate portion in toasted shredded coconut.
Orange Chocolate Butter Cookies
Add 1 teaspoon finely grated orange zest to the dough for a bright citrus note that pairs beautifully with dark chocolate.
Coffee Chocolate Cookies
Add ½ teaspoon instant espresso powder to the melted chocolate for a subtle mocha flavor.
Double Chocolate Drizzle
Dip the cookies in milk chocolate, allow the coating to set, then drizzle with dark or white chocolate in thin decorative lines.
Make-Ahead Instructions
The cookie dough can be prepared up to 2 days ahead and stored tightly covered in the refrigerator.
Let it soften slightly before shaping if it becomes too firm.
You can also shape the cookies and refrigerate them on their trays before baking.
For the freshest appearance, dip the cookies after baking and cooling.
Storage
Store completely cooled cookies in an airtight container at room temperature for up to 5–7 days, provided the room is cool and dry.
Place parchment paper between layers to protect the chocolate coating.
If your kitchen is particularly warm, refrigerate the cookies in a sealed container. Allow them to sit briefly at room temperature before serving.
Freezing
For best results, freeze the baked, undipped cookies in an airtight container for up to 2 months.
Thaw completely before dipping in melted chocolate.
Chocolate-dipped cookies can also be frozen, but condensation during thawing may affect the coating’s appearance.
Serving Suggestions
Serve these buttery chocolate-dipped cookies with:
- Coffee or cappuccino
- Black tea or Earl Grey
- Hot chocolate
- Cold milk
- Vanilla ice cream
- Fresh strawberries
- A mixed dessert platter
They’re also perfect for Christmas cookie boxes, birthdays, baby showers, afternoon tea, and homemade edible gifts.
Final Result
Beautiful Chocolate-Dipped Butter Cookies with a tender, delicate crumb, rich buttery vanilla flavor, and a smooth chocolate coating that adds just the right amount of indulgence. Simple, elegant, and wonderfully versatile, they’re the kind of homemade cookies that look as good as they taste.