🍪 Chocolate-Covered Sandwich Cookies
Rich Chocolate Cookies, Sweet Creamy Filling, and a Smooth Chocolate Coating!
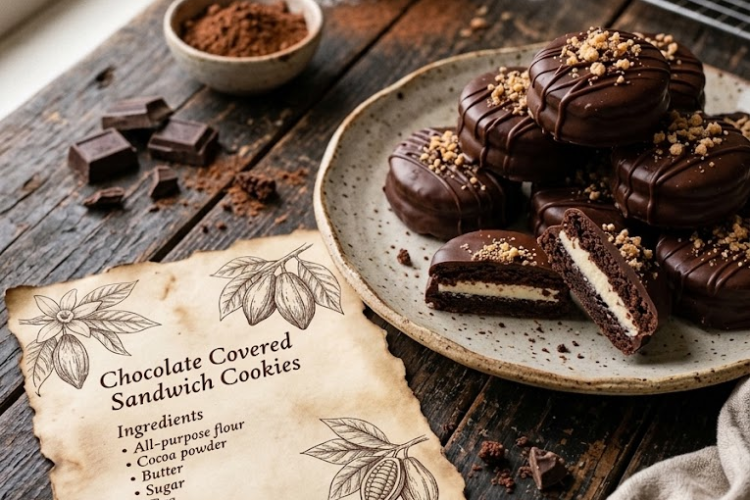
These homemade Chocolate-Covered Sandwich Cookies are the ultimate treat for chocolate lovers! Crisp, buttery chocolate cookies are sandwiched together with a fluffy vanilla cream filling, then dipped in melted chocolate for a beautiful, bakery-style finish.
Each bite combines deep cocoa flavor, a sweet, creamy center, and a satisfying chocolate shell. They look elegant enough for holiday cookie trays, birthdays, parties, and edible gifts, yet they’re made with simple baking ingredients you probably already have in your kitchen.
The best part? You can customize the filling, chocolate coating, and decorations to make them your own!
Recipe Information
- Prep Time: 30 minutes
- Chilling Time: 30 minutes
- Bake Time: 8–10 minutes per batch
- Setting Time: 20–30 minutes
- Total Time: Approximately 1 hour 30 minutes
- Yield: 20–24 sandwich cookies, depending on cookie size
- Course: Dessert, Cookies
- Difficulty: Moderate
- Oven Temperature: 350°F (175°C)
Ingredients
For the Chocolate Cookies
- 2 cups (250 g) all-purpose flour
- ½ cup (45–50 g) unsweetened cocoa powder
- ¾ cup (150 g) granulated sugar
- ¾ cup (170 g) unsalted butter, softened
- 1 large egg
- 1 teaspoon vanilla extract
- 1 teaspoon baking powder
- ¼ teaspoon salt
For the Creamy Vanilla Filling
- ½ cup (113 g) unsalted butter, softened
- 2 cups (240 g) powdered sugar, sifted
- 1 teaspoon vanilla extract
- 1–2 tablespoons milk or heavy cream, as needed
For the Chocolate Coating
- 12 oz (340 g) semi-sweet or milk chocolate, chopped or in melting wafers
- 1 teaspoon coconut oil or neutral vegetable oil, optional, for a smoother coating
Optional Decorations
- White chocolate, melted, for drizzling
- Chocolate sprinkles
- Crushed cookies
- Colored sprinkles
- A small pinch of flaky sea salt
Instructions
Step 1: Prepare the Oven and Baking Sheets
Preheat your oven to 350°F (175°C).
Line two baking sheets with parchment paper. This prevents the cookies from sticking and makes it easier to transfer them after baking.
If your kitchen is warm, keep some space in the refrigerator available for chilling the cookie dough before rolling.
Step 2: Combine the Dry Ingredients
In a medium bowl, whisk together the flour, cocoa powder, baking powder, and salt until evenly combined.
Sifting the cocoa powder is helpful if it contains lumps. Set the bowl aside.
Step 3: Cream the Butter and Sugar
In a large mixing bowl, beat the softened butter and granulated sugar with an electric mixer for about 2–3 minutes, until the mixture becomes smooth and creamy.
Add the egg and vanilla extract. Beat again until everything is well incorporated, scraping down the sides of the bowl as needed.
The mixture should look smooth, with no large streaks of butter remaining.
Step 4: Make the Chocolate Cookie Dough
Add the dry ingredients to the butter mixture in two or three additions. Mix on low speed, or stir with a sturdy spatula, until a soft dough forms.
Avoid overmixing once the flour has been added, as too much mixing can make the cookies tough.
The dough should be soft enough to roll but not excessively sticky. If it feels too soft to handle, cover and refrigerate it for 20–30 minutes.
Step 5: Roll and Cut the Cookies
Place the dough between two sheets of parchment paper and roll it to approximately ⅛ inch (3 mm) thick.
Remove the top sheet and cut the dough into circles using a round cookie cutter, approximately 2 inches (5 cm) in diameter.
Gather the scraps, gently re-roll them, and cut more cookies. Try to make an even number of cookies so each one has a matching partner.
Transfer the cutouts to the prepared baking sheets, leaving about 1 inch (2.5 cm) between them.
For especially neat cookies, refrigerate the cutouts for another 10 minutes before baking.
Step 6: Bake the Chocolate Cookies
Bake for 8–10 minutes, depending on their size and thickness.
The cookies should look set around the edges, while the centers may still feel slightly soft. They will become firmer as they cool, so avoid overbaking them.
Remove the baking sheets from the oven and let the cookies rest on the trays for about 5 minutes. Transfer them carefully to a wire rack and allow them to cool completely before filling.
Important: Do not add the cream filling while the cookies are warm, as it may melt and slide out.
Step 7: Prepare the Vanilla Cream Filling
Place the softened butter in a mixing bowl and beat until smooth and creamy, about 1–2 minutes.
Gradually add the sifted powdered sugar, mixing on low speed at first to avoid a cloud of sugar. Once incorporated, add the vanilla extract.
Beat until the filling is fluffy. Add milk or heavy cream one teaspoon at a time until it reaches a smooth, pipeable consistency.
If the filling becomes too soft, add a little more powdered sugar or refrigerate it briefly.
Step 8: Assemble the Sandwich Cookies
Pair the cooled cookies by size.
Spread or pipe a small amount of vanilla filling onto the flat side of half the cookies, leaving a narrow border around the edge.
Place a matching cookie on top of each filled cookie and press very gently until the filling reaches the edges without squeezing out excessively.
Arrange the assembled sandwich cookies on a tray and refrigerate for 15–20 minutes to help the filling firm up before dipping.
Step 9: Melt the Chocolate Coating
Place the chopped chocolate in a microwave-safe bowl. Microwave in 20-second intervals, stirring thoroughly after each interval, until the chocolate is mostly melted and smooth.
Stir in the optional coconut or vegetable oil if you’d like a slightly thinner coating.
Alternatively, melt the chocolate in a heatproof bowl set over a saucepan of gently simmering water. Make sure the bottom of the bowl does not touch the water, and keep water and steam away from the chocolate.
Allow the melted chocolate to cool slightly if it feels very hot. It should remain fluid enough for dipping.
Step 10: Dip the Sandwich Cookies
Line a tray with fresh parchment paper.
Using a fork or dipping tool, lower each chilled sandwich cookie into the melted chocolate. Turn it gently to coat it completely, or dip only half for a decorative finish.
Lift the cookie out and allow the excess chocolate to drip back into the bowl. Gently tap the fork against the side of the bowl if needed.
Place the coated cookie on the prepared tray. Repeat with the remaining sandwich cookies.
If the chocolate begins to thicken while dipping, warm it briefly and stir until fluid again.
Step 11: Decorate the Cookies
While the chocolate coating is still wet, add sprinkles, crushed cookies, or a tiny pinch of flaky sea salt.
For a more elegant finish, let the chocolate coating firm up first, then drizzle the cookies with melted white chocolate using a spoon or piping bag.
Refrigerate the tray for approximately 20–30 minutes, or until the chocolate shell has fully set.
Step 12: Serve and Enjoy
Once the coating has hardened, arrange the cookies on a serving plate or package them in a decorative box for gifting.
Allow refrigerated cookies to sit at room temperature briefly before serving for the best flavor and texture, while keeping them within safe storage conditions.
Enjoy the delicious combination of crisp chocolate cookies, sweet vanilla cream, and a rich chocolate shell!
Tips for Perfect Chocolate-Covered Sandwich Cookies
- Measure the flour carefully: Too much flour can make the dough dry and the cookies difficult to roll. Weighing the ingredients gives the most consistent results.
- Chill the dough if needed: Cooler dough is easier to roll and helps the cookies keep their shape.
- Roll evenly: Uniform thickness ensures the cookies bake at the same rate.
- Cool completely before filling: Warm cookies can cause the buttercream to soften or melt.
- Make the filling pipeable: Add the milk or cream gradually so the center stays firm enough to hold its shape.
- Chill before dipping: A firm filling helps prevent the sandwich cookies from separating in the melted chocolate.
- Keep the chocolate dry: Even a small amount of water can cause melted chocolate to seize and become grainy.
- Let excess coating drip away: This creates a smoother finish without thick pools of chocolate underneath.
Delicious Variations
🍫 Double Chocolate Sandwich Cookies
Use dark chocolate for the outer coating and add 2 tablespoons of melted, cooled chocolate to the vanilla filling for an extra-rich center.
🤍 White Chocolate-Covered Cookies
Dip the sandwich cookies in melted white chocolate and decorate with chocolate sprinkles or finely crushed chocolate cookies.
🍓 Strawberry Cream Filling
Replace the vanilla filling with a strawberry-flavored buttercream. Use a small amount of freeze-dried strawberry powder for concentrated flavor without adding too much moisture.
🥜 Chocolate Peanut Butter Cookies
Replace part of the butter in the filling with 2–3 tablespoons of smooth peanut butter. Add a drizzle of melted chocolate and chopped peanuts for decoration.
☕ Mocha Sandwich Cookies
Add ½ teaspoon instant espresso powder to the dry cookie ingredients for a deeper, coffee-chocolate flavor.
🎄 Holiday Chocolate Cookies
Decorate the chocolate coating with festive sprinkles, crushed peppermint candy, or colored white-chocolate drizzle.
Make-Ahead Instructions
Cookie dough: Prepare the dough up to 2 days ahead and store it tightly wrapped in the refrigerator. Let it soften slightly before rolling if it becomes very firm.
Baked cookies: Bake the cookies and allow them to cool completely. Store them in an airtight container until ready to fill.
Assembled cookies: Fill the cookies and refrigerate them briefly before dipping. For the neatest finish, coat and decorate them on the day you plan to serve them.
Storage Instructions
- At room temperature: If the filling is a standard buttercream made without perishable additions, the cookies may be kept in a cool environment for a short period. For longer storage, refrigeration is preferable, particularly in warm weather.
- Refrigerator: Store the finished cookies in an airtight container for up to 5 days. Separate layers with parchment paper to protect the chocolate coating.
- Freezer: Freeze the assembled, chocolate-coated cookies in a freezer-safe container for up to 2 months for best quality. Thaw in the refrigerator before serving.
- Serving tip: When moving chilled cookies to room temperature, allow them to warm gradually in a covered container to help minimize condensation on the chocolate shell.
Frequently Asked Questions
Why are my chocolate cookies too hard?
They may have been overbaked or rolled too thinly. Remove them when the edges are set and allow them to finish firming as they cool.
Why is my sandwich filling too soft?
The butter may have been too warm, or too much milk or cream may have been added. Beat in additional powdered sugar a little at a time, then chill the filling until firm enough to pipe.
Why did my melted chocolate become thick and grainy?
Chocolate can seize when exposed to water or steam, or become overheated. Use completely dry utensils and melt the chocolate gradually, stirring frequently.
Can I use store-bought chocolate cookies?
Yes. If you’re short on time, use ready-made chocolate cookies and sandwich them with the homemade filling before dipping them in melted chocolate.
Can I make the filling chocolate-flavored?
Absolutely. Beat 2 tablespoons of sifted cocoa powder into the filling, adding a little extra milk if necessary to maintain a smooth consistency.
Can I skip the outer chocolate coating?
Yes! The chocolate cookies and vanilla cream are delicious on their own. Simply assemble the sandwich cookies, chill until firm, and serve without dipping.
A Chocolate Lover’s Dream! 🍪🍫
These Chocolate-Covered Sandwich Cookies turn simple baking ingredients into an elegant homemade treat. Crisp cocoa cookies, fluffy vanilla cream, and a smooth chocolate shell make every bite rich, satisfying, and wonderfully indulgent.
They’re perfect for sharing, gifting, holiday baking, or keeping a special dessert ready in the refrigerator.
Bake the cookies, sandwich them with creamy filling, dip them in chocolate, and enjoy your very own bakery-style chocolate treat!