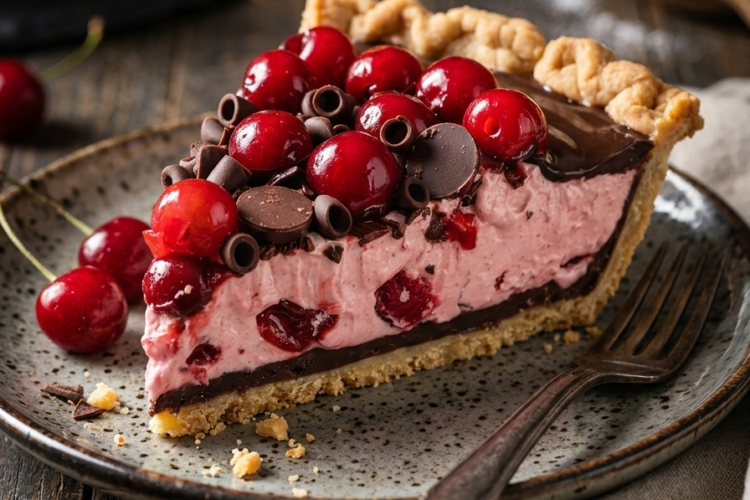
🍒🍫 Chocolate Cherry Pie – A Slice of Pure Dessert Magic!
Rich Chocolate, Creamy Cheesecake Filling, Sweet Cherries, and Fluffy Whipped Topping!
If you love the irresistible combination of chocolate and cherries, this Chocolate Cherry Pie is about to become your new favorite dessert! It starts with a crunchy chocolate pie crust, followed by a smooth cream cheese filling folded with fluffy whipped topping and chocolate chips. A generous layer of glossy cherry pie filling adds fruity sweetness, creating a beautiful dessert that tastes as wonderful as it looks.
Best of all, there’s no baking required if you use a ready-made chocolate pie crust! Simply prepare the creamy filling, layer everything together, and let the refrigerator do the work.
Perfect for holidays, potlucks, birthdays, Valentine’s Day, or whenever you’re craving a rich, refreshing dessert that’s easy to share.
Recipe Information
- Prep Time: 20 minutes
- Cooking Time: None
- Chilling Time: 4–6 hours
- Total Time: Approximately 4 hours 20 minutes
- Servings: 8
- Course: Dessert, Pie
- Difficulty: Easy
- Method: No-bake
- Pan Size: One 9-inch pie crust
Ingredients
For the Chocolate Cherry Pie
- 1 prepared 9-inch chocolate pie crust
- 8 oz (226 g) cream cheese, softened
- 1 cup (120 g) powdered sugar, sifted
- 1 can (21 oz / 595 g) cherry pie filling
- 1 container (8 oz / 227 g) Cool Whip, thawed
- 1½ cups semi-sweet mini chocolate chips, divided
For Decoration
- Extra Cool Whip, for topping
- Maraschino cherries, optional
- Extra mini chocolate chips or chocolate shavings, optional
- Chocolate syrup, optional
Instructions
Step 1: Prepare the Pie Crust
Place the prepared 9-inch chocolate pie crust on a stable serving plate or keep it in its original pie dish.
If using a ready-made no-bake chocolate cookie crust, there’s no need to bake it. If you’ve prepared a homemade crust, make sure it is completely cooled before adding the filling.
For a firmer base, refrigerate the crust for 10–15 minutes while preparing the cream cheese mixture.
Step 2: Beat the Cream Cheese
Place the softened cream cheese in a large mixing bowl.
Using an electric mixer, beat on medium speed for approximately 2 minutes, until smooth, creamy, and free of lumps.
Scrape down the sides and bottom of the bowl as needed to ensure the cream cheese is evenly blended.
Tip: Let the cream cheese soften at room temperature before mixing, but don’t allow it to become warm or runny.
Step 3: Add the Powdered Sugar
Gradually add the powdered sugar to the cream cheese, mixing on low speed at first to avoid a cloud of sugar.
Once incorporated, increase the mixer speed slightly and beat until the mixture is smooth and fluffy.
The filling should be thick, creamy, and evenly sweetened.
Step 4: Fold in the Cool Whip
Add the thawed Cool Whip to the cream cheese mixture in two additions.
Using a silicone spatula, gently fold until the mixture becomes light, airy, and uniform. Avoid vigorous stirring, which can deflate the whipped topping and make the filling too soft.
Step 5: Add the Chocolate Chips
Measure out 1 cup of the mini chocolate chips and gently fold them into the cream cheese filling.
Distribute the chips evenly so every slice contains little bites of chocolate.
Reserve the remaining ½ cup for decorating the top of the pie.
Step 6: Fill the Chocolate Pie Crust
Spoon the chocolate chip cream cheese mixture into the prepared crust.
Spread it evenly with a spatula, reaching the edges and smoothing the surface.
Work gently so the crust remains intact and the filling forms a level layer.
Step 7: Add the Cherry Pie Filling
Spoon the cherry pie filling over the cream cheese layer.
Spread the cherries and their thick sauce evenly across the top, leaving a narrow border around the edge if you want the creamy filling to remain visible.
For the neatest presentation, avoid pouring excess watery liquid into the pie. The cherry filling should be thick enough to sit on top of the cream cheese layer.
Step 8: Decorate the Pie
Sprinkle the remaining ½ cup of mini chocolate chips over the cherry topping.
Add decorative swirls of extra Cool Whip around the edge, then place maraschino cherries on top if desired.
For a bakery-style finish, drizzle a little chocolate syrup over the whipped topping or scatter chocolate shavings across the center.
Step 9: Chill Until Firm
Cover the pie carefully without pressing the covering against the topping.
Refrigerate for at least 4–6 hours, preferably overnight. This allows the cream cheese layer to firm up and the flavors to blend together.
For clean slices, make sure the pie is thoroughly chilled before cutting.
Step 10: Slice and Serve
Use a sharp knife to cut the pie into 8 slices, wiping the blade between cuts to keep the layers neat.
Serve chilled, making sure each slice includes chocolate crust, creamy chocolate-chip filling, and sweet cherry topping.
Enjoy a beautiful combination of rich chocolate, fluffy cream, and juicy cherries in every bite!
Tips for the Best Chocolate Cherry Pie
- Use softened cream cheese: This is essential for a smooth, lump-free filling.
- Thaw the Cool Whip completely: Make sure it is thawed in the refrigerator and still cold before folding it into the cream cheese.
- Fold gently: Gentle folding preserves the airy texture of the filling.
- Use mini chocolate chips: Their small size makes them easier to distribute throughout the filling and creates a pleasant chocolate crunch.
- Keep the cherry layer thick: Excess liquid can run into the cream cheese layer and make the pie difficult to slice.
- Chill thoroughly: The filling needs several hours to set properly.
- Decorate shortly before serving: Add extra whipped topping and delicate garnishes near serving time for the freshest appearance.
- Slice with a warm knife: Dip a knife in warm water, wipe it dry, and cut for cleaner layers.
Delicious Variations
🍫 Double Chocolate Cherry Pie
Replace part of the chocolate chips with dark chocolate shavings and drizzle melted chocolate over the finished pie.
🍒 Chocolate Cherry Cheesecake Pie
Add ½ teaspoon vanilla extract to the cream cheese mixture for a classic cheesecake-inspired flavor.
🤍 White Chocolate Cherry Pie
Replace ½ cup of the semi-sweet mini chocolate chips with white chocolate chips for a sweeter, creamier flavor contrast.
🍓 Mixed Berry Chocolate Pie
Replace the cherry pie filling with strawberry or mixed berry pie filling for a fruity variation.
🌰 Chocolate Cherry Crunch Pie
Sprinkle ¼ cup finely chopped toasted pecans over the topping for extra crunch and nutty flavor.
❤️ Valentine’s Chocolate Cherry Pie
Decorate the top with whipped cream rosettes, maraschino cherries, and heart-shaped chocolate decorations for a romantic presentation.
What to Serve with Chocolate Cherry Pie
This pie is wonderfully rich on its own, but it also pairs beautifully with:
- Fresh cherries or strawberries
- Hot coffee or espresso
- A glass of cold milk
- Vanilla ice cream
- Dark chocolate curls
- A small bowl of fresh berries
For a special dessert plate, serve a chilled slice with a small scoop of vanilla ice cream and a drizzle of chocolate sauce.
Make-Ahead Instructions
This Chocolate Cherry Pie is ideal for preparing ahead of a gathering.
Prepare the day before: Assemble the pie, cover it, and refrigerate overnight. The extra chilling time helps the filling firm up and makes the pie easier to slice.
Decorate later: For the freshest presentation, add extra whipped topping, maraschino cherries, and delicate chocolate decorations shortly before serving.
Transporting the pie: Keep it in a covered pie carrier and transport it in a cooler with ice packs if it will be outside the refrigerator for any significant period.
Storage Instructions
- Refrigerator: Store the covered pie in the refrigerator for up to 3–4 days for best quality.
- Room temperature: Because the pie contains cream cheese and whipped topping, do not leave it at room temperature for more than 2 hours.
- Freezing: Freezing is not ideal because the whipped topping and cherry filling may change texture after thawing. If freezing, wrap individual slices carefully and use within about 1 month for best quality.
- Serving: Return leftover slices to the refrigerator promptly and keep them covered.
Frequently Asked Questions
Can I use homemade chocolate pie crust?
Absolutely! A homemade chocolate cookie crust works beautifully. Make sure it is fully cooled before adding the filling.
Can I use homemade whipped cream instead of Cool Whip?
Yes. Use approximately 2 cups of prepared, firmly whipped cream in place of the 8 oz container of Cool Whip. Whip it until it holds its shape, then fold it gently into the cream cheese mixture. The finished pie may be softer, so allow plenty of chilling time.
Why is my pie filling too soft?
The cream cheese may have been too warm, the whipped topping may not have been fully thawed and cold, or the pie may need more chilling time. Refrigerate overnight before slicing.
Can I use fresh cherries instead of canned cherry pie filling?
Yes, but fresh cherries need to be cooked into a thick filling first. Simmer pitted cherries with sugar and a suitable thickener until glossy, then cool completely before spreading them over the cream cheese layer.
How can I make the pie less sweet?
Use dark chocolate chips and choose a less-sweet cherry filling if available. You can also reduce the powdered sugar slightly, though this may make the cream cheese layer a little softer.
Can I make this pie in individual cups?
Yes! Layer chocolate cookie crumbs, the cream cheese filling, and cherry topping in small dessert glasses. Chill them until firm for attractive individual servings.
A Slice of Pure Dessert Magic! 🍒🍫
This Chocolate Cherry Pie combines everything dessert lovers crave: a chocolate cookie crust, fluffy cream cheese filling, mini chocolate chips, and a glossy layer of sweet cherries.
It’s simple to assemble, beautiful to serve, and perfect for celebrations when you want an impressive dessert without turning on the oven.
Layer it, chill it, decorate it with chocolate and cherries, and enjoy every creamy, chocolatey, fruit-filled bite! ❤️