🍮 Caramel Custard Pudding
A silky, creamy baked custard topped with a beautiful layer of golden caramel sauce.
Caramel Custard Pudding is a timeless dessert made with a smooth mixture of eggs, sweetened condensed milk, evaporated milk, and vanilla. As the pudding bakes, it develops a delicate, creamy texture. Once chilled and inverted, the golden caramel melts into a luscious sauce that flows beautifully over the custard.
This elegant dessert is surprisingly simple to make and is perfect for family dinners, holidays, and special occasions.
Recipe Information
- Prep Time: 15 minutes
- Cook Time: 50–60 minutes
- Chilling Time: 4 hours or overnight
- Total Time: About 5 hours
- Servings: 8
- Difficulty: Easy
- Method: Baked in a water bath
- Oven Temperature: 325°F (165°C)
Ingredients
For the Caramel
- 1 cup (200 g) granulated sugar
- 2 tbsp water
For the Custard
- 4 large eggs
- 1 can (14 oz / 396 g) sweetened condensed milk
- 1 can (12 oz / 354 ml) evaporated milk
- 1 tsp vanilla extract
Instructions
1. Preheat the Oven
Preheat your oven to 325°F (165°C).
Prepare a deep baking pan large enough to hold your pudding mold or baking dish.
You will use this pan to create a water bath, which helps the custard cook gently and evenly.
2. Make the Caramel
Add the sugar and water to a heavy-bottomed saucepan.
Place the pan over medium heat.
Allow the sugar to dissolve and begin cooking.
Avoid stirring once the sugar begins boiling. Instead, gently swirl the pan occasionally if necessary.
Continue cooking until the sugar turns a deep golden amber color.
Watch carefully during the final stage, as caramel can burn very quickly.
Important Safety Tip
Hot caramel is extremely hot and can cause serious burns. Handle the saucepan carefully.
3. Pour the Caramel Into the Mold
Immediately pour the hot caramel into a round cake pan, loaf pan, flan mold, or heatproof baking dish.
Carefully tilt the mold so the caramel coats the bottom evenly.
Set aside for several minutes.
The caramel will harden as it cools. This is completely normal.
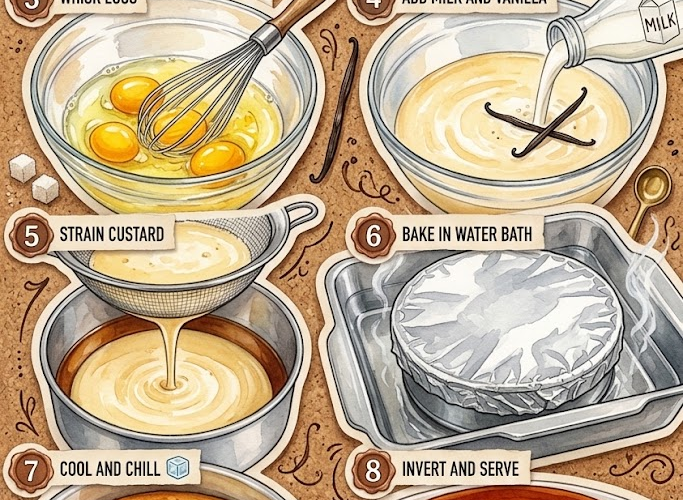
4. Prepare the Custard
In a large mixing bowl, crack the eggs.
Gently whisk them until the yolks and whites are combined.
Try not to whisk too vigorously, as excessive air bubbles can create a less smooth custard.
Add:
- Sweetened condensed milk
- Evaporated milk
- Vanilla extract
Whisk gently until smooth and completely combined.
5. Strain the Custard
For an especially silky and smooth caramel custard, pour the mixture through a fine-mesh strainer.
This removes any egg strands and helps create a beautifully smooth texture.
Pour the strained custard over the hardened caramel in the prepared mold.
6. Prepare the Water Bath
Place the custard mold inside the larger deep baking pan.
Carefully pour hot water into the larger pan until it reaches approximately halfway up the sides of the custard mold.
Be careful not to splash water into the custard.
The water bath, also known as a bain-marie, protects the eggs from direct intense heat and helps prevent the custard from becoming rubbery.
7. Bake the Custard
Carefully transfer the pan to the oven.
Bake for approximately 50–60 minutes.
The exact baking time may vary depending on the size and depth of your mold.
The custard is ready when:
- The edges are set.
- The center has a slight jiggle.
- A thin knife inserted near the center comes out mostly clean.
Avoid overbaking, as overcooked custard can become firm and develop small holes.
8. Cool
Carefully remove the custard mold from the water bath.
Place it on a wire rack.
Allow it to cool completely to room temperature.
Once cooled, cover the mold and refrigerate for at least 4 hours.
For the best texture and flavor, chill it overnight.
How to Unmold the Caramel Custard
9. Loosen the Edges
Once thoroughly chilled, run a thin knife carefully around the inside edge of the mold.
Do not cut deeply into the custard.
10. Invert Onto a Serving Plate
Place a serving plate with raised edges over the top of the mold.
Holding both the plate and mold firmly, quickly flip them upside down.
Lift the mold away.
The caramel sauce should flow beautifully over the smooth custard.
11. Serve
Slice into portions and spoon some of the caramel sauce over each serving.
Serve chilled.
👩🍳 Chef’s Tips
Don’t Burn the Caramel
Remove the caramel from the heat once it reaches a rich amber color.
Very dark caramel can become bitter.
Avoid Overmixing the Eggs
Whisk gently to avoid incorporating too much air.
Too many bubbles can affect the smooth appearance of the finished pudding.
Always Use a Water Bath
A water bath creates gentle, even heat and helps produce a smooth, creamy custard.
Strain for a Silky Texture
Straining isn’t absolutely necessary, but it makes a noticeable difference in the smoothness of the finished dessert.
Don’t Overbake
The center should still have a slight wobble when removed from the oven.
It will continue setting as it cools.
Delicious Variations
🍊 Orange Caramel Custard
Add 1 teaspoon finely grated orange zest to the custard mixture.
☕ Coffee Caramel Custard
Dissolve 1–2 teaspoons instant coffee in a tablespoon of warm evaporated milk and add it to the custard.
🥥 Coconut Caramel Custard
Replace part of the evaporated milk with coconut milk for a creamy tropical flavor.
🍫 Chocolate Caramel Custard
Add 2 tablespoons unsweetened cocoa powder to the custard mixture.
Whisk thoroughly until smooth.
🍋 Lemon Vanilla Custard
Add 1 teaspoon finely grated lemon zest for a fresh citrus flavor.
Storage
Store Caramel Custard Pudding covered in the refrigerator.
It will keep well for up to 3–4 days.
Keep the pudding chilled until ready to serve.
Can I Freeze Caramel Custard?
Freezing is not recommended.
The custard may separate and become watery after thawing.
For the best creamy texture, enjoy it freshly chilled from the refrigerator.
⭐ Final Result
This Caramel Custard Pudding is smooth, creamy, delicate, and perfectly sweet, with a rich golden caramel sauce cascading over every slice.
Simple ingredients, an elegant presentation, and a classic dessert that never goes out of style. 🍮✨