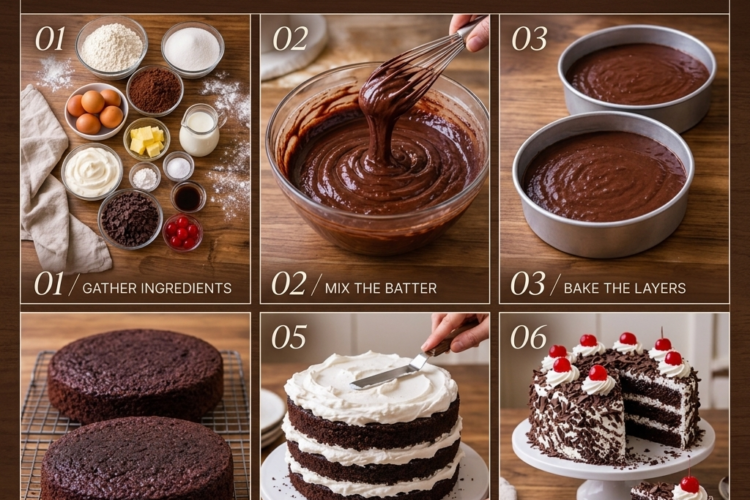
🍒🍫 Black Forest Cake – Rich Chocolate, Cherries & Whipped Cream
A Classic German-Inspired Dessert That Looks as Stunning as It Tastes!
If you love the combination of chocolate, cherries, and fluffy whipped cream, this Black Forest Cake is the dessert of your dreams! Featuring moist chocolate cake layers, juicy cherries, sweet cherry syrup, and clouds of freshly whipped cream, every slice delivers the perfect balance of rich, fruity, and creamy flavors.
Inspired by the famous German Schwarzwälder Kirschtorte, this beautiful cake is finished with chocolate shavings and cherries for a bakery-style presentation. It’s perfect for birthdays, holidays, anniversaries, and any celebration that deserves something truly special.
Recipe Information
- Prep Time: 40 minutes
- Bake Time: 25–30 minutes
- Cooling Time: 1 hour
- Chilling Time: 1–2 hours
- Total Time: Approximately 3½–4 hours
- Servings: 10–12 slices
- Course: Dessert
- Cuisine: German-inspired
- Difficulty: Moderate
- Pan Size: Two 8-inch (20 cm) round cake pans
Ingredients
For the Chocolate Cake
- 2 cups (250 g) all-purpose flour
- ¾ cup (75 g) unsweetened cocoa powder
- 1½ cups (300 g) granulated sugar
- 1½ teaspoons (6 g) baking powder
- 1½ teaspoons (7 g) baking soda
- ½ teaspoon (3 g) salt
- 2 large eggs, at room temperature
- 1 cup (240 ml) milk
- ½ cup (120 ml) vegetable oil
- 2 teaspoons (10 ml) vanilla extract
- 1 cup (240 ml) hot water or hot brewed coffee
For the Cherry Filling
- 2 cups (300–350 g) pitted cherries, fresh or frozen, or well-drained canned cherries
- ½ cup (100 g) granulated sugar, adjusted to taste
- 2 tablespoons cornstarch
- ¼ cup (60 ml) cold water
- 1 tablespoon lemon juice
- ½ teaspoon vanilla extract, optional
- 2–4 tablespoons cherry juice or water, as needed
Optional traditional flavor: Add 1–2 tablespoons cherry liqueur, such as Kirsch, to the cooled cherry filling if desired. Omit it for an alcohol-free version.
For the Whipped Cream Frosting
- 3 cups (720 ml) cold heavy whipping cream, at least 35% fat
- ½ cup (60 g) powdered sugar, sifted
- 2 teaspoons vanilla extract
- 1 teaspoon powdered gelatin plus 1 tablespoon cold water, optional, for a more stable frosting
For the Cake Layers
- ¼–½ cup (60–120 ml) cherry juice or cooled cherry syrup, for brushing the cake layers as needed
For Decoration
- ½–1 cup (60–100 g) dark chocolate shavings or curls
- 8–12 whole cherries, fresh or well-drained, for garnish
- Extra whipped cream for piping, optional
Instructions
Step 1: Prepare the Oven and Cake Pans
Preheat your oven to 350°F (175°C).
Grease two 8-inch round cake pans and line the bottoms with parchment paper. Lightly grease the parchment as well to help the cakes release easily.
Sift the flour and cocoa powder together to remove lumps, then set aside.
Step 2: Mix the Dry Ingredients
In a large mixing bowl, whisk together the flour, cocoa powder, granulated sugar, baking powder, baking soda, and salt until evenly combined.
Mixing the dry ingredients thoroughly helps distribute the raising agents, creating a more even cake texture.
Step 3: Add the Wet Ingredients
Add the eggs, milk, vegetable oil, and vanilla extract to the dry mixture.
Beat with an electric mixer on medium speed for about 1–2 minutes, scraping down the sides of the bowl as needed, until the batter is smooth.
The batter will be fairly thick at this stage.
Step 4: Add the Hot Water or Coffee
Slowly pour in the hot water or hot brewed coffee while mixing on low speed.
Continue mixing just until the liquid is incorporated. The batter will become thin and pourable, which is normal for this moist chocolate cake.
Tip: Hot coffee deepens the chocolate flavor without necessarily making the cake taste like coffee. Use hot water for a more neutral chocolate flavor.
Step 5: Bake the Chocolate Cake
Divide the batter evenly between the prepared cake pans.
Bake for 25–30 minutes, or until a toothpick inserted into the center comes out clean or with a few moist crumbs.
Begin checking at around 25 minutes because oven temperatures and pan materials vary.
Remove the cakes from the oven and let them cool in their pans for 10–15 minutes. Run a thin knife around the edges if necessary, then turn the cakes out onto wire racks.
Peel away the parchment paper and let the cakes cool completely before assembling. Warm cake will melt the whipped cream, so allow enough time for cooling.
Step 6: Prepare the Cherry Filling
Place the pitted cherries, granulated sugar, and lemon juice in a small saucepan over medium heat.
If using fresh or frozen cherries, add 2–4 tablespoons of cherry juice or water to help them release their juices. If using canned cherries, a little reserved cherry juice works well.
Cook for approximately 5–8 minutes, stirring gently, until the cherries soften and release their juices. Frozen cherries may need a little longer.
In a small bowl, whisk the cornstarch with the cold water until completely smooth.
Stir the cornstarch slurry into the simmering cherry mixture. Cook for another 1–2 minutes, stirring continuously, until the sauce thickens and looks glossy.
Remove from the heat and stir in the optional vanilla extract. If using cherry liqueur, add it after the mixture has cooled slightly.
Transfer the filling to a clean bowl and allow it to cool completely. Refrigerate if needed before assembly.
Important: The filling must be cool before it touches the whipped cream, or the cream may melt and become runny.
Step 7: Prepare the Stabilized Whipped Cream
For the optional gelatin stabilizer, sprinkle 1 teaspoon of powdered gelatin over 1 tablespoon of cold water. Let it bloom for 5 minutes, then warm it gently until fully dissolved. Allow it to cool until liquid but no longer hot.
Pour the cold heavy whipping cream into a large, chilled mixing bowl. Add the powdered sugar and vanilla extract.
Beat on medium-high speed until soft peaks form.
If using the gelatin, slowly drizzle it into the cream while mixing on low speed, then continue whipping until medium-firm peaks form. Avoid adding warm gelatin, which can damage the texture of the cream.
If you’re not using gelatin, simply whip the cream until it holds firm peaks, being careful not to overwhip it.
Refrigerate the whipped cream until you’re ready to assemble the cake.
Step 8: Level and Slice the Cake Layers
Once completely cool, check the tops of the cakes. If they have domed, use a serrated knife to trim them level.
Carefully slice each cake horizontally in half to create four thin layers, or keep the cakes as two thicker layers for a simpler version.
For a traditional layered presentation, four thinner layers create more opportunities for the cherry filling and whipped cream to shine through.
Place the first cake layer on a cake stand or serving plate.
Step 9: Brush with Cherry Syrup
Lightly brush the first cake layer with cherry juice or cooled cherry syrup.
Use just enough to moisten the cake without soaking it. Too much liquid may cause the cake layers to slide or become soggy.
Repeat this step with each layer during assembly.
Step 10: Add the Whipped Cream and Cherries
Spread a generous layer of whipped cream over the first cake layer, leaving a small border around the edge.
Spoon some of the cooled cherry filling over the cream, keeping the filling slightly away from the very edge to reduce the chance of it spilling out when the next layer is placed.
Position the next cake layer on top, pressing very gently to level it.
Repeat with the remaining cake layers, alternating between whipped cream and cherry filling. Reserve enough whipped cream to cover the sides and top, and keep some cherries for decoration.
Step 11: Frost the Cake
Spread the remaining whipped cream over the top and sides of the assembled cake.
Use an offset spatula or the back of a spoon to create a smooth finish, or leave soft decorative swirls for a rustic appearance.
For a more traditional Black Forest look, cover the sides with dark chocolate shavings. Press the shavings gently into the cream using clean hands or a spatula.
Step 12: Decorate with Chocolate and Cherries
Sprinkle dark chocolate curls or shavings over the top of the cake.
Pipe small whipped cream rosettes around the edge, if desired, and place a whole cherry on each rosette.
For a classic finish, add a few extra chocolate curls in the center.
Refrigerate the completed cake for at least 1–2 hours before slicing. This gives the layers time to settle and helps the whipped cream remain stable.
Step 13: Slice and Serve
Use a sharp knife dipped in warm water and wiped dry between cuts for neat slices.
Serve the cake chilled, revealing the beautiful layers of moist chocolate cake, creamy whipped frosting, and glossy cherry filling.
Enjoy every rich, fruity, chocolatey bite!
Tips for the Best Black Forest Cake
- Cool the cake completely: Even slightly warm cake can melt the whipped cream and cause the layers to slip.
- Use cold heavy cream: Cold cream whips faster and holds its shape better.
- Drain watery cherries: Too much liquid in the filling can make the cake soggy.
- Cool the cherry filling thoroughly: Warm fruit filling will soften the cream.
- Brush the layers lightly: A little cherry syrup adds moisture and flavor, but too much may make the cake unstable.
- Use a serrated knife: It helps slice the cake layers without tearing them.
- Stabilize the whipped cream if needed: Gelatin is useful if the cake must hold its shape for several hours at a gathering.
- Decorate shortly before serving: Keep the cake chilled and add delicate garnishes near serving time for the freshest presentation.
Delicious Variations
🍫 Extra-Chocolate Black Forest Cake
Mix a small amount of grated dark chocolate into the whipped cream layers and finish with a generous coating of chocolate shavings.
🍒 Easy Black Forest Cake with Cherry Pie Filling
Replace the homemade cherry filling with approximately 2 cups of cherry pie filling. Allow it to chill before assembling and avoid spreading it too close to the edge.
☕ Mocha Black Forest Cake
Use hot coffee in the chocolate cake batter and add a small amount of instant espresso powder to the dry ingredients for a richer mocha flavor.
🤍 White Chocolate Black Forest Cake
Add white chocolate curls to the top and decorate with a few white chocolate shards for a striking contrast against the dark chocolate.
🍓 Mixed Berry Chocolate Cake
Replace part of the cherry filling with strawberries or raspberries for a fruity variation that pairs beautifully with the chocolate cake.
🍰 Two-Layer Black Forest Cake
For easier assembly, leave the cakes as two thicker layers and divide the cherry filling and whipped cream between them. Frost the outside as usual.
What to Serve with Black Forest Cake
This cake is rich and indulgent, so it pairs well with simple accompaniments:
- Fresh cherries or berries
- A cup of black coffee or espresso
- Unsweetened tea
- A scoop of vanilla ice cream
- Freshly brewed cappuccino
- A small glass of cold milk
For special celebrations, serve each slice with a few fresh cherries and a little extra chocolate shaved over the plate.
Make-Ahead Instructions
Bake the cake layers ahead: Bake the chocolate cakes up to 2 days before assembly. Once completely cool, wrap each layer tightly and refrigerate. You can also freeze the unfilled cake layers for up to 2 months.
Prepare the cherry filling ahead: Cook the filling up to 2 days in advance and store it in a covered container in the refrigerator.
Assemble the cake: For the best texture, assemble the cake on the day before serving or several hours ahead. Keep it refrigerated so the whipped cream stays firm and the layers hold their shape.
Storage Instructions
- Refrigerator: Store the assembled cake in a covered cake container in the refrigerator for up to 3 days. The whipped cream and fruit filling are perishable.
- Freezing: Freezing the fully assembled cake is not ideal because whipped cream and cherries may change texture when thawed. The unfilled chocolate cake layers freeze much better.
- Serving: Keep the cake chilled until shortly before serving, and do not leave it at room temperature for more than 2 hours.
- Leftovers: Return leftover slices to the refrigerator promptly in an airtight container.
Frequently Asked Questions
Can I use canned cherries?
Yes. Well-drained canned cherries work beautifully. Reserve some of the juice for brushing the cake layers, and use cornstarch to thicken the filling if the liquid is too thin.
Can I use cherry pie filling instead?
Absolutely. Cherry pie filling is a convenient shortcut. Use it chilled, and adjust the quantity so it doesn’t push out between the layers.
Why is my whipped cream runny?
The cream may not have been cold enough, it may have been underwhipped, or it may have been exposed to warm cake or filling. Use cold heavy whipping cream and make sure all the cake components are thoroughly cooled.
Do I need to add coffee to the chocolate cake?
No. Hot water works well, too. Coffee simply enhances the deep chocolate flavor without necessarily making the cake taste strongly of coffee.
Can I make Black Forest Cake without alcohol?
Yes. Traditional versions may use Kirsch, a cherry brandy, but it is entirely optional. Cherry juice works well for brushing the cake layers and adding fruity flavor.
How do I keep the cake layers from sliding?
Avoid overfilling the layers, use a thick and completely cooled cherry filling, and spread the whipped cream evenly. Chill the assembled cake before slicing to help it set.
Can I use store-bought whipped topping?
Yes. It can be used as a shortcut, especially if you need a stable topping. Follow the product’s storage instructions and keep the cake refrigerated.
A Slice of Chocolate-Cherry Heaven! 🍒🍫
This Black Forest Cake brings together everything that makes a celebration dessert unforgettable: rich chocolate cake, juicy cherries, soft whipped cream, and beautiful chocolate decorations.
Every slice looks impressive, yet the cake can be prepared in manageable steps by making the cake layers and cherry filling ahead of time. Whether you’re celebrating a birthday, hosting a holiday gathering, or simply craving a bakery-style dessert at home, this classic combination never disappoints.
Layer it with love, finish it with chocolate curls and cherries, chill until set, and enjoy a gorgeous slice of Black Forest perfection!