🍪 Biscoff Cheesecake Lasagna (No-Bake)
Layers of Creamy Cheesecake, Irresistible Cookie Butter, and Crunchy Biscoff Cookies!
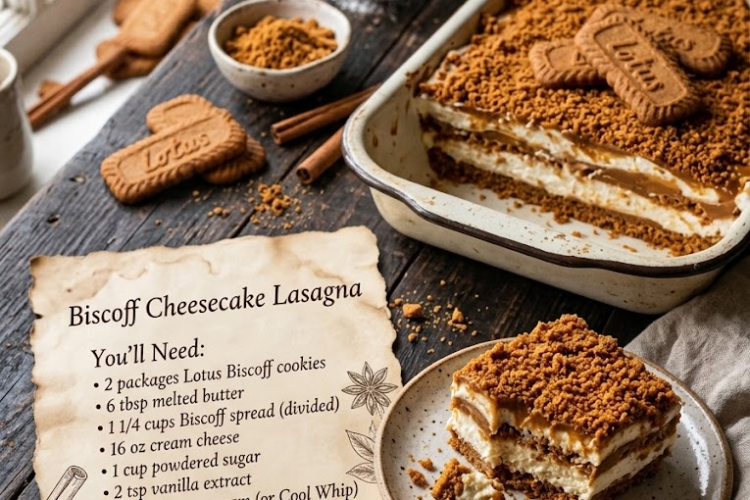
Get ready to fall in love with this dreamy No-Bake Biscoff Cheesecake Lasagna! With layers of buttery Biscoff cookie crust, silky cheesecake filling, rich cookie butter, and plenty of crunchy cookie crumbs, this indulgent dessert is a true showstopper.
Every bite combines the warm caramelized flavor of Lotus Biscoff cookies with a fluffy, creamy cheesecake layer and luscious cookie butter. Best of all, there’s no oven required! Simply assemble the layers, refrigerate until set, and enjoy a beautiful dessert that’s perfect for holidays, birthdays, potlucks, or any special occasion.
Recipe Information
- Prep Time: 35 minutes
- Chilling Time: 6–8 hours, preferably overnight
- Total Time: Approximately 6 hours 35 minutes
- Servings: 12–15
- Course: Dessert
- Cuisine: European-inspired
- Difficulty: Easy
- Cooking Method: No-bake
- Pan Size: 9 × 13-inch (23 × 33 cm) dish
Ingredients
For the Biscoff Crust and Cookie Layers
- 2 packages Lotus Biscoff cookies (about 17–18 oz / 482–510 g total)
- 6 tablespoons (85 g) unsalted butter, melted
- 1¼ cups (about 300 g) Biscoff cookie butter spread, divided
For the Creamy Cheesecake Filling
- 16 oz (450 g) full-fat cream cheese, softened to room temperature
- 1 cup (120 g) powdered sugar, sifted
- 1 teaspoon vanilla extract
- 2 cups (480 ml) cold heavy whipping cream
- 1 tablespoon lemon juice, optional, for a subtle tang
For the Topping
- Reserved crushed Biscoff cookies
- A few whole Lotus Biscoff cookies, optional, for decoration
- A little extra melted Biscoff spread, optional, for drizzling
Instructions
Step 1: Prepare the Cookie Crust
Set aside several Biscoff cookies for the middle layers and decoration.
Place approximately half of the remaining cookies in a food processor and pulse until they become fine crumbs. Alternatively, put them in a sealed food bag and crush them with a rolling pin.
Reserve about ½ cup of cookie crumbs for the final topping.
Transfer the rest to a mixing bowl and pour in the melted butter. Stir until the crumbs are evenly moistened and resemble damp sand.
Press the mixture firmly into the bottom of a 9 × 13-inch dish, creating an even crust. Use the bottom of a measuring cup to compact it neatly.
Refrigerate the crust for 15–20 minutes while preparing the filling.
Step 2: Prepare the Whipped Cream
Pour the cold heavy whipping cream into a large, chilled mixing bowl.
Using an electric mixer, beat on medium-high speed until the cream forms firm peaks. When you lift the beaters, the cream should hold its shape without becoming grainy.
Set aside in the refrigerator while you prepare the cheesecake mixture.
Tip: Keep the cream cold for the best volume and stability.
Step 3: Make the Cheesecake Filling
In a separate large bowl, beat the softened cream cheese with an electric mixer until completely smooth and free of lumps.
Add the powdered sugar, vanilla extract, and optional lemon juice. Beat again until the mixture becomes creamy, fluffy, and evenly combined.
Scrape down the sides of the bowl as needed to ensure everything is incorporated.
Add the whipped cream to the cream cheese mixture in two or three additions. Gently fold with a spatula until the filling is light, smooth, and uniform.
Avoid vigorous mixing at this stage, as gentle folding helps preserve the airy texture.
Step 4: Add the First Cookie Butter Layer
Measure out about ½ cup of the Biscoff cookie butter spread.
Warm it very briefly in the microwave, using 10-second intervals, until it becomes soft enough to spread easily. It should be slightly fluid but not hot.
Spread the cookie butter over the chilled crust in a thin, even layer. Let it cool slightly if necessary before adding the cheesecake filling.
Step 5: Add the First Cheesecake Layer
Spread approximately half of the cheesecake filling over the cookie butter layer.
Use a spatula to smooth the surface and push the filling gently into the corners of the dish.
Break several reserved Biscoff cookies into small pieces and scatter them over the filling for extra crunch and caramelized cookie flavor.
Step 6: Add More Cookie Butter and Cheesecake
Warm another portion of the remaining Biscoff spread until pourable but not hot. Drizzle it lightly over the cookie pieces.
Spread the remaining cheesecake filling carefully over the top, creating a smooth, even layer.
Take your time when spreading so the layers remain distinct and the bottom layers don’t get pulled upward.
Step 7: Decorate the Top
Warm the remaining Biscoff cookie butter just enough to make it drizzle easily.
Drizzle it over the cheesecake layer in thin ribbons. Use the tip of a knife or a toothpick to create a decorative swirl if desired.
Sprinkle the reserved cookie crumbs over the top and arrange a few whole or broken Biscoff cookies for an attractive finish.
For a particularly neat presentation, add the whole cookies shortly before serving so they retain more of their texture.
Step 8: Chill Until Firm
Cover the dish carefully and refrigerate for at least 6–8 hours, preferably overnight.
Chilling gives the cheesecake filling time to firm up and allows the flavors to blend together. For the cleanest slices, make sure the dessert is thoroughly chilled before cutting.
Step 9: Slice and Serve
Once fully set, cut the cheesecake lasagna into squares using a sharp knife.
Wipe the blade clean between cuts to create neat layers and beautiful servings.
Serve cold and enjoy the combination of creamy cheesecake, sweet cookie butter, and buttery Biscoff crunch!
Tips for the Best Biscoff Cheesecake Lasagna
- Use full-fat cream cheese: It gives the filling a richer flavor and a firmer texture.
- Soften the cream cheese first: Room-temperature cream cheese blends smoothly and helps prevent lumps.
- Keep the whipping cream cold: Cold cream whips more efficiently and helps create a light cheesecake filling.
- Don’t overheat the cookie butter: It should be easy to drizzle, not hot enough to melt the cheesecake layer.
- Compact the crust firmly: Pressing the crumbs evenly into the dish helps the base stay together when sliced.
- Allow enough chilling time: Overnight chilling is ideal when you want beautifully defined layers.
- Add decorative cookies near serving time: Whole cookies can soften as they absorb moisture from the cheesecake.
Delicious Variations
🍫 Chocolate Biscoff Cheesecake Lasagna
Add a thin layer of chocolate ganache or drizzle melted chocolate over the top for an indulgent chocolate-cookie butter combination.
🍌 Banana Biscoff Cheesecake Lasagna
Add a layer of thinly sliced ripe bananas between the cheesecake layers. For the best appearance and flavor, assemble shortly before chilling and serve within a couple of days.
☕ Coffee Biscoff Cheesecake
Dissolve 1 teaspoon instant espresso powder in a few drops of hot water, let it cool, and mix it into the cream cheese mixture for a subtle coffee flavor.
🥜 Crunchy Biscoff Cheesecake
Fold ½ cup of roughly crushed Biscoff cookies into the cheesecake filling or sprinkle extra cookie pieces between the layers.
🍮 Caramel Biscoff Cheesecake
Drizzle a little thick caramel sauce between the cheesecake layers for an extra-sweet, caramel-forward dessert.
Make-Ahead Instructions
This dessert is perfect for preparing ahead of a gathering.
Assemble it the day before serving, cover tightly, and refrigerate overnight. The extended chilling time helps the filling set beautifully and makes slicing easier.
For the freshest appearance, add the final cookie decorations shortly before serving.
Storage Instructions
Refrigerator: Store covered in the refrigerator for up to 3–4 days. Keep the dessert chilled because the filling contains cream cheese and whipped cream.
Freezing: Freeze individual portions in airtight, freezer-safe containers for up to 1 month for best quality. Thaw overnight in the refrigerator before serving. Note that the cookie layers may soften after freezing and thawing.
Serving: Serve cold, and return leftovers to the refrigerator promptly. Do not leave this cream-based dessert at room temperature for more than 2 hours.
Frequently Asked Questions
Can I make Biscoff Cheesecake Lasagna without a food processor?
Yes! Place the cookies in a sturdy, sealed food bag and crush them with a rolling pin until they form fine crumbs.
Can I use whipped topping instead of heavy cream?
Yes. Use approximately 3 cups of thawed whipped topping in place of the 2 cups of heavy whipping cream. Fold it gently into the cream cheese mixture. The texture and sweetness may vary slightly by brand.
Why is my cheesecake filling too soft?
The cream may not have been whipped enough, the cream cheese may have been too warm, or the dessert may need more chilling time. Refrigerate it overnight for the best chance of achieving firm, clean layers.
Can I use smooth or crunchy Biscoff spread?
Either works. Smooth cookie butter is ideal for drizzling and spreading, while crunchy cookie butter adds extra texture.
Do I have to bake the crust?
No. The melted butter binds the cookie crumbs together, and refrigeration helps the crust firm up without baking.
Can I use another type of cookie?
Yes. Speculoos cookies, graham crackers, or digestive biscuits can work as substitutes, although the distinctive caramelized Biscoff flavor will change.
A Dreamy No-Bake Dessert Worth Sharing! 🍪
This Biscoff Cheesecake Lasagna combines creamy cheesecake, buttery cookie layers, and irresistible Biscoff spread in one beautiful make-ahead dessert. Every slice delivers a little crunch, a little creaminess, and plenty of rich caramelized cookie flavor.
It’s effortless enough for casual family gatherings yet elegant enough for celebrations—and since there’s no baking involved, you can prepare it ahead and let the refrigerator do the work.
Layer it, chill it, slice it, and get ready for a dessert that Biscoff lovers will absolutely adore!