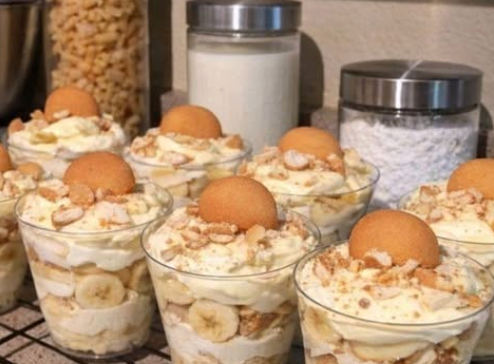
Classic banana pudding holds a permanent place in the comfort food hall of fame, but serving it in individual cups transforms a homely casserole-dish staple into an effortless, party-ready showstopper. Layered with rich vanilla cream, ripe bananas, and tender vanilla wafers, these single-serve parfaits deliver the ideal balance of textures and flavors without requiring any baking.
Why Single-Serve Cups Work Best
Making individual cups isn’t just about aesthetics; it fundamentally improves the dessert experience:
- Balanced Proportions: Every guest gets the exact ratio of velvety pudding, soft fruit, and crunchy-turned-cakey wafer crumb.
- Effortless Hosting: No messy spoons, scooping mishaps, or fallen layers at the buffet table.
- Flawless Presentation: Clear cups showcase the distinct, golden-and-cream layers, complete with a classic whole wafer garnish on top.
Ingredients You’ll Need
- 1 box (3.4 oz) Instant Vanilla Pudding Mix: Provides the luscious, reliable base. (French vanilla or banana cream pudding also work well).
- 2 cups Cold Milk: Whole milk or 2% ensures a rich, full-bodied custard.
- 1 cup Heavy Whipping Cream: Whipped to stiff peaks to give the pudding an airy, cloud-like mousse texture.
- 1/3 cup Powdered Sugar: Sweetens and stabilizes the homemade whipped cream.
- 1 tsp Pure Vanilla Extract: Enhances the depth of flavor throughout the cream layer.
- 2 cups Sliced Bananas (about 2–3 medium bananas): Choose bananas that are ripe and sweet, but still firm with minimal brown spots.
- ~25 Vanilla Wafers (such as Nilla Wafers): Crushed for layering, with extra whole cookies reserved for crowning each cup.
Step-by-Step Instructions
1. Prepare the Pudding Base
In a medium bowl, whisk together the instant vanilla pudding mix and 2 cups of cold milk for about 2 minutes until smooth and slightly thickened. Place the bowl in the refrigerator for 5 to 10 minutes to set completely.
2. Whip the Cream
In a separate chilled mixing bowl, combine the cold heavy whipping cream, powdered sugar, and vanilla extract. Beat using a hand mixer or stand mixer on medium-high speed until stiff peaks form.
3. Fold Together for a Mousse Texture
Gently fold about half of the whipped cream into the chilled vanilla pudding until completely combined and uniform in color. Reserve the remaining whipped cream for layering or piping on top.
4. Assemble the Cups
Line up 6 to 8 clear plastic or glass cups (6–8 oz capacity) on your workstation:
- Bottom Layer: Add a generous tablespoon of crushed vanilla wafers to the base of each cup.
- Fruit Layer: Arrange a layer of sliced bananas over the crumbs.
- Pudding Layer: Spoon or pipe a layer of the lightened vanilla pudding mixture over the bananas.
- Repeat: Repeat the layers once more with crushed wafers, banana slices, and pudding until the cup is nearly full.
5. Garnish and Chill
Top each cup with a dollop of reserved whipped cream, a dusting of wafer crumbs, and one whole vanilla wafer pressed gently into the center. Cover loosely with plastic wrap and chill in the refrigerator for at least 2 to 4 hours before serving.
Pro Tips for Success
Make-Ahead Timing: These cups are best consumed within 24 to 36 hours. Beyond two days, bananas begin to release excess moisture and soften too much.
The Wafer Transformation: Chilling for a few hours allows the crisp wafers to absorb moisture from the pudding, softening them into the signature melt-in-your-mouth, cake-like texture authentic banana pudding is known for.
Preventing Brown Bananas: Ensure the banana slices are fully submerged and enclosed by the pudding layers to minimize oxygen exposure. If assembling well in advance, lightly toss the sliced bananas in a teaspoon of lemon or pineapple juice before layering.