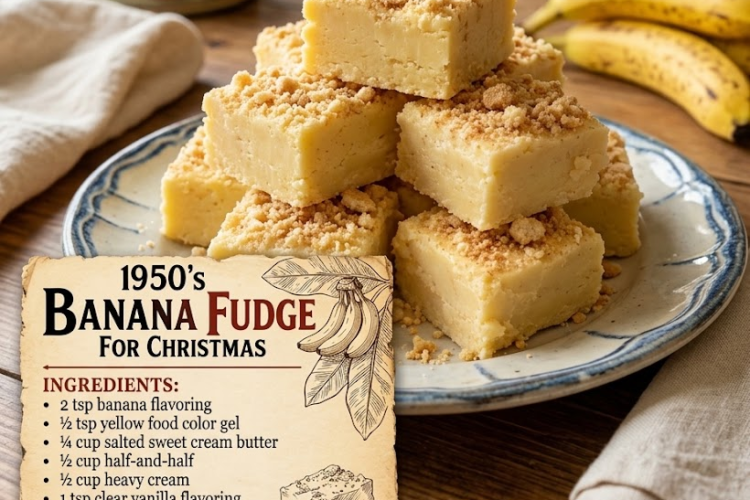
🍌🎄 1950s Banana Fudge for Christmas
Bring a little old-fashioned holiday magic to your dessert table with this 1950s-Inspired Banana Fudge. This creamy, melt-in-your-mouth candy combines sweet banana flavor, smooth white baking chips, buttery cream, and fluffy marshmallow creme for a rich, nostalgic treat.
A cheerful hint of yellow food coloring gives the fudge its classic banana-inspired look, while crushed Nilla wafers add a delicate vanilla crunch. Cut into neat little squares, this festive fudge is perfect for Christmas dessert platters, homemade candy boxes, holiday parties, and edible gifts.
Recipe Information
- Prep Time: 15 minutes
- Cook Time: 15–20 minutes
- Cooling Time: 2–3 hours
- Total Time: About 3 hours 35 minutes
- Yield: 36–49 small squares
- Difficulty: Moderate
- Method: Stovetop candy-making
- Pan: 8 × 8-inch (20 × 20 cm) square pan
Ingredients
For the Banana Fudge
- 2 teaspoons banana flavoring or banana extract
- ½ teaspoon yellow food coloring gel, adjusted to achieve the desired color
- ¼ cup (57 g) salted sweet cream butter
- ½ cup (120 ml) half-and-half
- ½ cup (120 ml) heavy cream
- 1 teaspoon clear vanilla flavoring
- 3 cups plus 2 tablespoons (about 612 g) granulated sugar
- 1¼ cups (about 215 g) white baking chips
- 7 oz (198 g) marshmallow fluff
For the Topping
- 2 tablespoons crushed Nilla wafers
Instructions
1. Prepare the Pan
Line an 8 × 8-inch square baking pan with parchment paper, leaving some overhang on two sides. Lightly grease the parchment if needed.
The overhang will make it much easier to lift the fudge out once it has completely set.
Set the prepared pan aside.
2. Measure the Ingredients
Measure out all the ingredients before you begin cooking.
Place the white baking chips and marshmallow fluff near your stovetop so they are ready to use as soon as the sugar mixture reaches the correct temperature.
Candy-making moves quickly once the hot mixture is removed from the heat, so having everything ready is important.
3. Combine the Cream, Butter, and Sugar
Place the salted butter, half-and-half, heavy cream, and granulated sugar in a large, heavy-bottomed saucepan.
Set the pan over medium heat.
Stir gently until the butter melts and the sugar begins dissolving.
Use a heatproof spatula or wooden spoon, and keep the mixture moving gently at this stage to prevent scorching.
4. Bring the Mixture to a Boil
Continue heating until the mixture reaches a full, rolling boil.
Once it begins boiling vigorously, stop stirring and attach a candy thermometer to the side of the saucepan. Make sure the thermometer tip is immersed in the mixture without touching the bottom of the pan.
Cook until the mixture reaches 234°F (112°C), the soft-ball stage.
This commonly takes several minutes after the mixture reaches a full boil, but the exact time depends on your pan, stove, and batch conditions. Use the thermometer rather than timing alone.
Watch carefully to prevent the mixture from boiling over.
Important: Hot sugar syrup can cause serious burns. Avoid touching or tasting it while hot.
5. Remove from the Heat
As soon as the mixture reaches 234°F (112°C), immediately remove the saucepan from the heat.
Let the bubbling subside briefly.
Do not scrape any crystallized sugar from the sides of the pan into the mixture, as this can encourage a grainy texture.
6. Add the White Baking Chips
Add the white baking chips to the hot sugar mixture.
Stir gently until they melt and the mixture becomes smooth.
If a few chips remain, continue stirring patiently. Avoid returning the saucepan to high heat, which may cause the white chocolate to scorch or separate.
7. Stir in the Marshmallow Fluff
Add the marshmallow fluff to the mixture.
Stir until it is fully incorporated and the fudge base looks thick, glossy, and uniform.
Scrape the bottom and corners of the saucepan gently to ensure everything is evenly combined.
8. Add the Banana and Vanilla Flavorings
Stir in the banana flavoring and clear vanilla flavoring.
Mix thoroughly so the flavors are distributed evenly throughout the fudge.
Start with the specified quantities, then avoid adding more flavoring unless it is specifically designed for candy-making and you know the appropriate concentration.
9. Add the Yellow Coloring
Add the yellow food coloring gel and stir until the color is uniform.
For a soft, vintage banana-yellow shade, begin with a small amount and add more gradually until you reach the desired color.
Food coloring strength varies by brand, so you may not need the entire ½ teaspoon.
10. Transfer to the Pan
Working carefully, pour the warm fudge mixture into the prepared baking pan.
Use a heatproof spatula to spread it evenly into the corners.
Smooth the surface gently without overworking the mixture.
11. Add the Nilla Wafer Topping
Sprinkle the crushed Nilla wafers evenly over the top.
Press the crumbs very lightly with the back of a spoon so they adhere to the fudge without sinking too deeply.
For a pretty holiday presentation, leave some slightly larger wafer pieces visible.
12. Cool and Set
Allow the fudge to cool at room temperature until it is no longer warm.
Cover the pan loosely and refrigerate for 2–3 hours, or until the fudge is completely firm enough to cut.
Avoid covering the pan tightly while it is still warm, as trapped condensation can affect the surface.
13. Cut into Squares
Use the parchment overhang to lift the set fudge from the pan.
Place it on a cutting board and use a large, sharp knife to cut it into small squares.
For cleaner edges, warm the knife under hot water, wipe it completely dry, and clean the blade between cuts.
14. Serve or Package for Gifts
Arrange the fudge squares on a festive serving platter or place them in candy cups.
For homemade Christmas gifts, pack them in a lined candy tin or decorative box with parchment paper between layers.
Keep the fudge cool until ready to serve.
Chef’s Tips
- Use a candy thermometer: Accurate temperature is essential for fudge that sets properly without becoming too soft or too firm.
- Use a heavy-bottomed saucepan: It distributes heat more evenly and reduces the chance of scorching.
- Don’t skip the soft-ball stage: Stopping too early can leave the fudge overly soft; cooking too long can make it dry or crumbly.
- Prepare the add-ins in advance: Once the syrup reaches temperature, work promptly but carefully.
- Stir until the chips melt completely: This helps create a smooth, uniform texture.
- Add flavorings after cooking: This helps preserve the banana and vanilla aromas.
- Use gel food coloring sparingly: Too much coloring can make the fudge an unnaturally intense yellow.
- Let the fudge set completely: Cutting too early can make the squares smear or lose their shape.
- Keep the finished candy cool: Dairy-based fudge is best stored in the refrigerator.
Delicious Variations
🍫 Chocolate-Drizzled Banana Fudge
Once the fudge has set, drizzle the squares with melted dark or milk chocolate. Allow the chocolate to firm before packaging.
🍪 Banana Cream Pie Fudge
Use extra finely crushed vanilla wafers and sprinkle a little over the bottom of the lined pan before pouring in the fudge mixture.
🌰 Banana Pecan Fudge
Fold in ½ cup finely chopped toasted pecans after adding the marshmallow fluff and before pouring the mixture into the pan.
🍌 Banana Split Fudge
After the fudge has set, decorate with a small amount of melted chocolate and crushed freeze-dried strawberries for a banana-split-inspired finish.
🤍 White Chocolate Vanilla Fudge
For a milder flavor, replace the banana flavoring with additional vanilla flavoring and omit the yellow coloring.
🎄 Christmas Candy Squares
Cut the fudge into small squares and add a tiny pinch of festive red and green sugar decorations to the surface while it is still warm enough for them to adhere.
Make-Ahead Instructions
This fudge is an excellent make-ahead Christmas candy.
Prepare it 1–3 days before serving, allow it to set completely, then cut it into squares and store it in an airtight container in the refrigerator.
For the neatest presentation, add delicate decorative toppings shortly before serving.
Storage
Because this recipe contains dairy ingredients, store the finished fudge in an airtight container in the refrigerator for up to 1 week for the best quality.
Separate layers with parchment paper to prevent sticking.
Allow the fudge to stand at room temperature for a few minutes before serving if you prefer a softer bite.
Freezing Instructions
For longer storage, place the fully set fudge in an airtight freezer-safe container, separating the layers with parchment paper.
Freeze for up to 2 months for best quality.
Thaw in the refrigerator while still covered to help prevent condensation from forming on the surface.
Serving Suggestions
Serve these nostalgic banana fudge squares with:
- Hot chocolate
- Coffee or cappuccino
- Black tea
- Vanilla wafers
- Chocolate truffles
- Christmas sugar cookies
- Homemade caramel candies
- A festive holiday dessert platter
For a vintage-inspired candy display, arrange the yellow fudge squares in red or green paper candy cups alongside chocolate fudge, peppermint candies, and decorated Christmas cookies.
Final Result
Beautiful 1950s-Inspired Banana Fudge with a creamy, rich texture, sweet banana-and-vanilla flavor, cheerful yellow color, and a delicate crunch of Nilla wafers. Cut into little squares and packaged for the holidays, this nostalgic homemade candy makes a delightful addition to any Christmas dessert table or edible gift box.