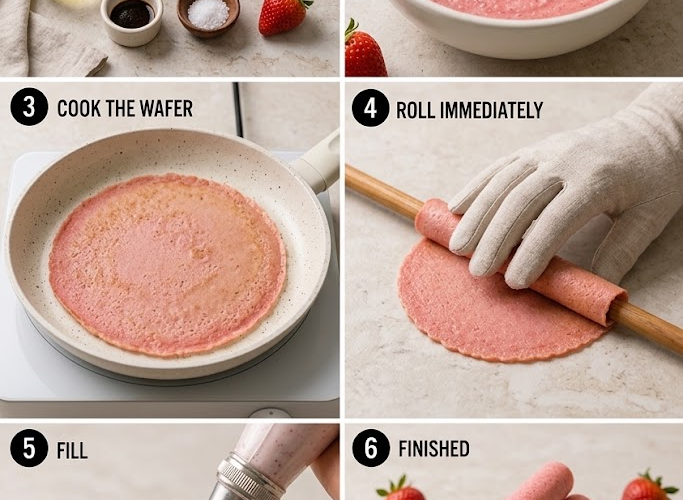
🍓 Pink Strawberry Wafer Rolls
Delicate, crisp, rosy-pink wafer rolls with a creamy strawberry center—these pretty little treats are as fun to make as they are to eat. The wafer shells are lightly crisp with a sweet strawberry flavor, while the creamy filling adds a rich, melt-in-your-mouth contrast.
Perfect for tea time, dessert platters, birthdays, afternoon snacks, and special occasions.
⏱ Recipe Information
Prep Time: 20 minutes
Cook Time: 20–25 minutes
Total Time: About 45 minutes
Servings: 10–12 wafer rolls
Difficulty: Medium
Method: Stovetop
Ingredients
Strawberry Wafer Rolls
- 1 cup (125 g) all-purpose flour
- 2 tablespoons strawberry milk powder
- 2 tablespoons powdered sugar
- 1 tablespoon cornflour/cornstarch
- ½ cup (120 ml) milk
- 2 tablespoons vegetable oil
- ½ teaspoon vanilla essence
- 2–3 drops pink or red food coloring
- Pinch of salt
Creamy Strawberry Filling
- ½ cup heavy whipping cream, cold
- 3 tablespoons powdered sugar
- 2 tablespoons cream cheese, softened
- 1–2 tablespoons strawberry milk powder
- ½ teaspoon vanilla essence
Optional Garnish
- Crushed strawberry wafers
- Freeze-dried strawberries
- Powdered sugar
- Melted white chocolate
- Pink sprinkles
Instructions
1. Prepare the Wafer Batter
In a medium mixing bowl, combine:
- All-purpose flour
- Strawberry milk powder
- Powdered sugar
- Cornflour
- Salt
Whisk until evenly combined.
The cornflour helps give the finished wafers their delicate, crisp texture.
2. Add the Wet Ingredients
Gradually add the milk while whisking.
Add the vegetable oil and vanilla essence.
Mix until you have a smooth, thin batter.
The consistency should be similar to a thin pancake batter.
If the batter seems too thick, add another teaspoon or two of milk.
3. Add the Color
Add 2–3 drops of pink or red food coloring.
Mix until the color is evenly distributed.
For a soft pastel pink, use just a small amount.
For a brighter strawberry-pink color, add another drop if needed.
Make the Wafer Sheets
4. Heat a Nonstick Pan
Place a clean nonstick skillet or flat griddle over low to medium-low heat.
The pan shouldn’t be excessively hot.
Wafer batter needs enough time to spread and cook evenly without burning.
5. Cook the First Wafer
Lightly grease the pan if necessary.
Pour approximately 1 tablespoon of batter into the center.
Immediately spread it into a very thin circle or oval using the back of a spoon or a small offset spatula.
The thinner the wafer, the crispier it will become.
6. Cook Until Golden
Cook for approximately 1–2 minutes per side.
The wafer should look set and develop very light golden spots.
Don’t let it become dark brown, as overcooked wafers will be difficult to roll.
🌸 Roll the Wafers
7. Roll While Hot
This is the most important part of the recipe.
As soon as each wafer comes off the pan, quickly roll it around a thin wooden spoon handle, metal cannoli tube, or small cylindrical utensil.
Press the seam gently to seal.
Hold for a few seconds until the wafer begins to set.
Then carefully slide the roll off the utensil.
Work quickly!
The wafer becomes crisp as it cools, so it must be shaped while still warm and flexible.
8. Repeat
Continue cooking and rolling the remaining batter.
If the wafers begin becoming difficult to roll, return the next one to the pan for a few seconds to soften it again.
Place the finished rolls on a wire rack to cool completely.
Make the Creamy Strawberry Filling
9. Beat the Cream Cheese
Place the softened cream cheese in a mixing bowl.
Beat until smooth and creamy.
Add the powdered sugar and strawberry milk powder.
Beat again until combined.
10. Whip the Cream
In a separate chilled bowl, whip the cold heavy cream until soft peaks form.
Add the vanilla essence.
Continue whipping until the cream reaches medium-stiff peaks.
Don’t overbeat.
11. Combine the Filling
Gently fold the whipped cream into the strawberry cream cheese mixture.
Continue folding until smooth, fluffy, and evenly combined.
Taste and add a little more strawberry milk powder if you want a stronger strawberry flavor.
Fill the Wafer Rolls
12. Transfer the Filling
Spoon the strawberry cream filling into a piping bag fitted with a small round or star tip.
If you don’t have a piping bag, use a zip-top bag and snip off one corner.
13. Fill Each Roll
Carefully pipe the strawberry filling into one end of each wafer roll.
Fill until the cream reaches the other end.
Don’t overfill, as the cream can push through the wafer.
Repeat with all the rolls.
Finish and Serve
14. Decorate
Dust lightly with powdered sugar or decorate the ends with crushed strawberry wafers.
For an extra-special finish, dip one end of each roll in melted white chocolate and sprinkle with freeze-dried strawberry crumbs.
15. Chill
Refrigerate the filled wafer rolls for approximately 30–60 minutes before serving.
This allows the filling to firm up slightly.
For maximum crispness, however, fill them shortly before serving.
⭐ Chef’s Tips
Make the Wafers Very Thin
Thinner batter produces crisp, delicate rolls.
Keep the Heat Moderate
High heat can brown the wafer too quickly and make it impossible to roll.
Roll Immediately
Don’t let the cooked wafer sit in the pan or on the counter. Once it cools, it becomes brittle.
Don’t Overfill
A thin, even layer of filling keeps the wafer crunchy and prevents messy leaking.
Keep the Filling Cold
Cold filling gives the finished rolls a cleaner texture.
🍓 Extra Strawberry Flavor
For an even stronger strawberry flavor, add:
- 1 tablespoon strawberry jam to the filling
- A little freeze-dried strawberry powder
- Finely crushed strawberry wafer cookies
You can also add a tiny amount of strawberry extract if desired.
Storage
Unfilled Wafer Rolls
Store completely cooled shells in an airtight container at room temperature.
Best within 2–3 days.
Keep them away from humidity, which will soften the wafers.
Filled Wafer Rolls
Because the filling contains dairy, store filled rolls in the refrigerator.
Best enjoyed within 1–2 days.
For the crispiest texture, fill them as close to serving time as possible.
Make-Ahead Instructions
The wafer shells can be made 1–2 days ahead and stored airtight.
The strawberry cream filling can be prepared up to 1 day ahead and refrigerated.
Pipe the filling into the rolls shortly before serving.
Delicious Variations
🍫 Strawberry Chocolate
Dip the ends in melted dark or white chocolate.
🍋 Strawberry Lemon
Add ½ teaspoon lemon zest to the filling for a bright strawberry-lemon flavor.
🥥 Strawberry Coconut
Add a little finely shredded toasted coconut to the filling or garnish.
🍓 Fresh Strawberry
Finely dice a few strawberries and fold them into the filling immediately before piping.
🎀 Birthday Wafer Rolls
Add colorful sprinkles to the filling and decorate the ends with pink and white sprinkles.
🍓 Recipe Summary
These Pink Strawberry Wafer Rolls are delicate, crisp, creamy, and wonderfully pretty.
The lightly sweet strawberry wafers are rolled while warm into elegant little tubes, then filled with fluffy strawberry cream for the perfect contrast of crunchy shell and creamy center.
A little strawberry crunch, a creamy center, and a gorgeous pink finish—definitely one to keep on your dessert list.